Sunday, 30 August 2020

Distractions pt19 - makers gonna make (Lighting Gel)

In the background of some of my photos you might've seen a brown lamp. 


A few years ago while walking around TK Maxx, I saw this casing and fell in love with it. It was designed as a patio lamp - supposed to hold citronella candles or something similar. I thought it would look lovely as an indoor lamp, a with a bit of modification to hold a lightbulb. It was £40, which was a lot for me at the time. To get it back to the flat we had to bungee cord it to B's motorbike and I had to get the bus home. I'm amazed it didn't break. 

Anyway, we modified it and installed a lightbulb. I've always meant to install some diffusers too - because the light is a bit harsh at short distances. I scavenged some lighting gel a few years ago from a theatrical supplier, but never managed to install it in the lamp. I over-complicated the job in my mind and then avoided it. I also dithered between using the lighting gel and buying some replacement acrylic (frosted) for the window panes. 


Shortly after moving in, I had a crafty itch and broke out all the supplies for the lamp. It took me an evening to install the diffusion gel. It's not perfect, but it's good enough and now the lamp casts some softer light. This will be perfect when we finally get a sofa and it can take its new place on a side table. 


K x

Sunday, 23 August 2020

Distractions pt18 - makers gonna make (Ikea Flintan chair reupholstery)

You might not know this but I have a variety of seating in my life. Each item fills a different purpose and, broadly, each one overlaps with another one a little bit: tall stool, short stool, deck chair, dining chair, camping chair etc. But, since lockdown and since moving in, I have been struggling with not having a real office chair to sit in for work. 

B invested in a new chair for his desk, so I took over his Ikea Flintan. As soon as I got my hands on the Flintan, I tore it apart. This chair has been sat on for hundreds, maybe thousands, of hours. It needed new foam and new fabric before I was prepared to sit on it. 

Also, the inside of the mesh back was filthy.

Lots of dust inside a IKEA Flintan seat back cover

FYI, the staples for the seat upholstery did not come out. I used a knife blade to cut around each staple.

I ordered new foam off the web (luxury firm), new fabric, new interfacing and a new zip. In the end, I reused the existing zip and used interfacing from my stash. It turns out I can't identify interfacing online at all and bought the wrong thing, and the new zip was a bit too chunky.

Replacing the foam in an Ikea Flintan Chair

The back is interfaced but the seat is not. I am fairly sure the original fabric is a cordura, but the website I was buying from offered it in different deniers and I had no clue what a sensible number was. I bought 1000dn, but this seems like overkill now. I could wear sandpaper trousers for a year and the seat wouldn't care.

Anyway, I seam ripped the existing chair and used the pieces as a pattern. I used upholstery thread to stitch and topstitch.

For the back support band you can see between the mesh pieces, I discovered that it is simply looped between two "hooks" which are held in place with screws. This was a relief because I didn't need to work out how to manouvre the metal frame around the sewing machine! This piece was 2x bits of seat fabric with a plastic sheet in the middle. It wasn't very rigid so I upgraded it with a piece of buckram leftover from millinery class. FYI, I really like this stiffener - for certain purposes. 

Cutting buckram for lumbar support

Also, since we're still in "box chaos mode" and I can't find most of my makery equipment, B kindly lent me his scissors for cutting and his fancy computer parts for pattern weights.

Overall, I'm pleased with how this turned out, especially the seat. I should have re-inserted the mesh back because there were some puckers but it doesn't affect the functionality of the chair, so I don't really care.


Did I spend as much on this revamp as buying a new Flintan? Yes, easily. About £100-£110. The foam was cheap, but the postage was not, the fabric came from Germany and I bought new threads etc. I could've cut the cost down to about £50 by not ordering the stuff I didn't end up using and by switching to a lower denier cordura. I could have cleaned and reused the seat back easily, but the seat fabric was badly damaged when I removed it, so it would need replacing. Replacing the foam was essential as we could feel the hardware though the seat.

I do want to say that the Flintann chair has good bones and is simple enough to re-upholster. Seriously, I think plenty of novice DIY-ers could do this, or find good alternative methods to replace what they need without completely replacing the chair. The base, seat and frame are all durable and I'd hate to see this go to landfill. I'm looking forward to getting a few more years of use out of this!

K x

Wednesday, 12 August 2020

Distractions pt17 - the sliding puzzle

I realise I've not done one of these distractions posts since May and you're probably all itching to know what's going on. Well...We're in. We're "finished".

The builders left us with a lovely new house, and all we needed to do was to (caulk it), paint it and move all of our junk 30 yards down the road from old house to new house.

Friends, it took us about 2 weeks to move our stuff. We spent our first night here on 12 June and have been here ever since. It is a lovely little house.

Since we moved in, everything has turned into one giant sliding puzzle.

We are making slow progress towards being "done" - there is still some bare plaster that needs painting, rooms need clearing of boxes, windows that need blinds, we need to put up a shed, we still need a couch. I have a week off at the end of the month and am going to try to get more done. Don't tell Occupational Health, but my current 'work from home' setup is a camping chair and an ironing board. Hopefully I will have a proper desk and chair by mid-September but we need to see how things go.

K x

Thursday, 6 August 2020

New Office Trousers and Dreams of Jeans

Timing is key. Just as my final RTW jeans were becoming ragged, some of my stalwart me-made trousers started visibly wearing out, and I changed shape/gained weight meaning that I couldn't actually get into quite a few pairs of trousers I normally rely on.

So, I spent some time making 2 paris of office-appropriate trousers:
i) Burdastyle 11/2012 #107 Straight Narrow Trousers
ii) Butterick 5682, View E

And then the lockdown hit and office clothes were no longer in vogue...

Burdastyle 11/2012 #107 Straight Narrow Trousers

A slim cut trouser, they've got slash pockets and a fairly uncomplicated design. The magazine shows them at several different hem lengths. I've overlooked them a lot, but they won the contest when I went searching through my Burda collection for candidates.

The outer fabric is from Misan's Clearance Basement of Wonder (R.I.P.) and had a few manufacturing defects (someone had cut a square right out of the middle!). The fabric has a right side and a wrong side - which is visible by examining how well the checks are defined. Both sides have a soft "brushed" texture, except one end of my cut which had a smooth bit. I wonder what went wrong in manufacturing this fabric. I guess it is a wool/wool blend by I'm not going to burn test it or anything. I'm laundering it like it's wool.

Subtle difference of fabric finishing

Unlike the original pattern, these trousers are underlined. The underlining fabric is a polka dot cotton brought back from India. I wasn't expecting a full length lining, but the fabric allowed for it - so I went for it!


I was keen to tweak my usual approach to the fly - so the shield is much wider than normal and I added some buttons. Now that I've worn these a few times, I can confirm I'm not a fan.

I also tweaked the pattern a little for fitting, and I think I would adjust a bit more if I make this pattern again in the future. I added extra space for my hips, but went a bit too far. I also wanted to be clever and cut a curved waistband as one piece for the trousers, but they ended up slightly too big and I had no obvious place to adjust. I added an extra bar at the centre front as a temporary fix, but after a couple of months I opened up the waistband, tightened at the CB (effectively introducing a CB seam) and inserted a drawstring. This seems to be an improvement, but it's not perfect.


You will see in the photo above that I have a lovely deep hem. This is one of my favourite features of these trousers, because they add good weight to the legs and kept my ankles toasty warm in the winter. 

Butterick 5682, View E

This one also needed some fit adjustments as I'm not familiar with Butterick drafts. I think their sample figure is very different to me. The darts were quite pointy and puffy - I tried to ignore it but it looked really bad in the pinstripe fabric. When comparing the Butterick pattern to the Burda one, the back darts were in completely different places - Burda's darts are about halfway between Centre Back and side seam; Butterick's were 3/4 of the way towards Centre Back. It feels like the draft was suited to people whose butts extend straight out from the CB, and they carry no weight around their sides. I'm not built like that! I ended up hacking it and moving them slightly further out to the side.

Darts on the muslin, quite close to CB
 Also, the stereotype about Big 4 patterns having a lot of ease still seems to hold true - the legs are much wider than the pattern photo suggests. The pockets are also quite small on this.

The outer fabric is a wool from Fabworks (Leftovers from my Hades jacket) and I barely had enough for these trousers. There are some sly patches where I had to piece togeter the fabric to accommodate the pattern piece. I like to live dangerously, so I made sure one patch was right on the centre front fly for all to see.


The other one is hidden in the crotch.


The lining is from my first trip to Japan. I thought I would try bagging a trousers lining, leaving no exposed edges, but it's tricky because you can't adjust the hem length as the last step. I ended up doing a row of blind stitching to keep the hem in place and ensure it would hang correctly. This was really important and it stopped some weird twisting down the leg. The lining is a synthetic and it melted slightly on the iron.


Unexpectedly, I really like the waistband here - I finished it with some lime green bias trim (leftover from my Persephone Dress) and it's such a fun detail. I accidentally went full Hadestown again. This waistband also ended up slightly tighter than the waistband on the Burdas, so they're pretty comfortable trousers to wear.


I threw a lot of design detail at this pair of trousers, more than the Burdas really: the green trim, the bagged lining, the piping on the pocket edges and the V-shape belt loops. The waistband is pretty thick, and feels like a design detail on its own. It is drafted straight originally, but I curved it for a better fit over my hips/around the sides. I tried to follow Davd Page Coffin's technique of using a wide bias strip as a waistband facing, but the new curve wouldn't allow it (it looked so bad!) so I ripped it out and just cut a regular facing.


You may be wondering why I lined both pairs of trousers. I don't find wool particularly itchy, but it does irritate me if it's next to my skin all day everyday. Also, I think the lining will help with cleaning, longevity, warmth and drape of these trousers. I hope they hold up well, they certainly feel like Stealth Pyjamas.

Anyway, this fixed an immediate problem but I am still low on jeans and soon my joggers will be ruined via DIY, so late 2020 may involve some new casual trousers. I am not sure I trust Butterick 5682 enough to launch straight into their jeans pattern and my planned fabric has zero stretch so I'm at a bit of a road block until I can find some spare time and the right pattern. At the moment, I am very excited about the new Waffle Patterns release (Azuki), so might try that one.

K


Wednesday, 22 July 2020

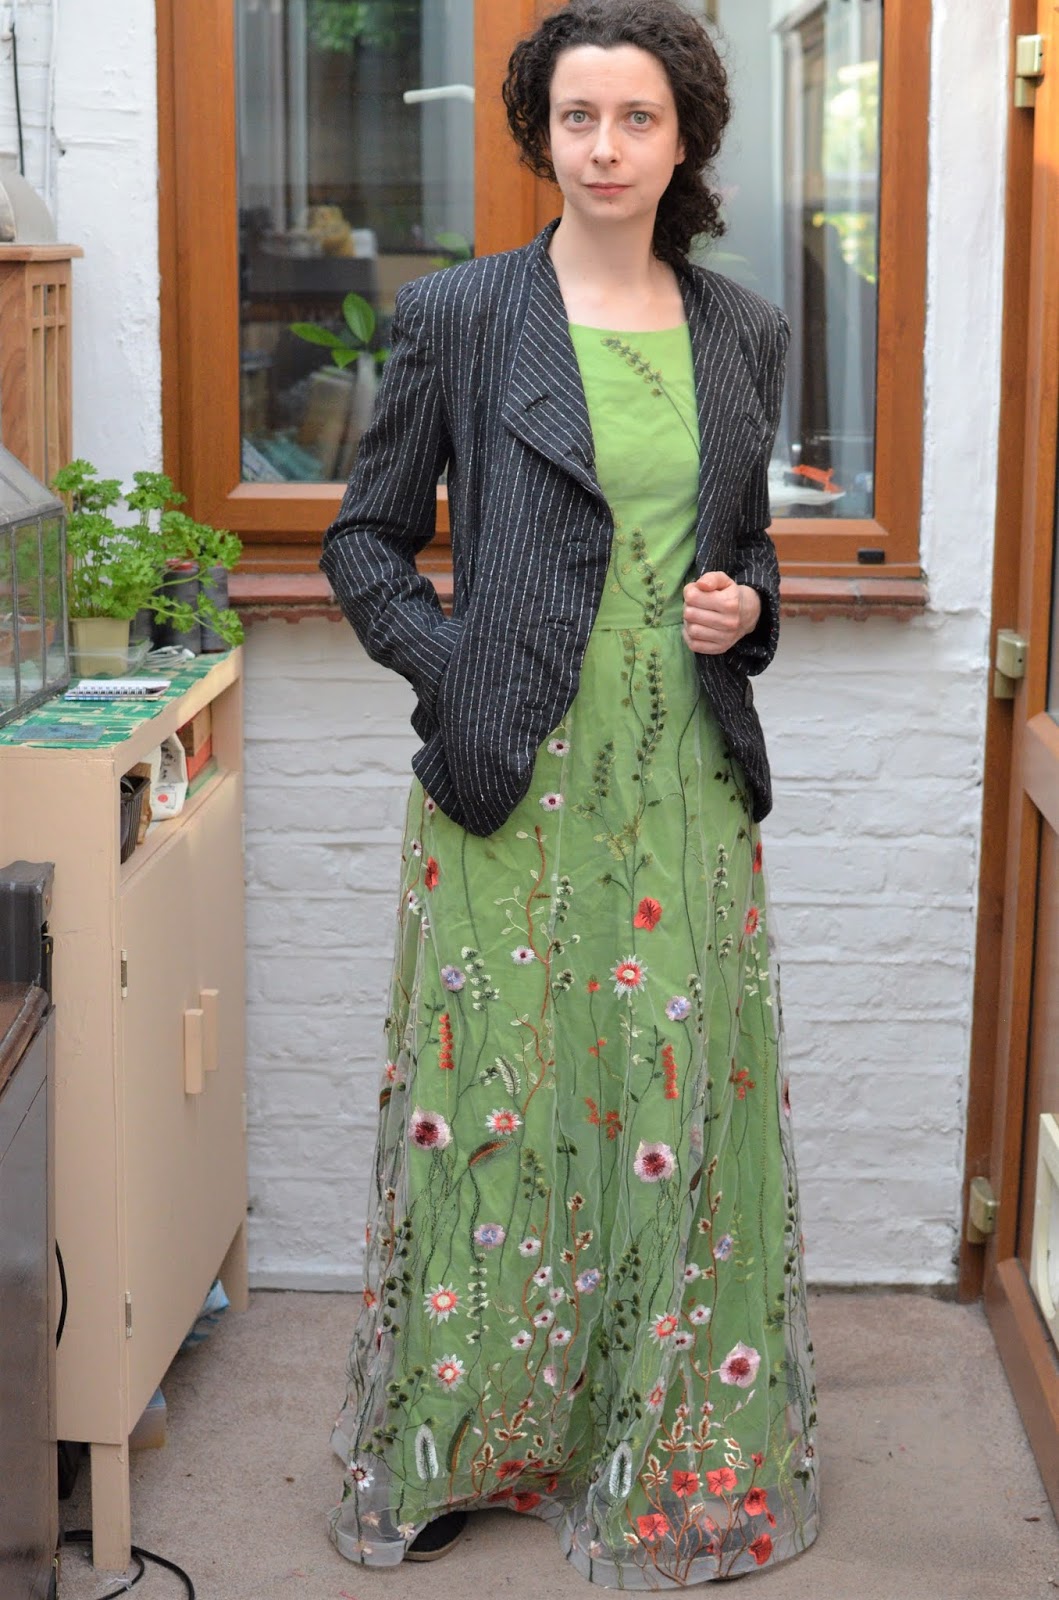
Hadestown at Henley: The Hades Jacket

Updated and republished post to include the link to the dress.

Read up on why I needed a Henley outfit here.

The Jacket

The story of this jacket's inception is almost the opposite of the dress. While the dress was created for the event and became a reference to the theatre show, the jacket was directly inspired by the show and accidentally became part of the outfit. I had coveted the Burdastyle Crossover Jacket since its launch - I dread to think how many times I'd Googled it and checked for other internet versions. I also bought the pattern, printed it and cut out size 36 before leaving it in an envelope for 2+ years. 

Having waited so long before attempting to make it, I had spotted some of the issues with the pattern in other people's reviews. Some of the important elements to flag were:
  • Sleeves needing a lot of care and attention to insert without visible gathering at the head
  • It only really looks good in photos when it's partially buttoned.
  • Two layer jacket - it has no facing/lining. Rather, all of the inside is made up of the same fabric
  • Sleeve seam shaping and the long sleeve vent - most people had puckers/dimples at the elbow where the vent becomes the seam.
It's a tricky pattern because the design is so strong - it needs to be executed well, otherwise it will look really bad. If I had attempted this in 2012 or 13, it would have ruined me - this is as good as my version of the jacket was ever going to get, so now I let it rest.


I'm trying to remember how this jacket got started. You remember how I fell in love with Hades' glittery pinstripes, I was determined to find the fabric. Well, I fell short but I did find a beautiful reasonably priced pinstripe on Fabworks. While I coveted it as the closest possible thing to the sparkly Hades fabric, I think it took me a few days to marry the fabric to the pattern in my head. It's a virgin wool, with some elastane built in. Interestingly, it is definitely a charcoal grey (not black) as I trialled about a dozen threads for it. I know it isn't glittery, but the slubby effect of the pinstripes does reference how they should glimmer. Besides, I told myself, I could just stitch in glittery lines on the jacket with some iridescent thread. It is a gem of a fabric, I love it so much.

Once I got it and started work, the first thing to do was to cut out the pattern pieces and start stitching in glittery lines on each pattern piece. I made slow progress for about 4 days and then gave up. However, I was too lazy to rip it out so there's still a hint of sparkliness on the front of the jacket.

Then I needed to to line up all of the stripes and make all of the bound buttonholes. Now, I've never done them before and while I knew they were basically welts, I wasn't sure about the finishing steps. I looked up some tutorials before attempting them, given that the jacket requires so many of them. They worked out okay, although I made a lot of effort to match the welt/lip stipes with the surrounding jacket, and I think that was only a partial success. This was my first time doing bound buttonholes, so I'll take them.

The lining is made from blue charmeuse and some turquiose bemberg. They were both in my stash at the time of cutting out the fabric - I don't think there's any more profound reasoning to the fabric choice. I think it looks really good with the pinstirpe (red is more common?), and I had some Nani Iro bias binding in my stash too which makes a fun accent between the lining/facing.


I made no fitting adjustments (because I'm lazy) but did alter the pattern to have a facing on the front, and around the sleeve cuffs.I should have done a Small Bust Adjustment, but didn't. It should be a learning point for me to refit every single jacket I make (even if it's a TNT) - they are so variable.


Finding buttons was a nightmare. I toured M&W, Fan New Trimmings and John Lewis looking for suitable candidates. I spent an hour in John Lewis with 2 viable candidates and then settled on these because they were sufficiently busy to blend with the jacket from a distance. They also came in two sizes, which was helpful because the pattern calls for the cuff buttons to be slightly smaller than the front ones. I bought extra (for repairs) but ended up using an extra button on each of the cuffs, because it filled the space better. So I have 6 buttons on each cuff when the pattern only calls for 5. The cuffs are interesting because the buttonhole is one big welt, and you hand-stitch the lips together at intervals, creating space for individual buttons. I've just remembered the buttons cost me £28 (twenty eight quid!) total. That was definitely bruising.

You will see that I failed to insert the sleeves without puckers. I seem to have this recurrent problem with jacket sleeves, no other garment sleeves pucker! They were ripped out and reinserted several times and settled for this. I did add shoulder pads and sleeve head roll, but the jacket looked awful. I removed the sleeve roll and kept the shoulder pads, tacking them only at the princess seams. This is another recurrent problem with jacket shoulders - the more I try to anchor them securely into place with lots of stitching, the worse they look.


Working on this pattern revealed a few more issues which might be interesting for people thinking of making the jacket:
  • The pockets (or their seam allowance) might get in the way of the jacket centre front seam. They really don't have much space.
  • My notes say "WTF sleeve vent pattern" - I remember it being counter-intuitive, and I think I redrafted my own. Be prepared for that to be confusing

I would like to find a way of incorporating a feather motif in the jacket the future, but haven't worked that out yet. I got some iron-on feather patches from the Dior exhibition at the V&A in 2019, but they're not quite right for this.

I am utterly surprised at how much I've worn this jacket since I made it. It's a pretty common work attire piece and I found that it works really well in the winter months (it fits nicely under my Mei jacket). It provides more warmth/wind resistance that I would have expected from such a thin fabric.On the other hand, I have never ever worn it with the buttons undone or sleeves rolled up. Seems odd, given that the cuffs are the man design feature, no?


The Outfit

Unexpectedly, I finished the outfit with a day to spare. I toyed with the idea of making a custom bag, but decided against it. Conveniently, I had a bag already that's printed with vintage microphones which nicely references 'Why We Build the Wall', and I paired it with my Aussie Pink Floyd The Wall pin badge just to hammer the point home. 

I had planned to debut the hat from my Summer 2019 millinery course, but there were some problems. Instead I used my standard sunhat and switched out the trim to match the Persephone Dress.


We were in full heatwave at the time and I knew that our day by the river was going to be hotter than hell. The jacket lasted approx 90 minutes on the day before being bundled in the bag, but the dress held up very well.

Ultimately I don't think anyone really noticed/cared about the dress in great measure. I don't remember if there were any compliments on it (it was noisy and the Pimms flowed freely). I am pleased I didn't stick out like a sore thumb. But in my head, on the day, I was utterly bulletproof. Smug. Chest puffed out. Striding around between the ice cream van/deck chairs/afternoon tea. Sure, there probably were a few more handmade outfits on the riverbank, and I couldn't tell one blazer from the next. But no one else at that event, under the blazing sun, was dressed simultaneously as the lord of the underworld and the goddess of summer. And that, I'll take as a win.


K


Sunday, 12 July 2020

Hadestown at Henley: The Persephone Dress

A toast to the world we dream about, and the one we live in now...

Today I have something wacky to share with you: a jacket and a [formal-ish] dress. I don't remember when I realised that I had to fully embrace the Hadestown theme, but when the idea got into my brain it wasn't going to leave until the outfit had been made.

It all started one a cold winter night when B and I went to see Hadestown at the National Theatre. It was a good show, a really good show. A really, really good show. I became obsessed with Hades' costume (and proving that his suit had sparkly pinstripes) and then found a good Playbill article highlighting some of the costume features across the cast. Once I knew for sure that Hades definitely has a sparkly pinstripe suit I was determined to find that fabric. I didn't need to have a project for it, I just needed to own some sparkly pinstripe fabric. For the stash. You know.

Separately, some rumours started emerging at work that our team might get to attend Henley Royal Regatta (2019, obvs). We were asked for our opinions. I was skeptical, I am not a boat person (nor a horse person, not a golf person, nor a ski person) and didn't want to be the only loser in the Stewards' Circle. But, this was a once in a lifetime opportunity to do something completely outside of my ordinary. I sucked up my worry and signed up.

It's worth noting that I had kept this little sewing habit hidden from my colleagues since I joined the team (well over a year at this point). This would be the event where I get outed as someone who makes their own clothes. The reveal (so to speak). No pressure.

There is a dress code, and I needed to find a way to fully respect it while also feeling confident in whatever I ended up in. I needed a fairly formal long dress, and probably something to cover my shoulders. For several months, I didn't give it much more thought. I browsed ideas idly and tried to think of something good that wouldn't be too much fuss to make. This deadline was fully in the middle of of millinery-tutu-summer dancing-volunteering madness* so while I had a fair amount of notice, I had very limited time to dedicate to the make. You guess what happened next.

The Dress (Persephone)

Ah, Persephone. I found it hard to get my head around her as a character - the fact that trashiness was a positive trait only came across after reading the Playbill article (amongst others). But her energy and exuberance is, literally, intoxicating.

I didn't start the dress design with Persephone in mind. I had been obsessed for a long time with the idea of a lace or embroidered net dress. This seemed like a good opportunity to use up the floral net remnants from my Molly Gaiters (honestly, a pretty trashy fabric). The embroidery design was all over eBay and RTW summer 2018 so I figured it would be relatively easy to get more and make a whole dress. I also figured that it might be a design that other people had seen before in RTW - therefore 'passing' potential scrutiny.

I had the net draped over my mannequin for a while and tested different fabrics/colours as underlinings. I had a vague idea that a green would make it look like the dress was growing a meadow, and the flowers on net would stand away a little. I shoved some green babycord remnants under the net and then left it in place for a few days. It was pure coincidence that the (soon to be) Hades Blazer was already partially constructed and also resting on my mannequin.


I think this was the first time I had the idea of the Hades/Persephone vibe. I yawned and went to bed. Never make important design decisions at 1am.

Anyway, the underlining fabric is a cotton sateen from Goldhawk Road. I tried to find a good colour match to Persephone's dress, this was the best I could do. It's very yellow, so I am a little worried about how it will fade. In Persephone style, I think these fabrics are probably quite cheap and trashy.

The bodice is underlined and has facings, but I wanted the skirt to be stand out more and have a visible separation between the green and the net. So I only joined them at the waist here. The net is hemmed with horsehair braid and it's a little bulkier than I would have liked. I mis-calculated the skirt length and I needed to turn it up one more time than I'd originally planned. I guess if I ever plan to wear this dress with heels, there's a little bit of excess length I can let out.

The pattern is a mashup of Vogue V8875 and the By Hand London Anna Dress. The skirt is drafted for a giant, so I removed 3" length and also turned the hem up an extra time. I added inseam pockets and am very pleased with them!


***This is how NOT to do pockets in a net/mesh dress***


I was working to a hideous time limit on this dress and the insides are mostly overlocked. Still, there were a few construction mishaps.

Firstly, the mesh fabric. Do you remember I said it was all over the place in summer 2018? Wel, unfortunately, by spring 2019 the supplies had mostly dried up! I bought this off eBay and though I ordered 3 metres, I received 3x 1m lengths instead. I took it up with the seller but they were having none of it, so I had to use what arrived. The issue here is that the Anna skirt is a fabric hog and I'd gone from having comfortably enough fabric to calculating where I might need to piece the skirt (don't forget it's a border print, therefore directional). Eventually, it all fit and I only had to get creative with how/where the bodice was cut out.

Secondly, I wanted to be nice and neat with the skirt seams so I french seamed them all. I looked at it afterwards and they were very thick/ugly, so I cut all of them out.

Thirdly, you remember that I said I wanted to use the remainder of my Molly Gaiters fabric? Well, I diligently matched the embroidery design on the new fabric, made up the skirt, stood back to take a look and saw a big problem. It's a different net!


I'm glad this was the CF skirt panel - it meant there was only one real solution: cut it out, find a big scrap of fabric and recut the piece. I was not very confident there would be a piece the right size, but I got very lucky. I assembled most of the skirt before attempting to cut out the bodice, and this really paid off here. If I had cut the bodice first, there would have been no big fabric scraps for the replacement skirt piece.

The dress closes with an invisible zip in the CB seam - it finished well but the zip is slightly too short and so there is only one way in/out of the dress.


Anyway - this is the Persephone dress. I think it ended up okay, though I can't decide if it's a bit dumpy/childish or not.

Next up: the Hades Jacket

K


*More on that later

Monday, 22 June 2020

Nani Iro Pleated Wave Skirt

2019 was the year of my second trip to Japan, my second trip to Nippori Fabric Town and my second haul to bring back to the UK. You may remember I posted a roundup of my previous haul (you can read it here) and I'm tempted to do the same again soon. There's just one small issue - I'm still working my way through the first batch of fabric!

On my first trip to Japan I made a small pilgrimage to the Nani Iro store. I had my heart set on a wave print for a waterproof coat (maybe with a large skirt attached). But, I came away with 3m of the Five Senses blue print on canvas. I was looking for a slightly different print with more pronounced brush strokes, but I couldn't find it on the day and so I came home with this. The Five Senses print stayed in my stash cupboard for over 2 years while I tried to work out what to do with it. Eventually on the 2019 August Bank Holiday I dragged it out and was determined to make something with it.

My brain was slightly fried at the time and I wasn't up to following a pattern, so the make had to be relatively simple and have relatively simple pattern pieces. I settled on a pleated rectangle midi skirt. The straight hem edge would show off the border print, the rectangular pattern pieces would give me a low waste cutting layout and the repetitive pleating would soothe my tired brain. If you're curious about the length, I am slightly in love with the Japanese fashion for skirts that fall below the knee.

So this skirt is made of the following pieces:
1x Front
2x Back
2x Inseam pockets (2 pieces each)
1x Lining
1x Waistband


I dithered a lot on whether the outer skirt should be 1 piece or 3, but in the end the 3-piece approach won. I knew I wanted pockets and a CB invisible zip and it seemed much easier to insert them into seams compared to the slashing/facing approach. The lining is only one piece, and has a seam at CB to accommodate the zip.


To retain the flow of the print (not quite pattern matching, but similar) I marked the centre of the fabric and used that as the Centre Front. The side/back panels are essentially cut off each end of the fabric. It looks alright. I don't really remember construction but I think I pleated each piece first, then inserted the pockets, then sorted out the seams. All the pleating was done with a fork at the machine (somewhere between 3:1 and 4:1 ratio). I think maybe the pleats would look better if they were a bit bigger/wider, but I only really have a limited selection of forks.

I used the selvedge to hem the lining and bias tape on the outer hem. The seams are French-seamed.

The waistband is pretty poor, but it does the job. I wanted a soft waistband, so there's no interfacing but now it twists a bit. I also wanted to do something clever and insert a partial elastic to allow for some sizing flexibility - but it doesn't look great. I will need to try again on something else. Oh, and my topstitching/stitching in the ditch leaves a lot to be desired here.


Side seam (I promise) with nothing in the pocket

Side seam. Proving there is a pocket!
In all honesty, I love this skirt. It's so fun and bold. It's so full because I pleated all 3m to my waist, and it has some superstar invisible pockets. It was out of rotation for the winter (except Xmas?) but I feel it will be a really good one for the British spring/autumn climates.

K