Tuesday, 31 December 2013

The Year in Review, the Mythbusters Jacket, and How I Learnt that Failure is Always an Option

Hi everyone! 

This is a long one today so make sure you're sitting down with a cuppa for the ride. Scroll down for Sewlution news.

First of all I'd like to introduce you to the Mythbusters Jacket.


Why's it called the Mythbusters Jacket? The first reason is because I got on a serious Netflix kick for the show while making this. The second is because it hangs in my wardrobe unworn, reminding me that no matter your skill, expertise, resources or circumstance, abject failure is always an option. I have an unusable jacket. 

But that's okay!

It's Burda 12/2011 Herringbone Jacket 121.It's by far the most complicated thing I've made and admittedly way above my skill level. Someone out there can make this amazing, just not me. The jacket is made up of over 40 pieces.

Everything cut out
Front view, on the new whasijig

So, the great thing about failure is that you can never create a foolproof recipe for success but you can learn a lot from screwing up. I mean, Brain Pickings seems to talk about failure more than anything else. If you learn from when you mess up, it will help you learn to make something much better in the future.

So, what are the issues? (Being a process-nut, I'm going to ignore the possibility that my design choice was bad)

  • I thought to try sew-in interfacing. It pulled, got in the way and did not offer support to the jacket.
  • Burda's instructions are...well...Burda instructions. But the PDF instructions don't mention the front lining piece at all. You must trace and modify a copy of the bodice front (see photo below). 

How to get the front lining piece
Pattern pieces to trace and seam numbers

  • There is also no instruction on the back lining piece, or if you need to trace a separate facing. I traced a  facing, but you can do what you like.
Lining
  •  There is too much space at the front, and not enough at the back. OR the jacket falls backwards, pulling all seams off. To be frank, I think there's too much bulk at the nape of the neck.
Pulling jacket forward on the whasijig
But I'm proud of the jacket, (I even made shoulder pads!) and I wonder whether it's worth going back in the new year and fixing it. Would it be wearable afterwards? Probably not...but that's not what this is about anymore.

I want to know what I can take from this:
On the whasijig
 To replicate and rip off these:

1950s for Dior, design in V&A. Pattern magic, anyone?

Desigual AW 2013, would you pay £200 for this?

But with that, we move on to the year in review. I won't bore you with stats, but I guess you might like to know I surpassed 20 makes this year, which is pretty unbelievable!

But in January I signed up to The Jar hosted by Karen and made a Sewlution  for the year ahead. As the end of the year fast approaches, I must hold up my hands and admit defeat. Karen has been a harsh Mistress of The Jar and has not been above publicly calling out participants on their projects. Spurred by terror every time, I have diligently worked on my project and piped up about progress. But now I must confess the dress will not be done today. Again, failure is always an option.


didyoumakethat

The project has undergone so many name changes and deadlines. It's passed by Chic Expectations, Sewlutions, Matthew Williamson Dress, Advent Calendar dress...I have plugged more than 100 hours on the project on design, fitting, research and actual sewing. Early in 2013 there was a lot of work on fitting and pattern, then a 6 month review prompted a final decision on the design to carry forwards, then there was a lot of time spent on drawing and visualising the design on anything I could get my hands on.

Over the last two months I've been working on actually sewing the thing! If you follow me on Twitter, you've been witness to the Advent Calendar too, with many sessions late into the night. Here's what it looked like this morning:

Pins and all

Turns out 10m ribbon wasn't enough...

The rear needs some work

The dress is a push to finish, but the more work that goes in to it, the more it can't be rushed. I've come to appreciate the idea of a hundred-hour project and want to bring that through to 2014. Something that takes a whole year.

Why?

Thanks to this dress I've learnt to grade patterns, fit muslins, sew difficult points and understand non-standard patterns, work with difficult fabrics and embellishments, create and work from a design sketch, source and trial materials, practice beyond sewing (drawing skills, anyone?), drape, hand-sew...and heck I've still got work to go!

If you can learn this much from one long-term project, it feeds in to every shorter project you do. A year in review is not about what has and hasn't been made or how often it's been worn, but how are you a different sewist (or maker) from the one you were 12 months ago. There is light far at the end of the Sewlution Tunnel. It's crawling closer, but the Mistress of the Jar will need to know this is going to be done on my time, not the Jar's.

Hope you'll join me for the rest of the journey,

K

Saturday, 28 December 2013

A Christmas Reith Dress

Have you heard of the Reith lectures? They're great!

Every year the BBC asks a prominent thinker to make a series of 5 lectures on some of the current themes of our age. Subjects have ranged from security and terror, democracy and economy, art and the role of the artist to name just a few. The archive goes all the way back to 1948 but I've recently been working through the last few years with Grayson Perry, Niall Fergusson, An Sang Suu Kyi plus a few others. They've been the main soundtrack to this project, put together for the office Christmas party. 

Hence Christmas Reith.

Spotted a stray bra strap...

It's Burda 12/2012 #112, graded to a size 34 and reduced to a non-tall pattern. The fabric is a midnight blue sandwash silk from Goldhawk Road (incidentally from the shop of cursed fabric). The existing versions of this dress from last winter were beautiful, so I've been egging to make it for quite some time. Plus, there is a lot of shaping in the CB seam which doesn't necessarily show up in the technical drawing.

Back
Front

Only major modification was to move the zip to the side and to hack some length off the skirt once the dress had been tried on and the bias left to relax. I need to start doing adjustments again, rather than relying on Burda size 34 to be a fairly close fit out of the packet. Does anyone else do that?

There seems to be a few shoulder/armhole alterations I really need to get right soon.


Back, you get the idea
I also used invisible thread on the hem. Definitely wouldn't recommend it as it kinks and unwinds very easily. Not sure how it will launder but the stuff is very frustrating to sew with! 

That's about it for this dress, but I have one question to those of you who've made it already: do you find the drape is constantly pulling the side seams (and cb seam) out of whack? Is this made any better by wearing a slip underneath or adding a lining?

Finally, you can check out the Reith Archive here. This year's talk with Grayson Perry is very interesting and he raises a lot of points that can hit home for anyone doing something creative, not just professional high art.

K

Sunday, 15 December 2013

Sewing Advent calendar roundup!

Hi guys! 

A quick roundup on what's happened with the Sewlution/Advent Calendar/MW dress over the past couple of weeks. It's it's been a roller coaster already and I can't believe there's only 10 days left to get this done! It's crazy!


Today was the first time I've been able to visualise the dress units colour distributions and properly plan how to do the appliqué bits and embellishments. Here's how it's looking, let's see if we can pull this off...


Of course no project is without it's problems, I'm hoping most of the issues were taken care of in the planning stages but we'll have to see. This apparition showed up during some pressing pages, and I'm beginning to get worried...


Wish me luck for the final ten days!

Thursday, 12 December 2013

Illusions, visual effects and mind-boggling stripes

I shouldn't really call this an Anna dress, though that's how it started its life. Sure it's got a slash neck and a maxi skirt, bust pleats, kimono sleeves and back darts, but the skirt and the profile of the finished project are so far removed from the pattern, I can't pass judgement on the pattern itself at all. (This obviously calls for another version).


The main reason for this? The fabric. This was hands down the most difficult fabric I have ever dealt with.

 Not only is the high quality slippery silk charmeuse prone to shifting out of shape, the print is incredible. A friend summed it up very well by saying the fabric left no room for error whatsoever. And of course there were errors! Matching nonregular stripes and diamonds in an unstable fabric across several seamlines is not easy. Plus, when I first bought the fabric from Emma One Sock, it looked like a border print. The repetition is actually much closer so diamonds were obviously going to feature more than planned. 


That being said it's an excellent opportunity to talk a bit about visual effects, and the capacity to create and exploit them when sewing. I love a good visual effect, whether achieved through lighting, weird shapes in odd places or the way something moves around. In garment sewing, you can create a lot of effects just from the colours, shapes and textures you wear.


By Hand London's designs always seem to make excellent effects in exaggerating their shapes. It seemed to be a good opportunity to complement that with a similarly audacious fabric. Obviously discount Roberto Cavali silk charmeuse would do the trick (bought in Feb). With that in mind, I wanted a dress to look as wide as possible at the shoulder (and follow the line of arms when they're moved), vary the size and number of the diamonds at the waist, make you look longer than a stretched cat, and for the skirt/hem to unfold in motion, revealing hundreds of concertina'd diamonds. 

Cue many late nights and stresses over cutting. 


If I can weigh in with a good tip for cutting silk: lay it out on your mattress, or on top of a duvet cover. It's much more effective at gripping than the tissue paper technique. Don't tell anyone else, but it also means you can stick pins vertically into the mattress, lowering any warping or shifting of shapes that might occur.

The angle of the seam and grain lines didn't correspond very well with the stripes so there were some very heavy modifications on the fly to match up diamonds and release fullness where it didn't look weird. The result is a much slimmer hipline than the original Anna, but also something a bit like grown on godets. They kick out beautifully.


The back was another story. Turns out any "curvature" is hugely exaggerated by the print, looking a bit odd. Looking like a column is nigh-on impossible. So to mirror the bodice front, I included some pleats to get the effect closer to vertical. In wearing, there are some amazing twists and angles to exaggerate the way you move or stand. If ever there were a dynamic dress, this would be it.


Could this have been solved by making a muslin? Perhaps, but only if you could emulate the print and hand of the fabric. Frankly, I don't think it would have helped my ability to visualise the project at all. I still love it!

Incidentally, it's our office Christmas party this week and I'm thinking about fabulous dresses for the occasion. I'm going for the Burda 12/2012 cover dress in an amazing sandwash midnight blue silk. Can't wait to show you.

Ciao,
K

(Also, photo credit to George O'D! An ever-willing photographer!)

Sunday, 1 December 2013

Advent calendars at the ready!

Hey guys! 

You know the festive season is clearly the best time of the year, right?

I adore it, and vow every year to get an advent calendar to count down (or up?) to the big day. But every year there seem to be the same disappointing range of overpriced chocolate ones. They don't really seem right, do they?

This year it's going to be a sewing advent calendar. One project, a tiny bit everyday until the 25th. I'll be tweeting about it every day and possibly a roundup once a week on here. 

Along with documenting the process, it's going to capture all of the excitement, stress, anticipation and reflection that good advent calendar should do! Without further ado:

1st Dec: planning, finding supplies and checking design and muslin


How about you? What's your advent calendar like? What's the most interesting one you've ever seen?

K

Thursday, 28 November 2013

Introducing: dumb projects for autumn!

Let's move straight to the point. I made a jacket.


The facts: Nani Iro Melody Sketch double gauze. Size 34 Burda

This is a dumb jacket. I love it.

So, why is it a dumb jacket?

The one MUST HAVE this cold season is definitely an unlined, dotty gauze blazer. You simply MUST try your first ever jacket/blazer using a burda pattern and instructions. Under no circumstances are you making a muslin (mockup/test/rehearsal garment). Minimalism is in, don't skip on omitting the interfacing. ABOVE ALL ELSE make sure you're cutting it from an obviously inadequate amount of fabric. 


It clearly has the makings of a smooth project.

Next, you need to discover that you've duplicate cut one piece instead of two different sides.


Then realise there clearly aren't enough scraps to recut the piece as one whole. Why not try piecing it with the sraps you do have? Great idea! Then use the fabric brand from the selvedge to cover up the evidence! Who cares if it's radically altered the shape of the arm hole and you can't remember which pieces have which different seam allowances!


The real kicker? Make sure that the blazer doesn't go with anything in your wardrobe except for your PJs (your Moomin PJs, obviously). Bam. New hipster housecoat.


K

Thread Theory Newcastle

Once again, another delayed project for you guys but this project really needed a bit of time to settle.

Yes, it's still shorts weather apparently...

The sleeve heads are also actually totally smooth

Thread Theory is a young independent pattern label that specialises in menswear patterns....they've been doing the rounds on the internet over the summer and have come up with some absolutely gorgeous patterns and projects.

The Newcastle is a shawl collar cardigan, which I was super-curious to see, having made something similar as a Christmas gift last year. Oh how I wish this pattern had been available last Christmas! It would have looked so beautiful! 

You know...instead of this...


Anyway...back to the Newcastle...

As a menswear pattern, it's quite rectangular and it's a nice change not to have to deal with darts and precise waistlines etc. There are a lot of good opportunities for detail variation in the cardigan: pockets, yokes, topstitching, closures, embellishments. but this has been a great tester to get a feel for the pattern before actual guy versions. 


This is an XS unmodified and I think the only actual adjustment it might have needed is to narrow the shoulders. I did start to freestyle and went a little overboard with the topstitching but it doesn't look like it has been an issue. 

FYI, the main fabric is from La Petite Emelienne in Strasbourg. The owner is lovely and that woman knows her stuff! I couldn't remember the fabric yardage (metrage?) at all and she advised 1m20. Look how perfectly that fit!


With Christmas coming up, I'm tempted to branch into some Strathcona Henleys for people. Anyone want one?
Guys, what are your thoughts on people making stuff for you?

Friday, 15 November 2013

Babel13: a spot of advice for sewist traveling in Strasbourg

Salut tout le monde! Aujourd'hui c'est la journée de blogging polyglotte, donc on va faire un petit cours de français. Bien que ce blog ne soit pas un blog bilingue, je vois plein des bloggeuses de couture qui viennent d'un peu partout et c'est toujours intéressant de les suivre! (et très utile quand les traductions des patrons ne sont pas très claires!). De plus, et la langue c'est une grande partie de notre culture personnelle, non ? Donc, voila...pour célébrer aujourd'hui : un peu de couture, un peu de culture!
Hi everyone! Today is the International Day of Mutlilingual blogging, so we're going to have a quick French lesson. Okay, so this isn't strictly a bilingual blog, but there are so many sewing bloggers who come from all over the place and I always find them interesting to follow (and useful when pattern translations are less than clear). I guess, also, language is a huge part of our personal culture. So to celebrate today, a bit of culture and a bit of sewing.


Je vais vous donner quelques bonnes adresses dans une ville près de mon coeur: Strasbourg. Au centre de l'Europe, avec plein d'institutions européennes et culturelles, il y a aussi dans la région use histoire riche de textiles. Si vous allez à Strasbourg (et je vous conseille de le faire) et vous aimez être créatif, voici un petit plan de la ville qui pourrait t'intéresser.
I'm going to give you a few good places to visit in a city close to my heart: Strasbourg. At the centre of Europe, there are loads of EU institutions and cultural landmarks, there's also a very rich textiles tradition in the region. So if you go to Strasbourg (and I recommend you do), here's a couple of quick maps that you could find very useful.

Wednesday, 13 November 2013

Shorts...

I'm a big subscriber to the idea of enjoying the learning process. With sewing, this means relishing in some horrendous failures before slicing them up and arriving at a much better solution. This has applied recently (loose definition of recently) to my sewing of summer shorts.

Let's take a look at the first pair:
Uuuuh, I guess they look okay...

Wait, what?

Oh.
Bahahahahaha

After a previous post about deliberate pattern cutting, I totally messed up these shorts. The check is a very solid Alsatian Kelsch (linen) and the blue is the spongy linen from the Boomerang Dress. Bad cutting plan and with a lot of messing up. But hey...it's a new pattern and it looks like it fits. Surely that's good...

From this abomination, I immediately restarted the project, cut new fabric (actually leftovers from the Pinch Me Bag) and arrived at these:
Full length
Rolled up with cuffs
 Big hooray, the shorts feature an invisible zip in the side seam and flat felled seams throughout. I don't think I used an iron at all to press out seams, the fabric reacted really well to just being pressed out by hand. Definitely a surprise! But what's the bit I really love about these shorts?

Hint...
 Pockets! Actual welt pockets!

You know that odd feeling of victory where you've tried out a new skill or technique successfully? That's pretty amazing, but when it happens at 1.30am immediately after a failed project and many hours going loopy in front of the machine...well it has the potential to lead to a full-on meltdown. Trust me, when I finished these pockets and tried them out for the first time, I lost my mind. It looked a bit like this:


Just for proof's sake, you can see the pocket bags and facing. The Kelsch is a great facing because it doesn't stretch or give too much. Hopefully there's enough to be used as other facings!

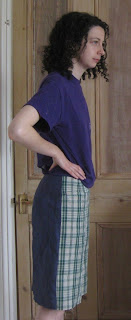
If you're wondering why I'm even posting this now when we're well into November, it's largely because these shorts have been a gateway into a whole host of other projects since. They have have been a nice little milestone in the learning journey. Hopefully more to follow soon, I have bags of cool stuff to show you!