My sewing corner is still not ready to give you a tour. I'm not really sewing seriously yet but I definitely have the itch.
I can tell you that we finally have some wardrobes! This took longer than expected after losing a gamble with Oak Furniture Land. The original units were lovely but didn't fit out our tiny victorian staircase. So they had to go back.
In the meantime B was living out of a suitcase with 7 days of clothes inside and I employed the "shove it all in one bag" approach. This meant that B seemed to have a limited supply of complete outfits whereas I seemed to be constantly fishing for t-shirts in an infinite sea of leggings.
Once the new wardrobes were in place I got to work on Step 2: fitting all my stuff inside. Not everything needs hanging space so I wanted some shelving to stack things too. I got excited about felt baskets too so I wanted to have one for each nook in my shelving unit.
Here's the nerdy bit....
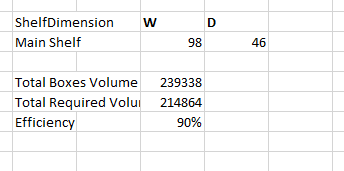
So, I got all of my clothes out of the big bag, sorted them into their normal piles and then measured them. I plugged all of the measurements into my Excel spreadsheet and worked out the volume in cubic centimetres of all of my clothes.
I then realised that I wasn't prepared to make bespoke-sized baskets for each category of clothing so I tried to divide them into S, M and L boxes. You'll see that t-shirts got split into 2 lines. This made them a lot easier to sort.
I then tried to work out the dimensions of each basket based on the volume requirements. Pro-tip: Goal Seek is your friend. I was struggling with finding consistent height/depth of boxes so I gave it to B to try out. He subsequently invented the Efficiency Ratio, which essentially says how full the storage space is based on the measured volume of stuff we have to fit in.
We thought we'd found a solution where all the baskets would be the same height and depth at about 90% efficiency. The next question: would it fit into the wardrobe??
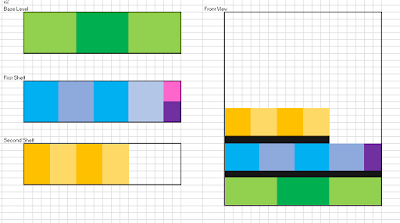
I do still need some hanging space, so there is a height limit. We needed to arrange the baskets so there was some long hanging space and some shorter hanging space. So, we worked out the maximum height of a stack of baskets
After a few iterations of basket layouts, we found a good one and I started designing the wooden shelving/nooks. I chose the easiest design possible and wanted to avoid any tricky (for me) carpenty. I'd like to try something tricky one day, but when there's a pandemic on and a house to finish, it really is flatpack or bust in my mind. Anyway, I got the pieces cut by Cutwrights because I got very excited about them as a business and their quote/cutting layout facility. I would love to use them again on a future project.
The two levels are completely separate box shelf units, for simplicity.
We sanded and varnished the 12mm ply, though I didn't clean the sawdust properly and it is rough in places. We worked together on drilling pilot holes, counter-sinking and screwing the panels together.
I ordered some right-angle clamps from Screwfix specifically for this job and they were so useful. Definitely worth the extra £10. The units would have been a lot worse without these. I also would have had at least one meltdown during the assembly of the shelves without these clamps.
So, once the nooks were in place I could at least organise my clothes into their spaces and think about the felt baskets.
I wanted a sturdy felt but was keen to avoid that ubiquitous mid-grey colour. The only website I found that offered felt in a good variety of thicknesses and colourways (and labelled them clearly) was myfabrics.co.uk so I ordered some samples from 1mm to 5mm thickness. In the end, the 5mm thickness won.
My plan was to use my tapestry needles and thick embroidery thread to sew, so I test-punched some holes using my awl and it seemed fine. I had quite a lot of variegated embroidery thread, and not much that matched the felt, so there's a bit of a rustic look to the stitching.
Next came the question of how much felt and in which colours. Working out the pattern was tricky. I do like the fold-up no-sew styles but they seemed like a serious waste of fabric, so I designed a boxy pattern with the seam running front to back. I drew it up in Excel (note: I have NEVER used Excel like this before this project). This formed the basis of the fabric requirement and I shared out the colours amongst the baskets. The full order from myfabrics.co.uk was MASSIVE. I cheerily threw in a bit of impulse buying too.
My cutting plan for these was to get each big rectangle cut and then remove the small squares in each corner. It really helped me sit down and get on with the stitching when the felt arrived. Speaking of stitching, I considered a few stitch styles (backstitch, chainstitch, running stitch) but ended up using a blanket stitch on the seams. The principle was to get a flat join in the same way as an overlocker faux flatlock. Basically, sew the seam right sides together and turn inside out once complete. It also meant the edges were butt joined and there was no need to deal with seam allowance.
This stitch was an absolute thread hog and I ran out of embroidery floss after about 6 boxes, so I switched to some upholstery spools I had available.
Here's a photo of them all sewn up:
I will confess I've been streaming a lot of Twitch in the background recently and watching other people play board games was one of the things that accompanied this make. So I want to share this very appropriate SUSD clip.
You might notice in the image above that the boxes are all quite round. I noticed that too. So did B. After I finished my first basket, B came to have a look and said "that'll be really nice once you've blocked it". Naturally this didn't go down well. Firstly, I didn't know how to block felt. Secondly, this sounded like extra work for something that I thought was already done.
But, after a day or so I came around and realised he was right. I also realised that I technically do know how to block felt because we covered it in millinery class last year (curse you millinery class!). So there was no opting out. I spent a few days mulling over various techniques to hold the sharp corners while the boxes cooled and dried. We do have some scrap wood that would make a good seam clapper but I decided to try using clothes pegs instead.
The pegs worked really well, though I had to steam the boxes in about 5 or 6 batches because we only have 1 bag of pegs and they get used up very quickly on something like this. The boxes had their bases squared first, then I came back around to do the vertical corners. The pegs really needed to stay in place while the felt dried completely, otherwise the corners didn't stay crisp. I left them on for about 24hrs each time.
Before starting on the steaming adventure I looked around the internet for some guidance on technique. Using steam to shape felt doesn't seem like a particularly niche technique to me (makers and crafters swap and steal techniques all the time) but the only resources I could find were millinery ones. I'm baffled that nothing showed up for any other discipline! (curse you millinery class!)
This meant that every resource recommended a wooden block as the only way forward (curse you millinery class!). I saw a few bulldog clips being used, but definitely no clothes pegs. I'm so glad I took a chance on this technique!
The other reason I was trying to find some resources online was to see how other people were generating the steam. You will remember from Distractions pt2 that we currently have the Family Steamer and I wanted some reassurance about using it for this. On my web travels I found people using: hat steamers, kettles, stockpots, warm showers, microwaves and irons...but not steam cleaners! Come to think of it, I didn't see anyone using garment steamers either and I would have thought they'd be ideal...
Ours has a pressure dial, so I turned it down to a minimum before using it on the boxes. This worked really well. My only problem is that the handle for the steam cleaner is enormous and quite cumbersome for small/medium projects. I would definitely consider using it for makery or millinery in the future.
Once my final batch of pegged boxes was complete I started putting them away in the wardrobe. They look so good.
All in all, I'm pleased with how this turned out. But, I'm more pleased with how many different techniques and skills were involved in bringing these together. It's so satisfying to draw on such a wide range of techniques and to see this designed from scratch.
Stay tuned to find out what I did with the scraps...
K x


Lovely colours on those boxes. They really turned out well.
ReplyDeletePeople use steam to shape wigs all the time! I have a garment steamer on mine.
ReplyDelete