Wednesday, 18 November 2020

Burda 6875 - Version 2

 Do you remember my previous adventures with Burda 6875?

Well, at some point in 2018 I got a yearning for it again. Progress on a new version was slow and it only took a global lockdown to get me to finish it

The Fabric

I found this fabric on the August bank holiday weekend in 2018. It was nestled in the wool remnants at Misan Berwick Street while they were setting up their Goldhawk Road store. There was a dearth of clearance fabrics in the Berwick Street shop and I really struggled with the decision to purchase it. Of course, it is lovely fabric but there was notably less on the bolt than the Burda packet said I would need for this pattern.

It is a W Bill check in exactly the kind of fabric I want in my life.


The Pattern Matching

This beautiful check didn't sit in my stash for too long, but while it did, I came to realise that it needed to look consistent across the whole garment. Nowadays you can get away with mismatched checks if they're sufficiently busy - thanks to fast fashion retailers. But such an approach would be a disservice to this fabric, so I needed to treat it with care. There are so many different stripe colours that it would be very obvious if they were offset at all. I was very nervous about this because this remnant technically wasn't big enough to make the pattern normally, let alone with fussy cutting and pattern matching!

I spent many hours planning my cutting layout. Firstly by pinning stripes together so they wouldn't shift when I cut the double layer/folded. Secondly by drawing stripe references onto every pattern piece with Frixion pen and walking all of the seamlines to match stripes. 

Yes, some stuff ended up unmatched in the finished project, but most of it is there. 

I did plan to match stripes between the sleeve heads and body, but failed. Technically the sleeves were cut to match but I never corrected the sleeve pattern after the forward shoulder adjustment in my first version. So they refused to match when I tried to sew them in. They refused to match 5 times. On insertion attempt #6, I stitched the fabric where it was content to lie. 

The other pattern matching thing is is about the welt pocket. I COULD NOT match the stripes on the body seam closest to centre front (it is is half seam, half dart). I unpicked and re-sewed the vertical seam several times before unpicking the welt and slicing the top edge of the side front panel at an angle. There was also a bit of easing using steam from the iron. Unfortunately I only figured out this fix in time for one side of the jacket.


The Lining

Both times I've made this jacket I've made a fragile silk lining. In both cases it was just a case of finding something that coordinated well with the outer fabric. I did buy this silk specifically for this project and was hoping to find something more robust in the shops but I just couldn't. I did shell out for some (overpriced?) cotton flannel to underline it though.

For this version I quilted the lining to the flannel after cutting out all of the pieces, and was pleased to make use of my Solvy wash-out stabiliser again. The silk was far too shifty to take the quilting on its own, but it did work well under a layer of Solvy. I washed it out in the sink, but did a sloppy job and the pieces dried like cardboard. It got me thinking that you could also treat this like wash-in stabiliser (like the gelatin technique) if needed in future. 

I made up the whole lining, overlocked the edges and ran it through the washing machine before attaching the lining to the outer. This got rid of the residual stiffness before inserting the lining into the jacket outer. Everything was pre-washed anyway so there wasn't any shrinkage post-quilting. 

The Interfacing

Why, you ask, when I bought silk and Savile Row wool, did I dare to use fusible interfacing? Don't you know that's not the couture method? You should be shamed!

Well, Imaginary Internet Sewing Police, because by now I have a fairly good idea of reliable fusibles and how to use them. I am a complete beginner with hair canvas, pad stitching etc. I am not prepared to ruin my nice fabrics with beginner attempts at new techniques. 

Also, Imaginary Internet Sewing Police, I am neither a tailor nor a couturiere. No one is obliging me to use these techniques and no one is paying me to perfect them.

I used a few different fusibles: William Gee K10 for softer areas, Macculloch and Wallis general purpose for more structured areas

I also used my new trick of using greaseproof paper as a press-cloth. No more glue seeping on to the iron!

The Buttons

Yes, I pattern matched the buttons too. 


How does anyone else do fabric-covered buttons with thick fabrics? I sewed a gathering stitch around the edge of a circle and then needed a clamp and pliars to get the backing in place. Does anyone else need woodworking tools to do this job??

Oh! You guys! I nearly forgot! I did cute little bound buttonholes too! Look how sweet they are:


The Pattern

Normally, the number of pieces in a pattern will be a good indicator of  how time consuming the project will be. I will repeat my claim that this pattern is pretty brutal in that respect. With every extra pattern piece there are extra seams to sew but also extra seamlines to check, match and "translate" if you make any fit adjustments. 

So what adjustments did I make this time?

  • Omit the sleeve vents. I only decided this quite late in the project, shortly after I'd finished working on the Hades Jacket. At that point I was DONE with sleeve vents.
  • Added some extra space for my hips in the lower part of the pattern
  • Kept my edits from the previous sewn version of the pattern

I'm a little frustrated that it still cuts quite high into the armhole and that there seems to be too much fabric between my shoulder and my waist (vertical folds visible in the photos). I didn't pick this up at the muslin stage but it does frustrate me a bit now. I just need to be careful with which jumpers and scarves get worn with this. However, overall I think the fit is alright. The shoulders look proportional to the rest of my body and I think that's quite important.


I will probably wear it buttoned because I like to keep warm,  but it does produce some weird buckles in the photos. I don't think I'd care when wearing it and carrying a bag, but it bothers me a bit here. It does look best when worn open. What causes the buckling when buttoned up? Well, maybe the extra space for my hips wasn't big enough, maybe I should have put some more shaping into the darts, maybe the bodice is too long. Maybe it's fine and you just need space to move in a non-stretch coat...


One thing that continues to frustrate me with this pattern is the 'Lower Side Front' piece. The one that sits under the pocket opening. Last time I made this pattern, I said that it was easy to lose track of which vertical edge was closer to the front, and which was closer to the side. This time I struggled with the length of the edges and the balance of the pattern piece (as explained earlier when I tried to match horizontal stripes). This is hard to explain, but I think the pattern piece doesn't account for the pocket insertion. I think it wants to match the horizontal waist seam but the pocket welts add extra length to the jacket front and the pattern doesn't correct for that. It means that the vertical on the side front piece is about ~2cm longer than the edge on the centre-front piece and the seam is thrown off. I don't think this would have been an issue with a "standard" welt pocket where you cut into the middle of a pattern piece. I has only become an issue because Burda tries to introduce the pocket with about 5 seams instead. 

The Pattern: Centre Back Vent

Twice I have made this pattern and twice I have sewn the vent by hand. 

Is it just me? I just don't understand the draft/method for this feature. I know you should be able to machine finish that area, but when the time comes I just can't do it on this jacket. Is it something about the notches that need to be matched? Is it something about the length/width of the lining compared to the outer? I just don't know. I just can't make it work.

This is also the second time I have mitred the vent corners instead of following the pattern instructions.

The topstitching across the top of the vent was incredibly difficult, but I think I got a passable result.


Pockets!

This pattern comes with 2 pockets with optional pocket flaps. They're not particularly generous in terms of size, so I increased them a bit. In this version I did cut out fabric for the pocket flaps but saw how bulky they would be and decided to leave them out. The pocket edges are double welts (also known as jetted pockets), and I really like how they look.

Unfortunately this pattern doesn't include any interior pockets, so I added 2 to the lining again. These are my first attempt at Bluff Pockets. I don't know whether they're any stronger than other styles, but I was getting a bit obsessed with them on other blogs/videos at the time. These are the same pattern piece as my pockets on the previous version. In the blog post for my previous version I list how much wedding swag I could fit in the pockets - which gives you a good indication of how spacious they are!

The Collar

There are elements of the collar I really like: the height, the width, the piecing, but I struggle to get the points around the notch to look flat and nicely executed. I think I need more practice and patience when sewing this step on future jackets.

The Hem

I've alluded to problems with the balance of the side front piece, but it's worth addressing a bit about the hem too. I feel like I just wanted to keep the same fabric stripe at the bottom, but it looks odd now because the hem dips to a point at the side seam. I also didn't have enough fabric for the lining and the outer to meet so I had to add a length of petersham ribbon to the hem. It does the job but it's not as supple as it should be. I think there is some odd buckling and pulling at the hemline - this always seems to be my downfall in jackets!


That's it. I like it. I finished it in lockdown and I haven't worn it anywhere yet. I am hoping it will get some outings in the autumn.

K x

Tuesday, 3 November 2020

Weekend Projects 1

Recently I did one of my classic "shut-in sewing binges". I'm still setting up my sewing space and haven't unpacked all of my boxes yet. I have tried to decant all of my stash into the cupboard but, embarrassingly, it doesn't all fit in right now. I'm not even sure what tipped it over capacity, but I saw the opportunity of a sewing weekend to maybe free up a bit of space in the cupboard.

I'm not ready yet to make complex projects, so I'm focusing on simpler items at the moment. I'm lucky I can shop my stash for quite a few items and will try to use up some more fabric before buying anything else. I do want to restock on cotton (for masks) and stretch activewear (to upgrade my leggings) but that needs to wait a little longer.

So I took things nice and slow and ended up with 3 items.

The Triangle Top

I fell in love with this fabric on the 2019 JP trip and knew that it had potential to become something twisty and conceptual that showed off both sides of the fabric (dots and stripes). So this Pinterest classic seemed like a perfect match.

I cut out some tiny paper triangles to figure out measurements and seamlines. I also used it to test stripe directions. As someone with slopey shoulders, I don't want to accidentally cut stripes in a way that emphasises them. The trickiest part of this was figuring out the sleeves. The photo shows gathering at the wrist and it's a bit puzzling. It's also confusing that the underarm seam is twisty when the garment is laid flat. You would expect only really to see that if one side of the triangle was longer than the other. If you sew the underarm seam like a normal underarm seam, then it just comes to a point where you effectively close up a cone.


I am thinking of making another mockup, taking photos and writing a tutorial - watch this space...

I finished the neck and wrist edges with bands because why not.


Fairisle Nautical Jumper

I fell in love with this fabric when buying my felt over the summer. It's so cosy and good for wearing about the house. It's a basic jumper using one of the Winifred Aldrich blocks.

I messed up the pattern placement on this so badly that it makes me laugh. I was not with it when I cut this!


Joggers

 I remade Burda 11/2012 #135 (?) using a sweatshirting remnant. These are so soft and cosy. I slimmed the leg down below the knee to make it easier to insert the cuff at the ankle, and because I like that style. The fabric is from girlcharlee and I'm a bit wary of how it will wear over time. I made my orange cardi out of a different colourway and it's a bit crusty after a year of wear.


I used an elastane jersey remnant for the cuffs but ran out so I had to piece one of the ankles together. 

I really enjoy wearing the nautical jumper and joggers together. They make me feel like growing a beard and repairing the lobster pots.

K


Saturday, 17 October 2020

Curse you millinery class

In spring/summer 2019 I took a millinery course at Morley College. Billed as a 3-month evening beginner course, I was hoping for some structured teaching but it turned out a lot more like an open workshop. The participants had varying levels of experience and I'd definitely describe it as a mixed ability cohort. Coming to class with ~9 years' garment sewing experience allowed me to keep my head above the water. A complete beginner wouldn't have had a chance.

Honestly, I think that to get the most out of the class you'd need to have a solid design idea in mind and seek the advice or techniques to realise it. I am so new to millinery I didn't really know what I was designing and, under pressure to start drawing up the pattern in Lesson 1, went for a very plain "practice hat".

The expectation was to work on multiple pieces at once and have several to show off at the end of the course (knowing that it doesn't specifically lead to a portfolio or a final show). I finished one, but it got damaged the week before the photo shoot due to an accident with the stretcher. To be honest, that completely took the wind out of my sails.

As determined as fate was to stop me getting the best out of class, I did learn some useful things  though:

  • Introduction to unfamiliar materials like buckram, wire and fusible glue
  • The difference between a buttonhole stitch and a blanket stitch (and when to use both)
  • The basics of hat design and construction (hint: bias is king)
  • Felt blocking
  • How to fix a piece to your head (combs, elastic, alice band, fitting etc)
  • Directing a photographer and model

Time will tell if I pick up this discipline again.

K


Monday, 28 September 2020

Distractions pt21 - Snoop My Wardrobe

My sewing corner is still not ready to give you a tour. I'm not really sewing seriously yet but I definitely have the itch.

I can tell you that we finally have some wardrobes! This took longer than expected after losing a gamble with Oak Furniture Land. The original units were lovely but didn't fit out our tiny victorian staircase. So they had to go back.

In the meantime B was living out of a suitcase with 7 days of clothes inside and I employed the "shove it all in one bag" approach. This meant that B seemed to have a limited supply of complete outfits whereas I seemed to be constantly fishing for t-shirts in an infinite sea of leggings. 

Once the new wardrobes were in place I got to work on Step 2: fitting all my stuff inside. Not everything needs hanging space so I wanted some shelving to stack things too. I got excited about felt baskets too so I wanted to have one for each nook in my shelving unit. 

Here's the nerdy bit....

So, I got all of my clothes out of the big bag, sorted them into their normal piles and then measured them. I plugged all of the measurements into my Excel spreadsheet and worked out the volume in cubic centimetres of all of my clothes.

I then realised that I wasn't prepared to make bespoke-sized baskets for each category of clothing so I tried to divide them into S, M and L boxes. You'll see that t-shirts got split into 2 lines. This made them a lot easier to sort. 

I then tried to work out the dimensions of each basket based on the volume requirements. Pro-tip: Goal Seek is your friend. I was struggling with finding consistent height/depth of boxes so I gave it to B to try out. He subsequently invented the Efficiency Ratio, which essentially says how full the storage space is based on the measured volume of stuff we have to fit in. 

We thought we'd found a solution where all the baskets would be the same height and depth at about 90% efficiency. The next question: would it fit into the wardrobe??

I do still need some hanging space, so there is a height limit. We needed to arrange the baskets so there was some long hanging space and some shorter hanging space. So, we worked out the maximum height of a stack of baskets

After a few iterations of basket layouts, we found a good one and I started designing the wooden shelving/nooks. I chose the easiest design possible and wanted to avoid any tricky (for me) carpenty. I'd like to try something tricky one day, but when there's a pandemic on and a house to finish, it really is flatpack or bust in my mind. Anyway, I got the pieces cut by Cutwrights because I got very excited about them as a business and their quote/cutting layout facility. I would love to use them again on a future project.

The two levels are completely separate box shelf units, for simplicity.

We sanded and varnished the 12mm ply, though I didn't clean the sawdust properly and it is rough in places. We worked together on drilling pilot holes, counter-sinking and screwing the panels together.  

I ordered some right-angle clamps from Screwfix specifically for this job and they were so useful. Definitely worth the extra £10. The units would have been a lot worse without these. I also would have had at least one meltdown during the assembly of the shelves without these clamps.

So, once the nooks were in place I could at least organise my clothes into their spaces and think about the felt baskets. 

I wanted a sturdy felt but was keen to avoid that ubiquitous mid-grey colour. The only website I found that offered felt in a good variety of thicknesses and colourways (and labelled them clearly) was myfabrics.co.uk so I ordered some samples from 1mm to 5mm thickness. In the end, the 5mm thickness won. 

My plan was to use my tapestry needles and thick embroidery thread to sew, so I test-punched some holes using my awl and it seemed fine. I had quite a lot of variegated embroidery thread, and not much that matched the felt, so there's a bit of a rustic look to the stitching.

Next came the question of how much felt and in which colours. Working out the pattern was tricky. I do like the fold-up no-sew styles but they seemed like a serious waste of fabric, so I designed a boxy pattern with the seam running front to back. I drew it up in Excel (note: I have NEVER used Excel like this before this project). This formed the basis of the fabric requirement and I shared out the colours amongst the baskets. The full order from myfabrics.co.uk was MASSIVE. I cheerily threw in a bit of impulse buying too. 


My cutting plan for these was to get each big rectangle cut and then remove the small squares in each corner. It really helped me sit down and get on with the stitching when the felt arrived. Speaking of stitching, I considered a few stitch styles (backstitch, chainstitch, running stitch) but ended up using a blanket stitch on the seams. The principle was to get a flat join in the same way as an overlocker faux flatlock. Basically, sew the seam right sides together and turn inside out once complete. It also meant the edges were butt joined and there was no need to deal with seam allowance. 


Although I forgot the inside-out step for a couple of baskets.

In theory I should've tested the buttonhole stitch as an alternative, for its strength, because we covered it in millinery class last year. Secretly, I don't think it would be so easy to open out the seams because the stitch forms a bit of a knot. A blanket stitch is a bit more slidy. I used a few different stitches for the handles.

This stitch was an absolute thread hog and I ran out of embroidery floss after about 6 boxes, so I switched to some upholstery spools I had available. 

Here's a photo of them all sewn up:

I will confess I've been streaming a lot of Twitch in the background recently and watching other people play board games was one of the things that accompanied this make. So I want to share this very appropriate SUSD clip.

You might notice in the image above that the boxes are all quite round. I noticed that too. So did B. After I finished my first basket, B came to have a look and said "that'll be really nice once you've blocked it". Naturally this didn't go down well. Firstly, I didn't know how to block felt. Secondly, this sounded like extra work for something that I thought was already done. 

But, after a day or so I came around and realised he was right. I also realised that I technically do know how to block felt because we covered it in millinery class last year (curse you millinery class!). So there was no opting out. I spent a few days mulling over various techniques to hold the sharp corners while the boxes cooled and dried. We do have some scrap wood that would make a good seam clapper but I decided to try using clothes pegs instead.

The pegs worked really well, though I had to steam the boxes in about 5 or 6 batches because we only have 1 bag of pegs and they get used up very quickly on something like this. The boxes had their bases squared first, then I came back around to do the vertical corners. The pegs really needed to stay in place while the felt dried completely, otherwise the corners didn't stay crisp. I left them on for about 24hrs each time. 


Before starting on the steaming adventure I looked around the internet for some guidance on technique. Using steam to shape felt doesn't seem like a particularly niche technique to me (makers and crafters swap and steal techniques all the time) but the only resources I could find were millinery ones. I'm baffled that nothing showed up for any other discipline! (curse you millinery class!)

This meant that every resource recommended a wooden block as the only way forward (curse you millinery class!). I saw a few bulldog clips being used, but definitely no clothes pegs. I'm so glad I took a chance on this technique!

The other reason I was trying to find some resources online was to see how other people were generating the steam. You will remember from Distractions pt2 that we currently have the Family Steamer and I wanted some reassurance about using it for this. On my web travels I found people using: hat steamers, kettles, stockpots, warm showers, microwaves and irons...but not steam cleaners! Come to think of it, I didn't see anyone using garment steamers either and I would have thought they'd be ideal...

Ours has a pressure dial, so I turned it down to a minimum before using it on the boxes. This worked really well. My only problem is that the handle for the steam cleaner is enormous and quite cumbersome for small/medium projects. I would definitely consider using it for makery or millinery in the future.

Once my final batch of pegged boxes was complete I started putting them away in the wardrobe. They look so good. 


All in all, I'm pleased with how this turned out. But, I'm more pleased with how many different techniques and skills were involved in bringing these together. It's so satisfying to draw on such a wide range of techniques and to see this designed from scratch.

Stay tuned to find out what I did with the scraps...

K x

Sunday, 20 September 2020

V1591 - I fell in love with a jumpsuit

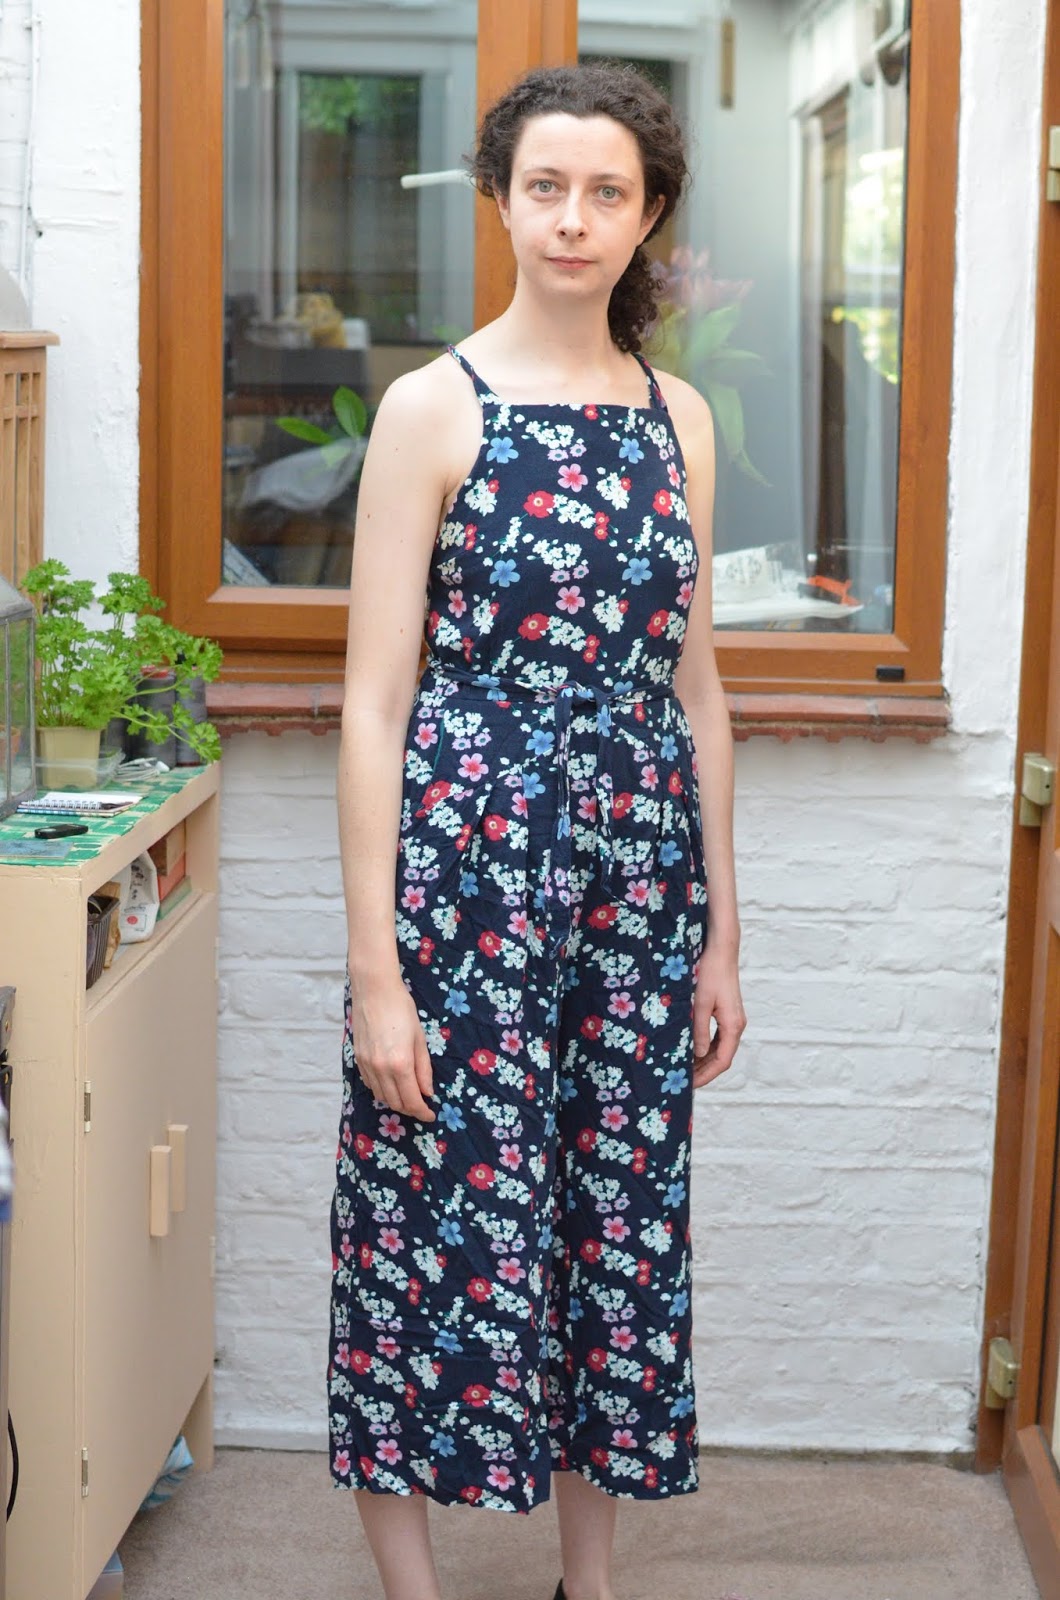
Friends, I never thought I would fall for the jumpsuit craze. I saw nothing for me in the angular stylised boss-lady suits or the casual summer florals all-over. They seemed quite overpowering. I was always disappointed with the single-layer, unfitted, spaghetti strap sewing patterns with elastic casings and ludicrous cutouts. They were not for me.

And then V1591 came along. Oh my. I still don't know if I fell in love with the sewing pattern or the model. Look at her: that sleek, smooth hairstyle, uncomplicated no-nonsense pose, those angular square shoulders reflected perfectly by the square neckline. The lack of cleavage, those dominant legs. The camera work is so good here: slightly lower, looking up at her. She takes no sh*t. Yes, these are wide legs. Wow.

So then I looked at the line drawing. This is a bold design with a bold pattern. Actual pleating/seamline detail! Pockets! Backless! Then I looked at the fabric requirements. Lined! underlined! Hanging loops! It's made of lace! I have never seen a lace jumpsuit before, and this one looks amazing.

This absolute goddess is wearing some sort of formal lace dungaree/jumpsuit with her full back on show and just looks like she's got places to be and people to stomp on. And the sewing pattern shows she knows what she's talking about.

I realised I needed that pattern.

I wanted to make sure it wasn't just me who thought this looked great so I waited a full damn year for reviews to pop up before buying it. There were a few instagram posts, but not much else. I also waited for a long time to find the right fabric. In the end I was fed up with dithering and impulse-bought the pattern and the fabric ready for an Easter-weekend (2019) making session. This took about 2 days to make with minimal fitting or design alterations. I will admit I'm incrediibly late to the party.

Incidentally, this floral viscose was £4/m from John Lewis. Nothing in John Lewis is £4/m! The lining is part of the gift haul that a friend brought back from India.

V1591 bodice facing, lining and hanging loops

v1591 catch-stitched hems and small thread chain for trouser lining

v1591 CB lining and facing

I actually followed the pattern instructions for this make and the finish is excellent. The only trouble I had was matching all of the notches at the waist seam between the bodice and the trouser. I think this is mostly because I like to mark the centre front and seamlines, whereas Big 4 patterns don't. They add notches in different places, so it can get quite confusing if both systems are potentially in play.

I also remember the pocket facings being a bit confusing at the cutting out stage as the pattern refers to them as a "patch". If you make this in lace as advised, they may tell you to cut the pocket facing from the lining/underlining fabric instead of the lace. If you're using regular fabric, you don't need to do this - it's a design choice. If you've made this type of pocket before (like on jeans, for example), you'll know what you need to do, so it's good to trust yourself. I still don't know if there's an error or not - but just watch out.

In terms of cut and fitting, I'm so impressed at the coverage and modesty of this garment considering it's really designed to be seductively braless. I cut an 8 on top, grading to 12 at the waist. The legs are very long - though my fabric also tends to shrink and droop, so it can vary on me. People with different proportions may benefit from shortening the legs. I could have done an SBA, but for this design it didn't seem worth it.

The cut is quite modest on CF, and around the sides/under the arms. 


My finished jumpsuit is more casual than the envelope. I'd love to make a more formal version but honestly, the current one has been worn so much that a casual version was the right choice. It wears best with no bra/shirt underneath (good for sweaty ceildhs) but I do also wear it with lacy M&S bralets or full t-shirts too. It has survived the office, late night ceildhs, duvet days, housework, house parties and camping. It is oddly well-suited to the british climate, handling our annual heatwaves (for which the Brits are famously ill-prepared) and more moderate temperatures too (the lining and underlining really work together).

On the next version, I'll pay more attention to the straps. I sewed tubes for this version and didn't top stitch at all. They will never lie flat again. I am hoping to find a solution that doesn't use ribbon like the pattern calls for, because the colour-matching challenge would be a big headache. In future, I  may also swap out the tie for a button or hooks and eyes - as I'm not a big fan of the knot and always tie it in front. We'll see what the future holds.

That's it for now,
K x

Saturday, 12 September 2020

How I use Airtable to organise my sewing projects (and you can use it too!)

One morning, early in 2018, I was clearing out my junk folder when an email from Angelist caught my eye. "Excel is dead" the subject declared - you don't say something like that without getting someone like me fired up*. I took the bait and opened the email. This is how Airtable entered my life.

I love a good spreadsheet, but I really hate trying to use a spreadsheet where a database would be better suited to the job. Airtable plugs this gap, it looks like a spreadsheet but has the functionality of a database (and it looks all pretty and contemporary).

There were some examples of applications out there already, though the community is much more active by now. At the time, I enjoyed Simon Hørup Eskildsen's posts on how he uses it (Minimum Viable Airtable, How I Use Airtable) and leafing through the Airtable Universe pages to see hundreds of applications I couldn't begin to imagine. I've built some test bases with enterprise applications but we're an Office365 organisation and I have enough problems with people staggering around abusing Teams.

FYI. This system below would probably work for any situation where you need to pull together several inventories and create projects. But I've done it for sewing as that's my thing. Feel free to take these ideas and run with them.

The Organisation Problem

On a basic level, I have a pile of fabric and a pile of patterns - they should all be linked together so I know what I'm using for which project. I want to know what I already own so I don't buy duplicates and I want to know what my stock looks like so I can colour match it.

I want to be able to plan projects when I'm not in my sewing space. I want to browse my stock or find something specific without having to leaf through everything.

The Problem With Sewing Apps

For a long time I was fruitlessly looking for a digital inventory system to help with sewing. There are a lot of sewing organisers out there, but I always felt that they weren't quite right. Some were expensive and had too many features, some were free and looked pretty rubbish. Some were designed for quilters, or embroiderers or general crafters, definitely not garment sewers. Some were social. Very few of them were designed to work on more than one device (and I don't mean they lacked the ability to sync (though that is true)), meaning that they were only ever developed for iPad or android or WindowsPhone. And none of them ever contained my holy trinity of requirements for an information store: backup, restore and exportable data. Because nothing gets me down like losing my entire inventory each time I replace a device.

OH AND THE MANUAL DATA ENTRY. EURGH.
Doing it for one app is a chore. Doing it for several is just eurgh...

And I understand that a lot of these apps will have been developed by tiny teams with a passion to help out other people like them. I get that. I'm sure that so many sewing apps are imperfect home-brewed solutions, but I desperately wanted to believe there was a better way. Something customisable by the user (we do know how to do alterations after all) but where the nitty-gritty infrastructure stuff was already taken care of.

In the past I've used:
  • OneNote (and Evernote): For pattern storage. OneNote is like a freeform filofax or notebook. It's good for images and annotations, but not very good for cataloging. For a long time you couldn't filter or search easily (it has improved), but it is a good ground for recording ideas and making digital collages. I really appreciate that this will work (fairly) seamlessley between computers and mobile devices, and I only need to sign in to a cloud account to access the information. You don't even necessarily need OneNote installed because you can access it in the browser.
  • Fabric Locker: This was on iPad several years ago, it might still be there. Allows you to store fabric and patterns, then you can link entries as projects and add free text notes. Used frustratingly tiny pictures, and only 1 per entry. I gave up on this app when I lost my data a couple of times after it crashed.
  • Clothio: Bless Clothio. I love this little Android app. Sure, I can't extract the data or access it on anything other than my phone. Sure, it clogs up my image library by saving image duplicates and breaks a bit if I accidenally delete a fabric image stored elswhere on my phone. Sure, it won't let me edit a fabric image once it has been added. Sure, it's only a fabric library so patterns are left in the wild - but I liked it. I can search by pattern, colour, type, shop, designer...loads of different attributes which are mostly added via tickboxes. Plus, it's offline so I can look at it anytime (but mostly between tube stops when then the wifi drops).

Enter Airtable

Again, I love a good spreadsheet, but I really hate trying to use a spreadsheet where a database would be better suited to the job. Except that I only know how to use databases, not build them. I suck at building/making relationships and I certanly don't know how to get one to support images, or integrate with third parties. And I have limited time, energy and brainspace to learn how.

I don't code - but I know how to build a smashing spreadsheet.

Before I take you on a tour of my setup, I wanted to give you a bit of context on why I've arrived at this way of working. When I first started using Airtable, I had a grand idea for something that I could deploy to the community for free and that could be copied by other users. I have a very long-standing annoyance about cataloguing patterns via technology to have quick reference available - ideally with some sort of link to a database that will auto-fill all the blank spaces about sizing, style, garment type, recommended fabric, size range, rabric required etc and the images. This is normally tied to a website's functionality as a shop, mostly as a by-product of this commercial activity. I know some people have accounts on PatternReview.com that allow them to do this, that The Foldline is probably one of the best repositories of information by now (but doesn't do the community stuff in the same way), and that Kollabora has also attempted this. I guess these are the most well-known multi-brand platforms.

The stick in the mud for me has always been magazine patterns. When I was buying Burda semi-regularly, this meant ~50 new patterns I needed to catalogue and refer to. I think there is a solution floating around the Russian Burdastyle community, and some people have just stored photos of each centre-page spread of line drawings into their phones. I used OneNote to store a big reference page of all of the line drawings. I guess it's good enough, but I longed for a system where you could tell Burda you owned a particular magazine edition and it would give you access to the PDF instructions, or pieces or just save a list in your user profile. It seemed like a very small ask.


And then they launched burdastyle.co.uk
With no pattern images and missing the back catalogue
And then they revamped the UK site and the US site
Completely obliterating the back catalogue, purchase history, project history of each user.
They forced most existing users to choose between inflated pattern prices in their domestic currency or bear foreign transaction fees and exchange rates to keep using the US platform that had a record of their projects and purchases.
Because of course your logins were completely separate accounts.
And then they failed to fill in the information on the product page so you didn't know what size you were buying or if you'd ever be able to procure the materials for the make.
And they kept the legacy issues where documents were attributed to the wrong patterns, or the wrong patterns to the wrong magazines. So you could buy something, open up the PDF and discover that it was for a different garment.

Oh, and then the magazine got very lame very quickly.

So now that Burda is never getting my money again, I think my OneNote solution is fine - I just need to break all of the web links. I tried to input a couple of issues of Burda into Airtable, but it's impossible without webscraping, API or a similar tool. So now I will only add a Burda Pattern if I have taced it out already - indicating a serious intention to make it. I've just cleared out the weblinks on these records:


For other pattern brands, Airtable works okay. I still can't call on an automated way of populating the pattern information, but I can link to the webpage and I don't actually buy that many so I don't need a scalable answer. This is semi-sustainable for now. One major advantage of Airtable is that I can upload my PDF patterns and instructions. That means that (give or take) if I am planning a project away from my main pattern stash, I can print a new version of the pattern! I can carry half my pattern stash around in my pocket.


The Tour

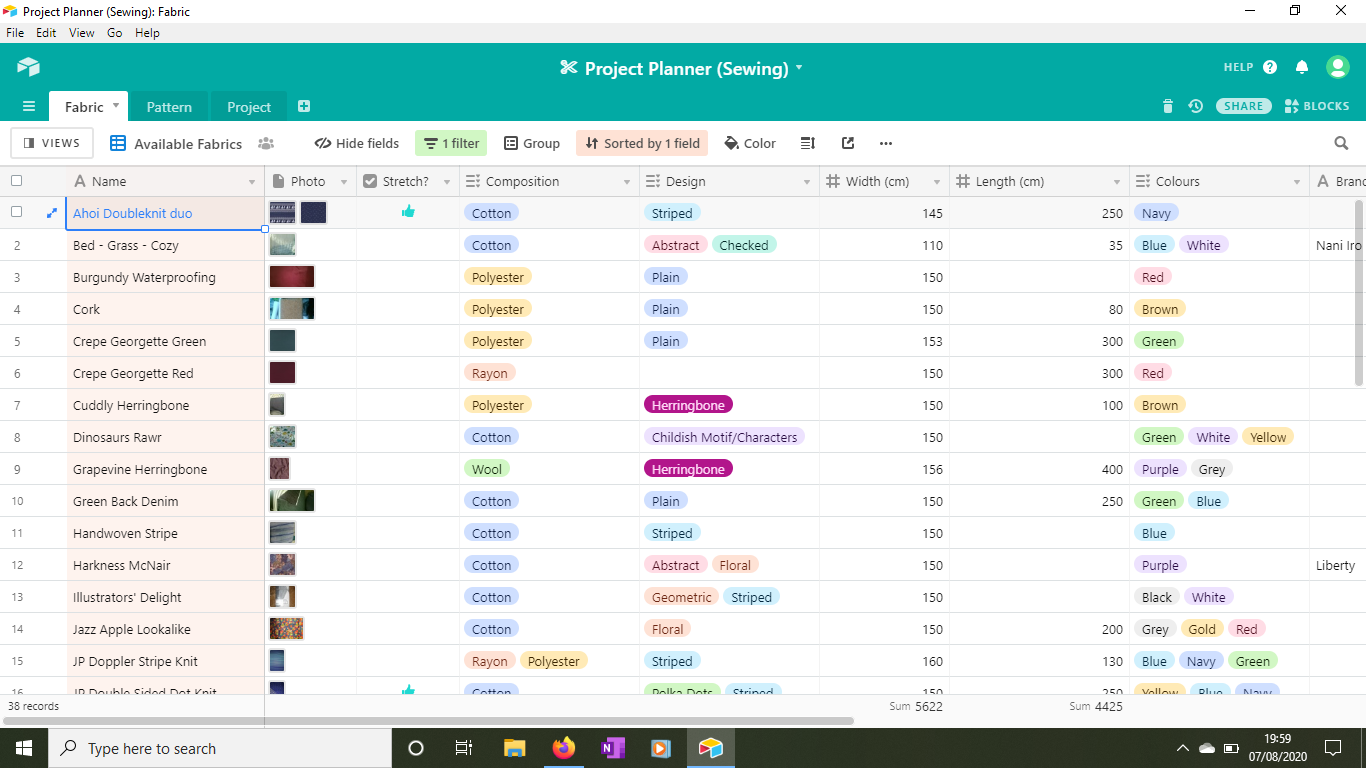
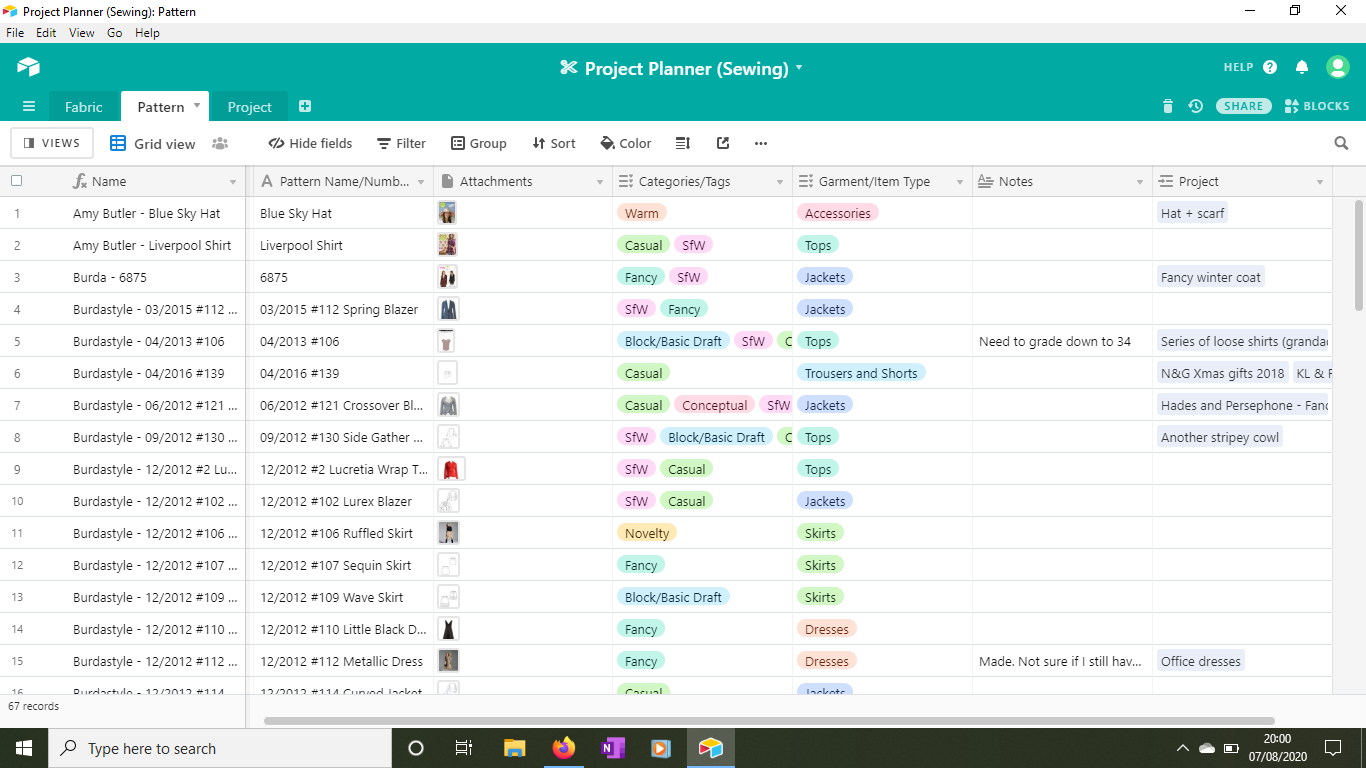
In essence I have 3 tables within my Project Planner (Sewing) base:
  • Fabric - in which I log an image, characteristics, composition, measurement, brand, colours and shop of the fabric
  • Pattern - in which I log the name, web link, image, garment type and category of a pattern
  • Project - Where I select items from Fabric and Pattern to go together.
The Fabric one gets updated immediately after a purchase and it helps me remember how much I bought of a particular fabric.

I have filters for various criteria and have just sorted out a Colour field. One of the things I struggled with was entering colour information into these records. For about 18 months, I just used a free text field but it wasn't great. I was hoping for a colour picker, but it never materialised. When I started using Airtable, the multi-select option had very limited colour choices and I didn't want to be stuck with a label colour coded "Green" when the text said "Blue" - I think this has been expanded, and it currently looks like this:

 
The Patterns and Projects tables have some notes sections, which can be useful if I need to put reminders to myself.

I have a small "Done?" Tick box on the Project records and can use this as a rule to filter between 'To Do' list/Available fabrics and completed projects. This has been really useful over time to check back on things. When adding fabric to a project, the table uses the All Fabrics list, so I can also add a scrap to the Project without clogging up my fabric list with tiny cuts.


Desktop vs Mobile

I love being able to view and edit this on mobile and computer. Most of the fabric entries and Projects are created on my mobile - but there are some edits that are only possible on computer (removing a fabric from a project). The desktop version has different views, while mobile only really has a standard one:


On desktop, you can have a Gallery View:

And a Grid View:


The Grid View is most helpful for editing things.

It is disappointing that there's no mobile Gallery View yet, but I just discovered a "hack" via this Community thread (and when my phone prompts me how I want to open the link, I choose Airtable not browser). This is what it looks like:


That's it. Happy organising!

K

*I am am Excel queen btw

Sunday, 6 September 2020

distractions pt20 - Home stretch

Way back in pt14 I said it was important to treat the household paint jobs like a marathon, not a sprint session. I showed a screenshot of my paint tracker and felt daunted by the amount of work ahead. Well, friends, this week we finally finished all of the indoor painting. Look at all of those Y's! 


For those of you following this saga,  we chose a bright butter yellow for the skirting/door frames upstairs and a deep blue for most of the skirting/door frames downstairs. The trim in the kitchen and bathroom is white gloss. There is also some tactical white gloss in the exterior doorways to make them seem bigger. These paints were so gloopy compared to the wall and ceiling paints, it was a bit of a shock when I started working with them! Also, the gloss paints look best with two coats - it was definitely worth the extra effort.

I am so relieved we have all "finished" rooms now. It feels like a big milestone!

There's still a bit of external masonry to paint, but I need to wait for a dry spell.

Stay safe