Showing posts with label trousers. Show all posts

Wednesday, 14 December 2016

Unsung workhorses

These 2 pairs of trousers have been in almost constant use since I finished them nearly a year ago. So quick was the transition from presser foot to my actual legs, I don't think they got any construction shots at all.

The fabrics came from Ditto (grey brushed cotton) and Misan's Clearance Basement of Wonder (navy synthetic - it's breathable and slightly hydrophobic). All the facings and pockets were scraps and stash. I may have scrounged a hook and bar off B. It's hard to remember.

Anyway, it's some pairs of trousers. We've done trousers up to the eyeballs now. What's new?

Well there was no pattern. They're a RTW copy. The original was a worn out pair of linen trousers I got when I started trying to get my first jobs and internships. The Christmas sale at Next, or something like that. I was so attached to the originals (both affection and necessity because I couldn't afford anything else) that I patched the knee when I fell and ripped it open on a train platform, coloured in bleach stains with a sharpie and only gave up when the bum cheeks wore through.

The fit was good though. The lovely, fat, interfaced waistband meant that it wasn't going anywhere. Good pockets and ready-made hanger appeal.


To copy, I followed some of the things I'd learned in Kenneth King's Jeanius course, but also cut the trousers into flat pieces. This helped with copying the sneaky darts at the back which are hiding above the welt pockets.

I rarely practice a technique before attempting it on the actual garment. It's a bad habit that I should try to break. These aren't the best welts I've ever done (my money is on this pair) and they could look a lot better. My hope is that no one is actually looking.


Otherwise, I love these trousers. Look at the fit, look at the wonderful facings and pockets. I'm really pleased with how they have become unremarkable workhorses, it's one of the best things about making stuff.

Front

Side

Back


K x

Friday, 4 November 2016

Curiouser & Curiouser - Dumb projects for winter

These are a not so recent pair of trousers. I must admit that they are a completely dumb project to be showing off in the middle of winter. In my defence, I had this idea in Feb 2015, when Liberty was having an online sale and triple points offer on their fabric (which would have actually made them an ideal summer project).


The outer is their classic Tana Lawn in the Curiouser & Curiouser print. I think it was part of the Alice in Wonderland series. Perfect for warm weather. Except that I made these in November 2015 and wore them to the office Christmas party.


The inspiration for these trousers was to develop my own spin on the bright, floral print trousers that seem to be on the streets these days. I bought the fabric first with the intention of making trousers, but hit a roadblock when trying to decide how they would look. I wanted to steer clear of cigarette, palazzo and hareem/hippy styles so a fairly standard suit trouser would work well. With trousers like these you can't really play with cut/style etc before they become very outlandish. The lawn doesn't have any stretch so I also needed to choose a style would let me move while wearing them (i.e. not skin tight). The pattern is Burda 04/2013 #103 Pleated Pants, which is actually the trouser complement to a jacket I made a while ago (version 1, version 2).

Unexpectedly, these have become a hit because they fit well under motorbike trousers, take up close to zero luggage space, are super comfy and can be thrown on over leggings after tap class. Like joggers/trackies. Except they're multicoloured. And they're actually dress trousers in disguise.

They're lined with a yellow cotton muslin (originally destined for another project) from Cloth House, The pocket lining is black/fuschia remnants from Misan Textiles. The fusible interfacing is from MacCulloch & Wallis. It's a veritable Soho party!


I dithered about making these for a long time because the fabric was expensive and it was so tough to see a a good result in my head. I was also wary of adornments and extras. It was important to strike the right balance of formality (darts not yokes, welt pockets not patch pockets, zip fly but with discreet buttons)  and flair, but the whole thing became quite daunting.

(Advance warning: I'm about to wax lyrical about tap again)

Sometimes daunting is a good thing, you need to stare the fear in the eye and make tiny steps towards the finishing line. Gradually it'll subside and you have will have won a battle. Sometimes you throw up your hands and say "not today", come back in 6 months. I've done that plenty of times in sewing - some things have gone well and some ended up as duds, but they were done and I was proud (or just relieved). I threw my hands up a couple of times on this project too, which is why they were finished in November and not March.

One of the most important parts of this kind of process - making, learning, challenging yourself and trying things - is to stop and say "wouldn't it be awesome if...". Or have someone to do it for you, who will make you do it anyway. I think these trousers are a means of paying respect to all the people - especially in the tap world - who are teachers, motivators, coaches, artists, athletes, enthusiasts and role models. They are major inspirations for me and for fellow sufferers of "Royally Screwing It Up 95% Of The Time" Syndrome. Without them saying things like "Next we're gonna do X, and you know what? It's gonna be awesome!" every 3 minutes in class, we wouldn't keep trying.

I'm working on it though, I try to wear these trousers as a reminder - the work you do between walking away from a challenge, and coming back to it 6 months later is important, don't forget it.

K x

Monday, 18 January 2016

That was the year that was (the year of the trouser)

I've finally emerged scratched an battered from December's festivities. It's by far my favourite time of the year, though after a month of non-stop parties (and great company), I'll be grateful for any darkened or quiet rooms that might cross my path. People (even the ones you love dearly) are exhausting.

Somehow I managed to make a few Christmas gifts for the most discerning of loved ones:

Tap Shoe Bags
Tap shoe bags for 2 lovely teachers

Thread Theory Newcastle Cardigan Navy and Tan
A Thread Theory Newcastle Cardigan for B

2 Teddy Bears
2 teddy bears

2 Bird Ornaments
2 bird ornaments

Keep your eyes peeled in January (or maybe Feb at this rate) for a proper write up of the teddy bears and the Newcastle Cardigan, both of which were really engaging and rewarding projects.

tap shoe bag detail: lining and RSD tap shoes
More detail on the shoe bags

I also finished my last 2 pairs of trousers for the year at the tail end of November

Brown bootleg jeans

Rainbow trousers in a Liberty lawn fabric


The brown ones were a remake of Burda 10/2013 #126 Bootcut Trousers using my stamps fabric and a brown denim from Ditto Fabrics. I sized up to a 36 for this pair after my previous versions (34) were too tight. Again, still not bootcut!

The rainbow ones were a bit more special and deserve their own post in due course. I still have 2 pairs of "in progress" trousers waiting in the wings. I tried to dedicate a lot of time to trousers over 2015 and have learned a lot in doing so.

Firstly, I learned a lot of new things about fitting and patterns. Assuming that all clothes are some weird geometric 3D experiment, it's still mind boggling to imagine how a 2D alteration will affect the 3D garment once it's on a body. To that end, I'm still not sure why you'd ever need or want to make an adjustment to the crotch seam on a pair of trousers. A bit like my approach to armholes I guess: check the shoulder, the chest, the torso, but do not mess with the armhole unless you absolutely have to, and you know all of the follow-on corrections you'll have to do afterwards. With trousers it's best to check the wait, the hips, the height, the grain etc. I'd only want to directly mess with the crotch seam as a measure of last resort.

I've also learned a lot about finishing and detail, the factors that really make you feel like your project is a cut above everything else. A lot of this is RTW industry standards (it's one way to spend the tube commute) and expectations for trouser styles. This is the really nerdy stuff about reinforcements/bar tacks, where the top-stitching goes, appropriate pocket styles etc. I'm all about making it look as good as it can be. Part of the general trepidation about sewing trousers is probably based around the finishing and making them look "real" (and not like a pair of clownish pyjamas), moreso than just fitting.

Anyway, that was the year of the trouser.

I'm clearing out my textiles at the moment ready for 2016's theme. It's been really useful to look at RTW, me-mades and fabric stash all as the same thing for once. The holistic approach is going to be my guide for the year ahead. 2016 will be the year of the outfit.

My making usually takes on a bit of a delay between inspiration and finished item. The stuff I found really exciting and inspiritng in November should (hopefully) be ready before the end of March. And you know, some of that is pretty flashy and challenging. If I only make that stuff then pretty quickly I'd have no underpants or pyjamas. You know?

I liked making nothing but trousers for 3 months. I liked production-lining wrap skirts (it was efficient!) but it's time for a different approach because my old RTWs are slowly wearing out and the projects that were "just about good enough" aren't getting chucked out when they should really go.

Thinking in terms of whole outfits will (hopefully) mean I can balance the fun with the sensible and really make sure that professional/officewear is fit for purpose too. You see, I want to dress in a very specific way at work. I want my bosses to think I'm valuable so I want to dress like I'm valuable. It's cheeky- but why not.

2016 is shaping up to have some interesting sewing challenges ahead: more little'uns, more softies, more gifts, more garments, more pants.

K

Tuesday, 15 December 2015

Purple Seagull Trousers

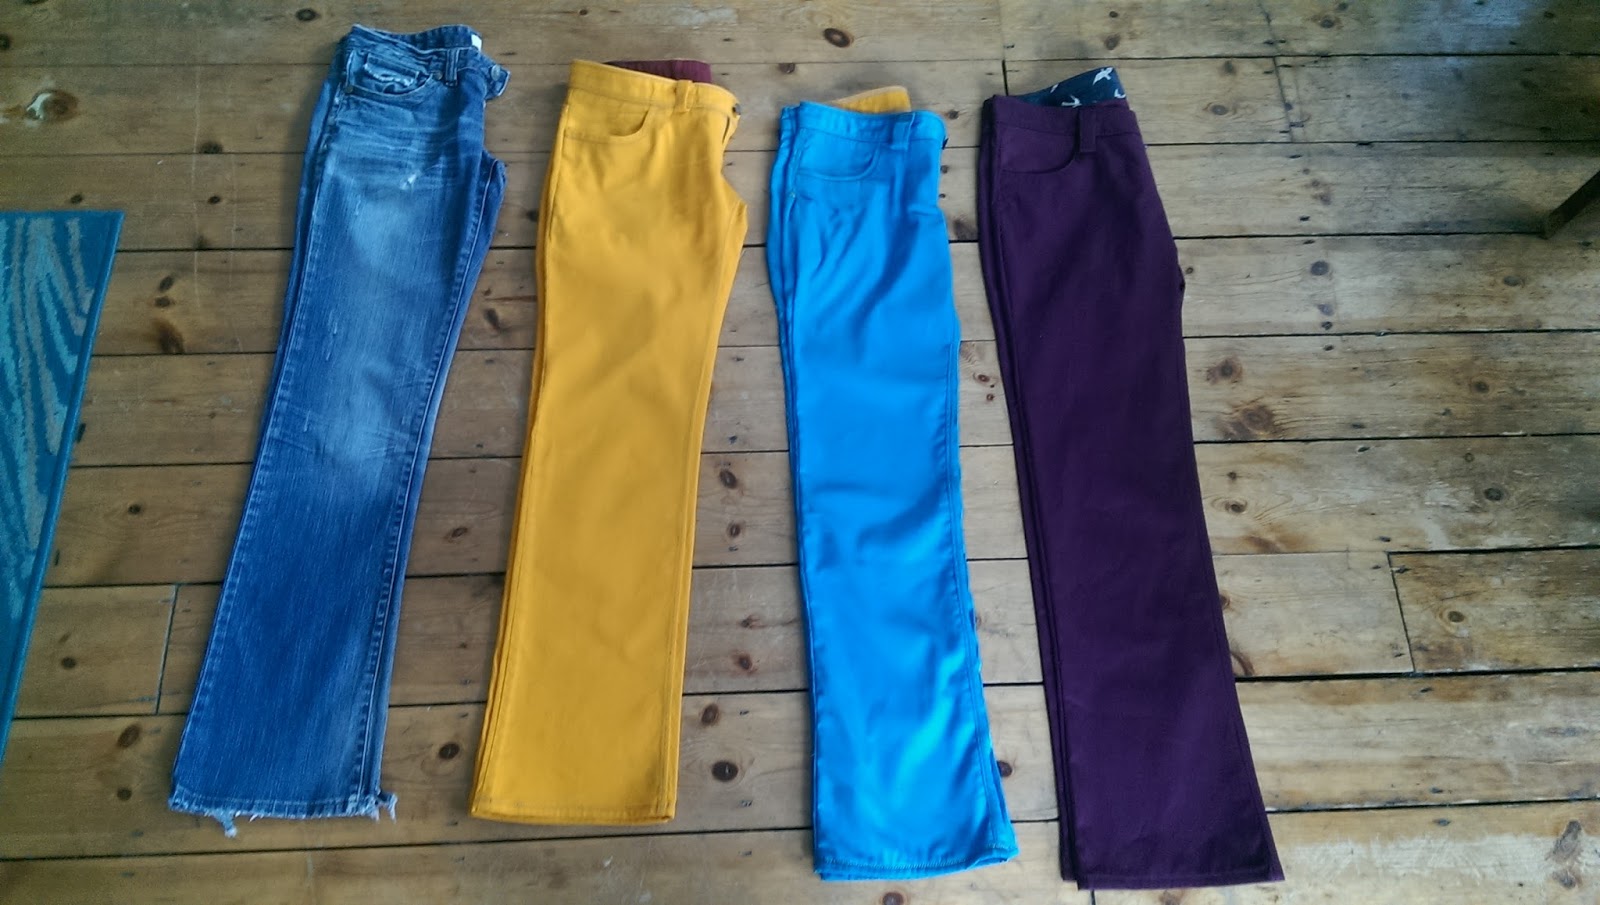
This is version 3 of my first RTW rip-off. You can see more detail on the fitting in this post where I've grouped all 3 versions together to show the progression.

The jeans are fully-fledged jeans and I'm proud to say that I can just about complete a pair in a day (6-8 hours). This includes all of the cutting, fusing and stitching with a good level of detail. If only jackets took that long!

While my dream of bright pink trousers still hasn't been realised, these are the best possible alternative. The fabric is a beautiful burgundy/mulberry/plummy colour and it was very easy to work with. It comes from Ditto Fabrics and did have a designer label attached to it, though I'll be damned if I remember which one. Thankfully it has lost a little of its sheen in the wash, at first it looked a little shiny under artificial light.

Inside of purple seagull jeans

I've been wearing them practically non-stop since they were first made. The fabric is being broken in and I think these will become perfect once they've been laundered a few more times. The fabric is also quite dense and is fairly wind resistant and warm - which is a relief as we're heading in to winter.

waistband and pocket detail on purple seagull jeans

The pocket lining and waistband facing are both seagulls again. I think this'll be the last of it. There are two lines of top-stitching, one in a a similar colour, which ends up nearly invisible, and one contrasting dark blue which pops a little up close. It's quite subtle but draws the garment together quite nicely.

side seam and bar tacks on purple seagull jeans
I finally remembered to take a photo of my bar tacks! Yay!
inseam detail on purple seagull jeans
Inseam topstitching
Up until now I've been freestyling a bit with belt loops, for future versions I'll actually measure and cut pieces that look a bit more normal.

fly detail on purple seagull jeans
Look at how this toptitching lined up across the waistband and the fly facing, yeah!
You know the problem though? By the time I get around to belt loops I'm so close to finishing and so excited to be nearly done that they get forgotten a bit. They definitely don't get the care they need. There's always next time.

I'm still getting my head around waistbands. My most recent pairs have been good, but I may do a whole post on the little nuances that make a difference.

It's probably about time for some normal-looking trousers, don't you think?

K


Tuesday, 8 December 2015

Blue Octopus Trousers

I'm not sure what to make of these jeans. The topstitching is absolutely adorable - it adds a great pop to the trousers, but they've got a few problems and are already sat on my repair pile.

First of all, I messed up the pattern (no biggie, it's a learning process) and took out too much space. You can read more the nitty-gritty of fitting here.

The plan for these trousers was a summery lime green or bright pink. B talked me out of it and in favour of this sky blue. Now, for all my grumping and moaning about the colour choice, it's actually quite nice. It's bright and goes well with the threads/notions I had in my stash. These trousers got worn a lot during the Edinburgh Fringe as they went well with the staff uniform. They also proved useful when colour-matching my lunch over the summer. The quality of the fabric isn't good, which is quite annoying, and you could tell from a distance that it wasn't great stuff. It has pilled and gone fluffy after very few washes - I should've said something before the guy cut it off the bolt. Too bad. It draped and stretched and bunched during sewing. My bad - it made sewing quite tough and it shows when they're laid out flat.

Colour-matching my lunch
Colour-matching with RIBA's Brutalist Playground
The detail shows these trousers have triple topstitching, bar tacks, octopus pockets, contrast waistband facing and zip fly. You know, I completely forgot to take any detail shots of these trousers, so hopefully you can see some of it in these pictures.


We'll see if they get worn a lot - they're useful as there's no way they'll fall down. I can't correct them without remaking the whole thing, so it's not really worth the effort.

I do need to develop better waistband habits though. This time the edges didn't meet nicely at centre front. For this pair and the yellow pair I also understitched the top edge of the waistband before anything else. So the corners ended up messy. I think it would be a better option to stitch this near the end.


Next up - purple jeans

K


Thursday, 19 November 2015

Yellow Seagull Jeans

It all started on the bus...

I spotted a lady wearing quirky ankle grazer trousers with seagulls printed all over. This was absolutely brilliant and put a grin on my face at the end of a long, hard, wet day.

I grew up in a part of the world where seagulls qualify as birds of prey, seeing such quirky, cute birds printed on these trousers was unexpected. I simply had to make something that had seagulls on it, that would make people smile on wet days.

I stalked this seagull quilting cotton for weeks before buying a small measure from Fabric Rehab. It was sat patiently in my stash for a few more weeks until I managed to pop over to Goldhawk Road for a snoop. In my head I wanted to emulate some lime green shorts from M&S...I even dithered with fuchsia/hot pink ideas. I've had trousers in these colours before and it seemed reasonable. But there just wasn't the right colour or texture mix in any of the shops. Then I spotted an absolutely beautiful golden marigold yellow and it came home with me. Oh, it's just fantastic.

I made these jeans over the course of a "crafternoon" - the cutting alone took 2 hours. We were making things late into the night, accompanied by prosecco and Celebrity Masterchef - but had to stop when our Wodehousian neighbours climbed into our (3rd floor) lounge through the window. That kind of thing does hamper working on your waistbands and top-stitching a little.

Yellow Jeans Front
Front
Yellow Jeans Back
Back

These jeans feature double top-stitching in yellow and blue, french seams, flat-felled seams, deep front pockets (lined with seagulls), back patch pockets (with top-stitched seagulls), zip fly, belt loops, jeans button and contrast waistband facing. I adore them. I honestly didn't expect to love wearing them so much. I also honestly didn't expect that other people would enjoy seeing them quite as much as they do. Before making these jeans, I always wondered what on earth yellow jeans would be good for and where I could possibly wear them. Thanks to this pair, I have been testing them out:

Good for many things!
These are also part of a wider project on fitting jeans. If you want to see some fitting details, have a gander at this post.

In the meantime, I absolutely love these jeans. They're just brilliant.

Bright jeans for grey days.

K


Friday, 13 November 2015

Working backwards from the answer

Do you remember in school where the answers to all the exercises were stashed in the back of the maths textbook? Peeking was frowned upon because if you followed the right steps in the right process, you'd get the right answer anyway.

One of the things I'm learning (rather cynically) is that sometimes it's good to start with the answer you want to see and work backwards do decide how you can get there. Knowing the answer can help you to choose the right process, and the right steps to achieve it.

Why should I try out a pile of unknown trouser patterns (choosing the process without knowing anything about the answer) when there are a few items already in my wardrobe that I'd consider to be the answer that I want to see? This might be a good way of taking out some of the mystery of more complex garments. I'd love to be able to copy them and just make endless repeats of the ones that work. I have had a particular pair of jeans a long time and they've finally worn out. I like the length, the fit and the size of the pockets. They don't have any darts and the grainline is quite visible after so much wear. I thought they'd be a good starter for my first RTW copy. I took a lot of the copying principles from Kenneth King's Craftsy class, Jeanius, though really wasn't keen to follow him to the letter. I used muslin, not organza; tracing paper, not carbon paper; and did a lot of marking in Frixion pen.


Original Front
Original Back

Once all the information was copied from jeans to muslin to paper, I threw it in the laundry and had a blank canvas muslin ready to copy a new item.

Version 1: Yellow Seagull Jeans
Despite their beauty, these jeans came up 2 inches too big in the waist. There is also some rumpling in the back thigh.

Version 1 Front
Version 1 Back


Version 2: Sky Blue Octopus Jeans
I compared the V1 pattern to the original jeans. The waistband was too big and the yoke pieces were slightly too big as well. I reduced the side seam above the hip and slashed the yoke to curve it more (which would in turn reduce the waistband by 2 inches).

The fabric is less stiff than the yellow pair, so some twisting and rumpling occurred during the execution, which shows all the way down the back of the leg. I think this compounded any issues that appeared in Version 1.

Here the waistband ended up slightly smaller than expected and the jeans ended up slightly too small all over. Bear in mind that all the adjustments were above hip level. By curving the yoke to reduce the top edge, I think I took a lot of space out of my backside that I really needed to have! Although these are low-rise jeans, they cause quite a few wedgies!

This also had an effect lower down where the outline of my pockets were visible through the front!. I clawed back some space through the seam allowances but it didn't fix the back.
Version 2 Front
Pocket outline on my right thigh (because it's bigger than the left one for some reason)
Version 2 Back

Version 3: Mulberry Seagull Jeans
I put the yoke back to its original shape. Now, Kenneth King's Jeanius doesn't cover copying waistbands at all. The message from the lecture is "don't worry about it, a waistband is just a long thin rectangle - ignore the one on the garment and draft a suitably sized rectangle". I believed him at first, then I did some snooping and pondering. Then I smelled bullshit.

Correcting the yoke
After looking closely at the waistband on the original, I spotted the grainline is different between the front and the back. This shouldn't happen if it's a basic rectangle, should it? Measured the top and the bottom edges of the original waistband again. One edge is 34" and one is 35.5". Aha, I'm betting the curve in the waistband is quite important.

This bet is for 3 reasons:
  1. I have quite a curvy back, so rectangular waistbands often sit a little funny, even if they are the right size.
  2. Ignoring the rise of these jeans, the difference between my waist and hip measurements is about 10". The distance between waist and hip is about 9"-10", so anything that sits on the body between waist and hip could be curved to match the change in shape more effectively.
  3. I've seen some pattern cutters argue about matching curves, and more heavy interfaced parts of a garment "pushing" the regular bits around (Patterncutter206 has this video and this video on shirt collars which is relevant, Catina on PatternReview is also a mine of information and ideas) which seems very applicable in this case.
Adjusted curvy waistband
Staying on the idea of matching curves - look at how the front two pieces align without a waistband:

Curvy front pieces
Surely a straight piece of fabric is just totally inappropriate?

Anyway, this is the finished set of version 3:

Version 3 Front
Version 3 Back
Those of you still with me will see the back wrinkles are still there. I reckon that this is mostly linked to the length of the leg and drape of the fabric. I like my trousers long, but when barefoot they will meet the floor before my feet do. The sturdy fabric rumples all the way up the back of the leg, whereas a drapier fabric might pool on the floor. This is what happens when I turn up the cuffs:

Version 3 Back (when they're not too long)
Better! Though you still need to discount the wearing wrinkles. Voila!

This effect will probably be cancelled out after some real-world wear. If you look again at the original jeans, the back heel has been worn out so the legs won't rumple. The fabric will also probably shrink very slightly over time. Wearing shoes and wearing the jeans at different heights will also have an effect on how much excess length there is in the leg.

I'm finally happy with these jeans and the pattern - I can finally throw away the old pair away and use this as a good pattern to churn out jeans. Copying RTW is also quite addictive, I have a shirt and some more trousers in line ready to make up as well. These have some more interesting details (like darts) and it might take some time to get them right. You'll probably see some updates soon. In the meantime, I'll do some posts on the detail and finishing on these jeans shortly.


Take care for now,
K

Tuesday, 27 January 2015

Ohh Lurgy...

Before I begin, I'd like to pass a quick message on to whichever one of the 12.1m people I have apparently been in contact with over the last few weeks has given me the lurgy: Not cool, bro. Not cool.

Anyway.

The trouser pattern is Burda 10/2013 #126A Bootcut Trousers. The pattern is definitely not bootcut.


I'm hoping that 2015 will yield some trousers/jeans for me. The first thing I need to find is a suitable pattern: Self-drafted? Printed? Traced/RTW copy? Right now I think it's just a case of testing what I can find against what is "good enough" and what sort of sizes and mobility work well for what I expect of  my trousers. Obviously they need to keep my ankles warm.

The trousers are bottle green, stretch drill from John Lewis. There is a metal-tooth zip in the fly, a jeans button in the waistband and the facings/pocket linings are made with some vintage William Morris floral I'd inherited. French seams throughout, I'm pretty proud of the finishing in here!


I made a size 34, and must admit these green trousers are tight. I'm showing you blurry photos because there is nowhere near enough room for my whole derriere (which is painfully visible in anything less blurry). I have popped the jeans button off twice already.

Green pants can't handle my booty.


I'm also showing you blurry photos because this case of "super long leg" showed up too:


(Which I, admittedly, find absolutely hillarious)

The t-shirt is a raglan tee I'd traced of a basic Fruit of the Loom crew t-shirt. Made from scraps, I had to do a bit of fiddling and piecing up the back to work with the pieces available. Let's call it a yoke. It seems to work well enough.

In this outfit I feel a bit like a character from The Prisoner. Anyone for a game of giant chess?


K