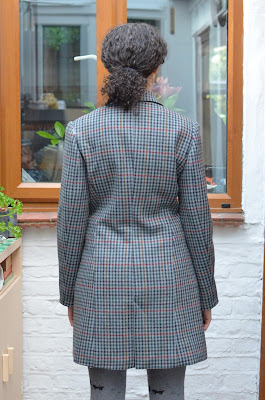
Do you remember my previous adventures with Burda 6875?
Well, at some point in 2018 I got a yearning for it again. Progress on a new version was slow and it only took a global lockdown to get me to finish it.
The Fabric
I found this fabric on the August bank holiday weekend in 2018. It was nestled in the wool remnants at Misan Berwick Street while they were setting up their Goldhawk Road store. There was a dearth of clearance fabrics in the Berwick Street shop and I really struggled with the decision to purchase it. Of course, it is lovely fabric but there was notably less on the bolt than the Burda packet said I would need for this pattern.
It is a W Bill check in exactly the kind of fabric I want in my life.
The Pattern Matching
This beautiful check didn't sit in my stash for too long, but while it did, I came to realise that it needed to look consistent across the whole garment. Nowadays you can get away with mismatched checks if they're sufficiently busy - thanks to fast fashion retailers. But such an approach would be a disservice to this fabric, so I needed to treat it with care. There are so many different stripe colours that it would be very obvious if they were offset at all. I was very nervous about this because this remnant technically wasn't big enough to make the pattern normally, let alone with fussy cutting and pattern matching!
I spent many hours planning my cutting layout. Firstly by pinning stripes together so they wouldn't shift when I cut the double layer/folded. Secondly by drawing stripe references onto every pattern piece with Frixion pen and walking all of the seamlines to match stripes.
Yes, some stuff ended up unmatched in the finished project, but most of it is there.
I did plan to match stripes between the sleeve heads and body, but failed. Technically the sleeves were cut to match but I never corrected the sleeve pattern after the forward shoulder adjustment in my first version. So they refused to match when I tried to sew them in. They refused to match 5 times. On insertion attempt #6, I stitched the fabric where it was content to lie.
The other pattern matching thing is is about the welt pocket. I COULD NOT match the stripes on the body seam closest to centre front (it is is half seam, half dart). I unpicked and re-sewed the vertical seam several times before unpicking the welt and slicing the top edge of the side front panel at an angle. There was also a bit of easing using steam from the iron. Unfortunately I only figured out this fix in time for one side of the jacket.
The Lining
Both times I've made this jacket I've made a fragile silk lining. In both cases it was just a case of finding something that coordinated well with the outer fabric. I did buy this silk specifically for this project and was hoping to find something more robust in the shops but I just couldn't. I did shell out for some (overpriced?) cotton flannel to underline it though.
For this version I quilted the lining to the flannel after cutting out all of the pieces, and was pleased to make use of my Solvy wash-out stabiliser again. The silk was far too shifty to take the quilting on its own, but it did work well under a layer of Solvy. I washed it out in the sink, but did a sloppy job and the pieces dried like cardboard. It got me thinking that you could also treat this like wash-in stabiliser (like the gelatin technique) if needed in future.
I made up the whole lining, overlocked the edges and ran it through the washing machine before attaching the lining to the outer. This got rid of the residual stiffness before inserting the lining into the jacket outer. Everything was pre-washed anyway so there wasn't any shrinkage post-quilting.
The Interfacing
Why, you ask, when I bought silk and Savile Row wool, did I dare to use fusible interfacing? Don't you know that's not the couture method? You should be shamed!
Well, Imaginary Internet Sewing Police, because by now I have a fairly good idea of reliable fusibles and how to use them. I am a complete beginner with hair canvas, pad stitching etc. I am not prepared to ruin my nice fabrics with beginner attempts at new techniques.
Also, Imaginary Internet Sewing Police, I am neither a tailor nor a couturiere. No one is obliging me to use these techniques and no one is paying me to perfect them.
I used a few different fusibles: William Gee K10 for softer areas, Macculloch and Wallis general purpose for more structured areas
I also used my new trick of using greaseproof paper as a press-cloth. No more glue seeping on to the iron!
The Buttons
Yes, I pattern matched the buttons too.
How does anyone else do fabric-covered buttons with thick fabrics? I sewed a gathering stitch around the edge of a circle and then needed a clamp and pliars to get the backing in place. Does anyone else need woodworking tools to do this job??
Oh! You guys! I nearly forgot! I did cute little bound buttonholes too! Look how sweet they are:
The Pattern
Normally, the number of pieces in a pattern will be a good indicator of how time consuming the project will be. I will repeat my claim that this pattern is pretty brutal in that respect. With every extra pattern piece there are extra seams to sew but also extra seamlines to check, match and "translate" if you make any fit adjustments.
So what adjustments did I make this time?
- Omit the sleeve vents. I only decided this quite late in the project, shortly after I'd finished working on the Hades Jacket. At that point I was DONE with sleeve vents.
- Added some extra space for my hips in the lower part of the pattern
- Kept my edits from the previous sewn version of the pattern
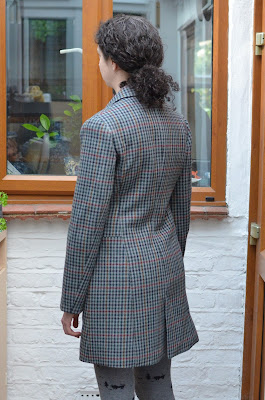
I'm a little frustrated that it still cuts quite high into the armhole and that there seems to be too much fabric between my shoulder and my waist (vertical folds visible in the photos). I didn't pick this up at the muslin stage but it does frustrate me a bit now. I just need to be careful with which jumpers and scarves get worn with this. However, overall I think the fit is alright. The shoulders look proportional to the rest of my body and I think that's quite important.
One thing that continues to frustrate me with this pattern is the 'Lower Side Front' piece. The one that sits under the pocket opening. Last time I made this pattern, I said that it was easy to lose track of which vertical edge was closer to the front, and which was closer to the side. This time I struggled with the length of the edges and the balance of the pattern piece (as explained earlier when I tried to match horizontal stripes). This is hard to explain, but I think the pattern piece doesn't account for the pocket insertion. I think it wants to match the horizontal waist seam but the pocket welts add extra length to the jacket front and the pattern doesn't correct for that. It means that the vertical on the side front piece is about ~2cm longer than the edge on the centre-front piece and the seam is thrown off. I don't think this would have been an issue with a "standard" welt pocket where you cut into the middle of a pattern piece. I has only become an issue because Burda tries to introduce the pocket with about 5 seams instead.
The Pattern: Centre Back Vent
Twice I have made this pattern and twice I have sewn the vent by hand.
Is it just me? I just don't understand the draft/method for this feature. I know you should be able to machine finish that area, but when the time comes I just can't do it on this jacket. Is it something about the notches that need to be matched? Is it something about the length/width of the lining compared to the outer? I just don't know. I just can't make it work.
This is also the second time I have mitred the vent corners instead of following the pattern instructions.
The topstitching across the top of the vent was incredibly difficult, but I think I got a passable result.
Pockets!
This pattern comes with 2 pockets with optional pocket flaps. They're not particularly generous in terms of size, so I increased them a bit. In this version I did cut out fabric for the pocket flaps but saw how bulky they would be and decided to leave them out. The pocket edges are double welts (also known as jetted pockets), and I really like how they look.
Unfortunately this pattern doesn't include any interior pockets, so I added 2 to the lining again. These are my first attempt at Bluff Pockets. I don't know whether they're any stronger than other styles, but I was getting a bit obsessed with them on other blogs/videos at the time. These are the same pattern piece as my pockets on the previous version. In the blog post for my previous version I list how much wedding swag I could fit in the pockets - which gives you a good indication of how spacious they are!
The Collar
There are elements of the collar I really like: the height, the width, the piecing, but I struggle to get the points around the notch to look flat and nicely executed. I think I need more practice and patience when sewing this step on future jackets.
The Hem
I've alluded to problems with the balance of the side front piece, but it's worth addressing a bit about the hem too. I feel like I just wanted to keep the same fabric stripe at the bottom, but it looks odd now because the hem dips to a point at the side seam. I also didn't have enough fabric for the lining and the outer to meet so I had to add a length of petersham ribbon to the hem. It does the job but it's not as supple as it should be. I think there is some odd buckling and pulling at the hemline - this always seems to be my downfall in jackets!
That's it. I like it. I finished it in lockdown and I haven't worn it anywhere yet. I am hoping it will get some outings in the autumn.
K x


