Sunday 30 August 2020

Distractions pt19 - makers gonna make (Lighting Gel)

In the background of some of my photos you might've seen a brown lamp. 


A few years ago while walking around TK Maxx, I saw this casing and fell in love with it. It was designed as a patio lamp - supposed to hold citronella candles or something similar. I thought it would look lovely as an indoor lamp, a with a bit of modification to hold a lightbulb. It was £40, which was a lot for me at the time. To get it back to the flat we had to bungee cord it to B's motorbike and I had to get the bus home. I'm amazed it didn't break. 

Anyway, we modified it and installed a lightbulb. I've always meant to install some diffusers too - because the light is a bit harsh at short distances. I scavenged some lighting gel a few years ago from a theatrical supplier, but never managed to install it in the lamp. I over-complicated the job in my mind and then avoided it. I also dithered between using the lighting gel and buying some replacement acrylic (frosted) for the window panes. 


Shortly after moving in, I had a crafty itch and broke out all the supplies for the lamp. It took me an evening to install the diffusion gel. It's not perfect, but it's good enough and now the lamp casts some softer light. This will be perfect when we finally get a sofa and it can take its new place on a side table. 


K x

Sunday 23 August 2020

Distractions pt18 - makers gonna make (Ikea Flintan chair reupholstery)

You might not know this but I have a variety of seating in my life. Each item fills a different purpose and, broadly, each one overlaps with another one a little bit: tall stool, short stool, deck chair, dining chair, camping chair etc. But, since lockdown and since moving in, I have been struggling with not having a real office chair to sit in for work. 

B invested in a new chair for his desk, so I took over his Ikea Flintan. As soon as I got my hands on the Flintan, I tore it apart. This chair has been sat on for hundreds, maybe thousands, of hours. It needed new foam and new fabric before I was prepared to sit on it. 

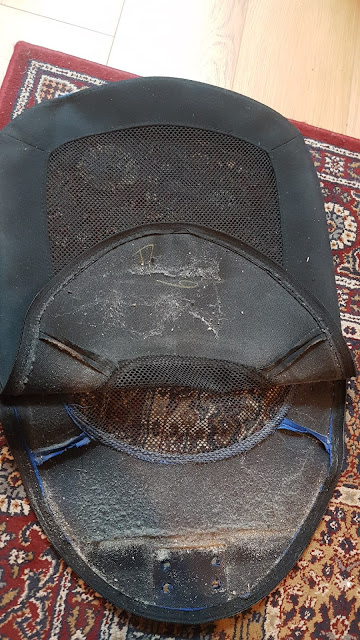
Also, the inside of the mesh back was filthy.

Lots of dust inside a IKEA Flintan seat back cover

FYI, the staples for the seat upholstery did not come out. I used a knife blade to cut around each staple.

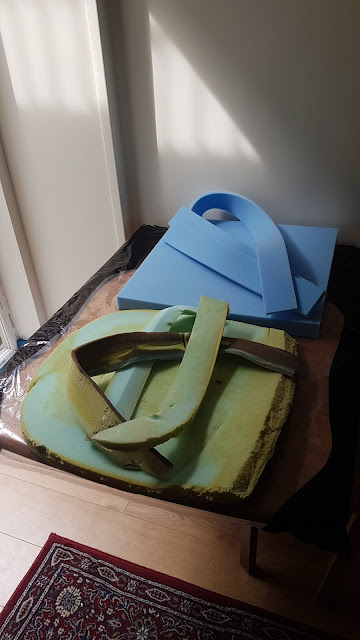
I ordered new foam off the web (luxury firm), new fabric, new interfacing and a new zip. In the end, I reused the existing zip and used interfacing from my stash. It turns out I can't identify interfacing online at all and bought the wrong thing, and the new zip was a bit too chunky.

Replacing the foam in an Ikea Flintan Chair

The back is interfaced but the seat is not. I am fairly sure the original fabric is a cordura, but the website I was buying from offered it in different deniers and I had no clue what a sensible number was. I bought 1000dn, but this seems like overkill now. I could wear sandpaper trousers for a year and the seat wouldn't care.

Anyway, I seam ripped the existing chair and used the pieces as a pattern. I used upholstery thread to stitch and topstitch.

For the back support band you can see between the mesh pieces, I discovered that it is simply looped between two "hooks" which are held in place with screws. This was a relief because I didn't need to work out how to manouvre the metal frame around the sewing machine! This piece was 2x bits of seat fabric with a plastic sheet in the middle. It wasn't very rigid so I upgraded it with a piece of buckram leftover from millinery class. FYI, I really like this stiffener - for certain purposes. 

Cutting buckram for lumbar support

Also, since we're still in "box chaos mode" and I can't find most of my makery equipment, B kindly lent me his scissors for cutting and his fancy computer parts for pattern weights.

Overall, I'm pleased with how this turned out, especially the seat. I should have re-inserted the mesh back because there were some puckers but it doesn't affect the functionality of the chair, so I don't really care.


Did I spend as much on this revamp as buying a new Flintan? Yes, easily. About £100-£110. The foam was cheap, but the postage was not, the fabric came from Germany and I bought new threads etc. I could've cut the cost down to about £50 by not ordering the stuff I didn't end up using and by switching to a lower denier cordura. I could have cleaned and reused the seat back easily, but the seat fabric was badly damaged when I removed it, so it would need replacing. Replacing the foam was essential as we could feel the hardware though the seat.

I do want to say that the Flintann chair has good bones and is simple enough to re-upholster. Seriously, I think plenty of novice DIY-ers could do this, or find good alternative methods to replace what they need without completely replacing the chair. The base, seat and frame are all durable and I'd hate to see this go to landfill. I'm looking forward to getting a few more years of use out of this!

K x

Wednesday 12 August 2020

Distractions pt17 - the sliding puzzle

I realise I've not done one of these distractions posts since May and you're probably all itching to know what's going on. Well...We're in. We're "finished".

The builders left us with a lovely new house, and all we needed to do was to (caulk it), paint it and move all of our junk 30 yards down the road from old house to new house.

Friends, it took us about 2 weeks to move our stuff. We spent our first night here on 12 June and have been here ever since. It is a lovely little house.

Since we moved in, everything has turned into one giant sliding puzzle.

We are making slow progress towards being "done" - there is still some bare plaster that needs painting, rooms need clearing of boxes, windows that need blinds, we need to put up a shed, we still need a couch. I have a week off at the end of the month and am going to try to get more done. Don't tell Occupational Health, but my current 'work from home' setup is a camping chair and an ironing board. Hopefully I will have a proper desk and chair by mid-September but we need to see how things go.

K x

Thursday 6 August 2020

New Office Trousers and Dreams of Jeans

Timing is key. Just as my final RTW jeans were becoming ragged, some of my stalwart me-made trousers started visibly wearing out, and I changed shape/gained weight meaning that I couldn't actually get into quite a few pairs of trousers I normally rely on.

So, I spent some time making 2 paris of office-appropriate trousers:
i) Burdastyle 11/2012 #107 Straight Narrow Trousers
ii) Butterick 5682, View E

And then the lockdown hit and office clothes were no longer in vogue...

Burdastyle 11/2012 #107 Straight Narrow Trousers

A slim cut trouser, they've got slash pockets and a fairly uncomplicated design. The magazine shows them at several different hem lengths. I've overlooked them a lot, but they won the contest when I went searching through my Burda collection for candidates.

The outer fabric is from Misan's Clearance Basement of Wonder (R.I.P.) and had a few manufacturing defects (someone had cut a square right out of the middle!). The fabric has a right side and a wrong side - which is visible by examining how well the checks are defined. Both sides have a soft "brushed" texture, except one end of my cut which had a smooth bit. I wonder what went wrong in manufacturing this fabric. I guess it is a wool/wool blend by I'm not going to burn test it or anything. I'm laundering it like it's wool.

Subtle difference of fabric finishing

Unlike the original pattern, these trousers are underlined. The underlining fabric is a polka dot cotton brought back from India. I wasn't expecting a full length lining, but the fabric allowed for it - so I went for it!


I was keen to tweak my usual approach to the fly - so the shield is much wider than normal and I added some buttons. Now that I've worn these a few times, I can confirm I'm not a fan.

I also tweaked the pattern a little for fitting, and I think I would adjust a bit more if I make this pattern again in the future. I added extra space for my hips, but went a bit too far. I also wanted to be clever and cut a curved waistband as one piece for the trousers, but they ended up slightly too big and I had no obvious place to adjust. I added an extra bar at the centre front as a temporary fix, but after a couple of months I opened up the waistband, tightened at the CB (effectively introducing a CB seam) and inserted a drawstring. This seems to be an improvement, but it's not perfect.


You will see in the photo above that I have a lovely deep hem. This is one of my favourite features of these trousers, because they add good weight to the legs and kept my ankles toasty warm in the winter. 

Butterick 5682, View E

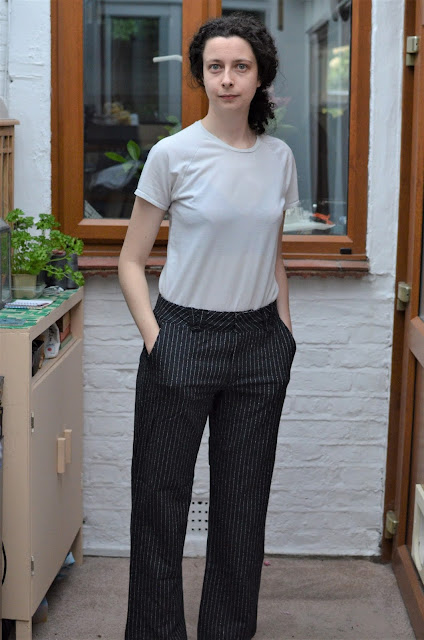
This one also needed some fit adjustments as I'm not familiar with Butterick drafts. I think their sample figure is very different to me. The darts were quite pointy and puffy - I tried to ignore it but it looked really bad in the pinstripe fabric. When comparing the Butterick pattern to the Burda one, the back darts were in completely different places - Burda's darts are about halfway between Centre Back and side seam; Butterick's were 3/4 of the way towards Centre Back. It feels like the draft was suited to people whose butts extend straight out from the CB, and they carry no weight around their sides. I'm not built like that! I ended up hacking it and moving them slightly further out to the side.

Darts on the muslin, quite close to CB
 Also, the stereotype about Big 4 patterns having a lot of ease still seems to hold true - the legs are much wider than the pattern photo suggests. The pockets are also quite small on this.

The outer fabric is a wool from Fabworks (Leftovers from my Hades jacket) and I barely had enough for these trousers. There are some sly patches where I had to piece togeter the fabric to accommodate the pattern piece. I like to live dangerously, so I made sure one patch was right on the centre front fly for all to see.


The other one is hidden in the crotch.


The lining is from my first trip to Japan. I thought I would try bagging a trousers lining, leaving no exposed edges, but it's tricky because you can't adjust the hem length as the last step. I ended up doing a row of blind stitching to keep the hem in place and ensure it would hang correctly. This was really important and it stopped some weird twisting down the leg. The lining is a synthetic and it melted slightly on the iron.


Unexpectedly, I really like the waistband here - I finished it with some lime green bias trim (leftover from my Persephone Dress) and it's such a fun detail. I accidentally went full Hadestown again. This waistband also ended up slightly tighter than the waistband on the Burdas, so they're pretty comfortable trousers to wear.


I threw a lot of design detail at this pair of trousers, more than the Burdas really: the green trim, the bagged lining, the piping on the pocket edges and the V-shape belt loops. The waistband is pretty thick, and feels like a design detail on its own. It is drafted straight originally, but I curved it for a better fit over my hips/around the sides. I tried to follow Davd Page Coffin's technique of using a wide bias strip as a waistband facing, but the new curve wouldn't allow it (it looked so bad!) so I ripped it out and just cut a regular facing.


You may be wondering why I lined both pairs of trousers. I don't find wool particularly itchy, but it does irritate me if it's next to my skin all day everyday. Also, I think the lining will help with cleaning, longevity, warmth and drape of these trousers. I hope they hold up well, they certainly feel like Stealth Pyjamas.

Anyway, this fixed an immediate problem but I am still low on jeans and soon my joggers will be ruined via DIY, so late 2020 may involve some new casual trousers. I am not sure I trust Butterick 5682 enough to launch straight into their jeans pattern and my planned fabric has zero stretch so I'm at a bit of a road block until I can find some spare time and the right pattern. At the moment, I am very excited about the new Waffle Patterns release (Azuki), so might try that one.

K