Thursday 25 February 2016

Sewing from Japanese Pattern Books

Shape Shape

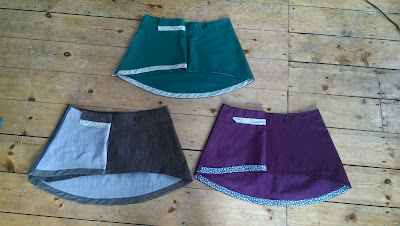
I revisited one of my favourite patterns from Shape Shape recently - these skirts are all made using the Apron Skirt pattern, and I've replaced the ties with some hidden buttons in the waistband facing. If I were a stickler for styling, this would be a brilliant spot for kilt pins. At the moment I'm switching out various badges/brooches/pins.  The skirts are all made from scraps, and if there hadn't been hard limits on the fabric available, I'd have made these a bit longer (because they're quite breezy!).

Shape Shape Apron Skirt


The facing and the skirt pieces are different sizes - I think this is a detail resulting from the waist ties - but I completely forgot to correct it in advance. Oh well.

Drape Drape

Like most of the sewosphere, I fell hard for the Drape Drape series of books (mostly thanks to Carolyn's beautiful versions, and very accessible introductions to the ideas in Japanese sewing books), but was proud to have abstained from buying copies in the hope that at some point they would appear in my Christmas stocking. Once the hype of the English launch had died down a little in sewing circles, I tried to look for some inspiring finished versions from other people on the internet. Some patterns have been wildly popular, though I'm not sure if this is due to their simplicity or the fact they are the closest available alternative to "normal" clothes. How can it be, that some patterns have absolutely no versions out there at all? I can only hope that some people have been making things from the book and just not sharing with the wider world - it would be a shame for a pattern to go to waste, and a bigger shame to be obliged to share everything you make with the general public.

The point of this post is to offer a quick review of my experience THUS FAR with the Drape Drape books. This is because I haven't actually finished a garment yet.

Now, the book is littered with funny artsy photos that have been well documented (and recreated) elsewhere. From a "fashion photography" point of view, perhaps "Japanese pattern styling" is trying to become an artform in its own right. Perhaps it's a marketing thing - the books are instantly recognisable for their crazy poses. It's pretty much what they're famous for. That, and correcting the misconception that it's actually a set of books about draping on a stand.

I like the full page images, they're fun. But from a user's point of view, they seem inconvenient and unhelpful. Unhelpful if you're actually planning to make something. A lot of the styling is indecent. Fabric is often solidly black - which makes seeing the draped effects really tough, and the seamlines/style lines are nearly invisible as a result. Plus, the technical dress form photos are tiny greyscale thumbnails, once again with black fabric. Why?

And the tracing! Oh the tracing. At the time of writing I haven't event got to the sewing and following instructions bit.

You know I'm a pattern tracer. I cut my teeth on Burda. But I was completely unprepared for these sheets. Tracing these patterns is like someone replacing all of the clues on an OS map with the same line. Going hiking in the country? Walking 5 miles down the M4 would be a fine idea! Not sure whether that blob is a pub, a church or a military firing range? Don't worry, they've got you covered by writing what it is, roughly nearby with another indecipherable tiny line to point it out! One advantage is that they will give you some consistent information on seam allowances. They handily give you both cutting and stitching lines on the pattern, again basically in the same colour and shade.

Surely it's commonplace that (at the very least) the sizes have different shape/weight lines? No! It's all the same bloody colour and weight for all sizes! I want to cut someone some slack on this point, perhaps printing all in the same colour is to lower print costs - maybe even B&W. Why then, are the individual pattern sheets printed in different colours?

I think I found an error in the dress I was tracing as well (a notch was missing). Notches are quite important with any design, moreso with strange pattern shapes where they're important signposts in construction! Then I paused. With a pattern sheet like this HOW AM I SUPPOSED TO TELL? How can I spot and correct errors when I can't even tell what their correct stuff is!

Perhaps these were always supposed to be coffee table books. One of those fancy avant garde designs you're never supposed to make unless you're a topologist or a madman. If so, bravo. It took me 8 months to have a go at this, it might be another 8 before I get round to finishing the project...


Naturally this falls into the realms of translation theory. It's one of the most fascinating topics I've ever dipped my toes into. Whoever is responsible for all of these translated sewing books has made their choices, and I trust they've made them well. If you are interested in knowing a bit more about the subject (in 45 mins or fewer) then a recent episode of The Forum on the BBC World Service covers a lot of interesting ground on machine translation and other aspects of translation theory.


In Other News...

  • I think I'm going to Japan in the spring. Does anyone have any recommendations on things to do/see? (I've already pinned Carolyn's fabric shopping guide)
  • This may also mean I need to learn some Japanese
  • The Threads November issue has an article on Japanese pattern books - although interesting, there seem to be quite a few points presented as universal fact, which is a bit of a sweeping generalisation for a whole industry. And some of them are very easy to dispute! If you're a Threads Insider, you can access the article online.
  • I also stumbled across this BBC Documentary called Misunderstanding Japan, which explores western media representations of the country and its citizens. It covers 1800s to today and digs up a lot of old reports, like when people here were first learning about karate (the deadliest thing imaginable, where you can kill a man with one strike after years of sadistic training - now it's a fun after school activity for almost every primary school child in Britian).
That's it for now, let's speak soon!

K
Sunday 14 February 2016

What I wrote and what I meant...

You've gathered by now that not very far behind sewing, one of my big obsessions is tap dance. I've causally been going to dance class for as long as I can remember, but tap has remained the true love and focus of why I regularly subject myself to skin-tight clothing and rooms filled with mirrors.

I've stepped up over the last few months and tripled the amount of time I spend in the studio and have started to prepare for Stockholm Tap Fesival 2016. It's Europe's largest festival and I've signed up to over 25 hours of class over the Easter weekend. Holy cats, that sounds scary now it's been said out loud!

I've made an outfit to bulk up the number of things I have available to wear to class. This is also my entry to the PatternReview 2016 Activewear contest. I'm publishing the blog post and contest entry in tandem as most other entries on the PatternReview site were far shorter than what I had originally drafted, and it looked like my faceceaous commentary was getting in the way of actual information about the project.

Patternreview 2016 activewear contest badge

So this is the full 1600 word text, please visit the PatternReview site if you'd like the abridged (less than 150 word) version!

Outfit comprises

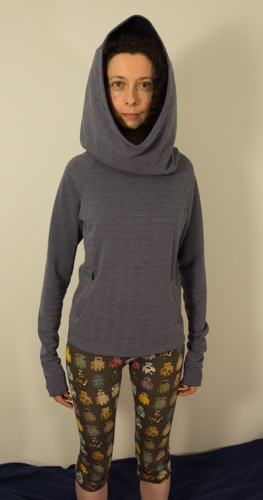
Counterfeit Nike Hoodie (aka, the Hoofer Hoodie)
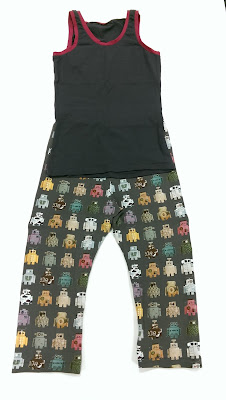
Paddle & Roll-bot Leggings
Bog Jazz Standard Tank Top

A hoodie, a vest top and a pair of leggings


Everything is sewn on my standard sewing machine, Janome 7025/525s.

Pattern description

The Hoofer Hoodie is a raglan sleeve hoodie with long sleeves, thumb holes in the cuffs, 2-piece cowl hood, kangaroo pocket and unusual seamlines. A classmate wore the original Nike hoodie to class and I decided to copy it as well as possible. I mean, not identical - that would be creepy - but recreating the hoodie in a different textile would be enough to fool most eyes. Most of this pattern was drafted from scratch using Winifred Aldrich's Metric Pattern Cutting for Womenswear.

The book was a Christmas gift from Mammafairy (thank you!) so I was itching to use it on a new project. I drafted according to size 10 measurements and drafted one of the loose blocks in the knitwear section.

The leggings and tank top are copies of well worn shop-bought clothes. The original trousers are still in use (obtain pattern by laying flat and drawing around it) whereas I cut up the vest top (use scissors to cut up along the seamlines).


vest top and robot leggings

a women's hoodie - copying Nike's style

Pattern sizing

The initial hoodie came out really wide. Good job I did a muslin! The original is a slim fit. To fix this I reduced the sleeve width by 1/3 and made follow-on corrections to the front and back bodice.

test garment version 1


The leggings and vest top were consistent with the originals and I have made several versions of these by now.

Demonstrating my new vest and leggings

Did it look like the original garment?

Now, I didn't have access to the original garment so only had information on the finished height of the cowl. The rest is all down to Nike's website. Thank you Nike for putting such large, high quality and comprehensive detail shots on your website! I finished this top and immediately gasped "holy cow, this is accurate!"

The original Nike Women's Tech Fleece is a running hoodie, and available to view/buy here. There was no way I'd have been able to draft this from scratch without those photos.

Cuff and pocket detail on my fake Nike hoodie


The hood is a major and recognisable design element on this garment, so I had to get it right. The hood draft I had made according to Winifred Aldrich looked wrong and I was struggling to correct it.

hoodie pattern pieces
Left shows my original draft, looking wrong. Right shows the corrected shape.


testing the fit of the hood
Hood muslin v2 - testing the fit
Enter again Nike's excellent detail shots. I used this hood photo to trace the correct piece by importing it into CorelDraw and then used the bezier tool to draw the piece I needed. InkScape will also do this perfectly well but I'm trying to learn how to use Corel and need the practice. Knowing the height of the cowl, I just scaled up my new object to the right size and printed it off. The gusset at the back of the hood is a rectangle, so I just drew one out on paper, tested it on the muslin and was ready to go!


Hood detail on my Nike hoodie copy
I can't get mine to lie as flat as the original, but you get the idea


This was far mor effective than correcting by hand, which was going very very wrong. Once again, thanks Nike for such good photos!

The hood on my new top is very large and dwarfs my head
Dark lining + dark hair + massive hood = floating head!


What do you like/dislike about the pattern?

I liked almost every aspect about the original. It's a really nice top.

I disliked the thumbholes. I mean, I understand why people say they will happily pay more for a top if it has thumbholes. I too like to keep my hands warm in a top with long sleeves. But I hate having a hole in my cuff where my wrist will get cold, and I hate random bits of my forearm/elbow poking out of a hole in a sleeve. Basically: less irritating design means better ability to concentrate in class. I redesigned the cuff so that there was no hole, but I would still be able to hook it over my thumb. Now they're as warm and as versatile as possible.

cuff and thumbhole detail on my Nike-style hoodie


Fabric used

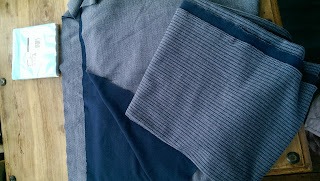
Hoofer Hoodie: No idea, sorry! It came from Misan's Clearance Basement of Wonder. My guess would be a mix of wool, something synthetic and some elastance/lycra. It's warm and very light. I was lucky enough to find it in 2 weaves making it fun to add contrast panels.

Stretchy fabric in 2 different textures
One is a herringbone weave, one is a boxy-style

Paddle & Roll-bot Leggings: 95/5 viscose/spandex Punto Milano from Ditto Fabrics. It's not listed as activewear, but it stretches and moves well. My assumption is that it's perfectly good activewear fabric in disguise.

Bog Jazz Standard Vest Top: 95/5 cotton/spandex jersey from Ditto's remnant pile. The contrast is the beginnings of some wonderful supplex from Zenith & Quasar (whose site seems to be undergoing some remodelling currently). I would have liked to use brighter colour for this top, but thinking in the context of The Year of the Outfit, the grey was the only one in the stash that was appropriate.


Whole torso view of my new hoodie

Alterations and design changes?

Mmm, let's see. I tried to be as accurate as possible to the original...

  1. Redesigned the cuffs as above
  2. Added invisibale zips to the pocket openings. I want the pocket to be as secure as possible so things (i.e. iPods) don't fall out while dancing or throwing the jumper across the studio. You don't see many hoodies in the shops with zips in the pockets, unless they have some sort of zip opening on the front of the body. Do you know why? They're blinkin' tricky! They are very fiddly, trust me.
  3. Secret easter egg-style alteration: avoided the topstitching on the original in some areas if I thought it would look a bit shoddy compared to the original. 
Invisible zip detail on my hoodie

From the original draft, the main alterations:
  1. Remove 1/3 width from the sleeves (and consequently the body) for fit and style
  2. Lengthening the sleeves for style
  3. Find a completely different method of drafting the hood, as above
Demonstrating very long sleeves on my new top
Somebody has super-long arms now!

Would you sew it again? Would you recommend the pattern to others?

YES and YES


I'm planning for another hoodie as a regular casual top, maybe omitting the zips. It'll probably be in simpler sweatshirting and I may modify the cuffs again for style.

I'd also totally recommend Nike as a good brand for copying clothes (so you don't need to buy them), the pictures and details of materials used are very thorough in the online shop. Anyone who fancies copying shop-bought clothes will appreciate the information they can get from the Nike site.


side view


Contest info

  1. This is my entry into the 2016 PatternReview Activewear contest. Those of you who have come here from PatternReview (hi!), thanks for bearing with me. The 3 items are hoodie, top and leggings. The hoodie is drafted from scratch and a blatant copy of this Nike hoodie. The vest and leggings are TNTs

    Those of you who have come here by other means (probably Facebook), well done for coming this far!
  2. What will you be using this for? I'll be wearing this stuff at tap class. We run, we jump, we get sweaty. Everyday we be shufflin'. We really don't want to tread on or fall over our trousers - as a result most people wear ankle-length leggings in class, whereas I prefer this length.
  3. Why does this qualify as activewear? I copied a pattern for a running top and made new versions of the clothes I already wear to class. It's going to spend its life in a backpack, getting sweated on or in a laundry pile so I made it light, compact, secure, easy care and stretchy/moveable. It the fabric is actually wool, could I also count that as anti-microbial?
  4. Fabric choice. Stretchy varieties with spandex for recovery. I chose fabrics that had similar composition and fibre content to my old RAD leotards and jazz pants.
  5. What makes is different to garments of other functions? Well It's definitely not office appropriate. It's February in London and it's bloody cold so I'm not wearing it outside (I tried briefly yesterday evening). It's not swim-appropriate and there's not enough skin on show to make it appropriate for pole or aerial. It won't protect my head in a cycling accident and isn't abrasion resistant so wouldn't stand up to motorbikes or theatre work.

    I supposed I could sleep in it...but why would I when there are moomin pyjamas a few feet away?

    I supposed what makes it uniqely tap-able compared to other garments is:
    + Style and fit to suit dancing, while also leaving room for my gargantuan shin muscles
    + Design to minimise tripping or loose items flying about
    + Light, easy care textile choice for easy packaging/crumpling, wearing during class and simplifying laundry
Thanks for reading guys and gals. I haven't managed to get any action shots yet, but there is proof I wore it to class on TapTapTap's Instagram page! The hoodie was daunting and I put it off for a couple of weeks as I was a bit scared of starting it. To paraphrase one of my classmates, tap is often about feeling the bear and doing it anyway.


Kx 

Friday 5 February 2016

Bear Necessities


Let's get the music thing out there as soon as possible:

It's not everyday that you become an auntie for the first time. I really think that such an important arrival requires a very special make. After all, you only get 1 first nephew!

Little nephew (LN) is on the other side of the world and so I didn't want to give him something he would grow out of very quickly. Oh sure, he will have some clothes sent his way at some point but I wanted to give him (and the family) something special and very important in the first off: a teddy bear.

Red homemade teddy bear (version 2)


It breaks my heart to see adult-only collector bears designed to sit in glass cases forevermore. Teddy bears should be loved and and carried on adventures for a long time. The lucky ones become friends, sages, minions, mascots, informants...for many years. I really wanted to make sure he will have a gorgeous bear to keep him company.

I used the Lekala #3050 free teddy bear pattern, size 1 and a couple of minky/cuddlesoft fabrics* from Plush Addict. Though I placed a huge fabric order with them in the Black Friday sale, absolutely nothing I needed was discounted. It's always the way, isn't it? The stuffing is from Hobbycraft, the eyes were from TP Textiles (which is brilliant if you want random notions at exceptionally low prices). Everything is loose and stored in jars. I picked up a few sets of eyes as I wasn't sure which ones would work best.

I made a practice bear as well. The pattern had so little information about the finished product, its requirements for fabric/notions and how to put the thing together that I was completely running blind. I bought extra eyes because I didn't know the size of the head, and had to keep sending people to Hobbycraft for extra stuffing. For anyone else planning to make this pattern, I hope the notes below are useful.


Homemade teddy bear version1

  • The finished photo on Lekala's site (blonde bear) is completely inaccurate. Head, arm, and feet all have totally different seam detail. The belly is also very long and slim in the pattern. The two sets of user photos are more illustrative, but don't give an indication of scale or size. The two below are size/scale 1.
2 handmade teddybears

Sewing the bear's snout
Finished teddy bear muzzle

  • For v2 (red bear) I made the belly fatter by redrawing the CF seam line between the top of the leg and the top of the armhole. 
pattern pieces for teddy bear belly

  • For v2 (red bear) I also made the arms longer and fatter as they looked a bit scrawny on v1 (green bear). The outer and inner pieces also didn't seem to match in the original pattern, so v1 has some gathering around its paws. By correcting and modifying the arms, I also managed to make the belly a bit shorter.
green teddy bear and its paws

  • For size 1 the bear was approx 50cm tall. I used approx 750g stuffing for each bear. One is firmer than the other.
me holding some polyester toy stuffing
Look! It's a little cloud!

  • The seam allowance guidance seems very confusing. I treated the pattern as having no seam allowance and added 1cm to all edges. 
This is very confusing advice - should I add seam allowance, or is it included?

  • The eyes are VERY close together in the pattern, I found that having them wide-set at the edge of the snout was a good look, like on v2 (red bear). 
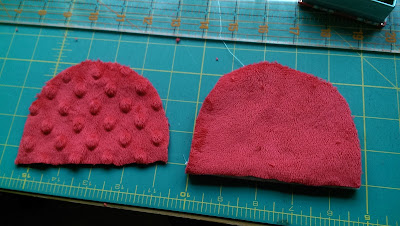
  • I cut a layer of wadding for the ears
Pattern pieces for teddy bear ears

  • The notches on the pattern are very good and meet up perfectly with corresponding darts/seams. I needed to rely on them for v1 (green bear) and was beginning to completely mistrust the pattern. I was wary of the notches, but was glad they were such effective reference points. 
  • I made up an order of construction that seemed sensible, if you're an intermediate sewer, you should be able to figure it out, but Sew Joyful will probably have some good generic advice as well. For v1 (green bear) I just started with the most obvious bits and hoped the rest would slot into place. For v2, I made the head and body separately, then joined everything together and pulled everything through a hole in the centre back.
Pattern layout and sewing instructions for Lekala 3050 teddy bear


There's not much that scares me in the sewing world - fluffy fabrics, shifty georgettes, monster sizes, complex patterns, fly fronts and zipper - none of them will draw sweat from my brow. But eyes on a soft toy are scary! They are so important to the project's personality (and overall success), but you have to wait until the very end before cutting a hole squarely in the face of the bear to install them! Oh I was very worried. But they both turned out so beautifully.


Red teddy bear next to Christmas tree

green teddy bear next to Christmas tree

Me and two handmade teddy bears


The two bears are yet nameless and their personalities not yet fully formed; they seem ready to go out into the world. The grandparents have adopted v1 and they seem to quite like it. I hope LN loves v2 and they keep each other company over the years to come.

2 teddy bears having afternoon tea


K x


*Doesn't that fabric name just make you feel ill?? Bleurgh.