Tuesday 28 December 2021

More jumpsuits? V1645

I wasn't expecting to fall in love with a second jumpsuit, but when V1645 was announced it caught my attention immediately. I do love a bit of asymmetry and this looked like a really cool asymmetric style. It is another striking jumpsuit from Vogue with very interesting detailing, unlined and with a Hong Kong/bias finish throughout. 

I've made 2 muslins and 2 versions now so I feel like I know the pattern pretty well. This post is going to be relatively long and I am expecting it to cover the story of making the jumpsuits, but also cover some of the issues I encountered while doing so. I'll try to break it up under a few different headings.


V1645 elsewhere on the web

I waited before making the jumpsuit to see some reviews pop up. Most of them have been really positive about the design and the look, although there seems to also be some general disappointment the first time the jumpsuit is tried on. I did go through this too but it didn't actually lead to any changes or adjustments in the garment. I think this is an odd look to get used to wearing, but it does look stunning and comes out almost exactly like the original photos. 

A few reviews also complained about the instructions being confusing. I have to agree with this, but it does get you a good final result. The pattern has about 60 individual steps (excluding all the binding!) and there are so many notches and tacks to keep track of. Don't skip ANY of these. I didn't find any to be in the wrong place, but it was easy to confuse notches for different sizes and mark the wrong one. 

The pocket insertion is confusing, but no moreso than the pockets for the Burda Matt Williamson dress (or dresses of that style, like TATB Zadie dress). You definitely need to be intermediate/advanced skill for this pattern - if there are omissions with the instructions, as highlighted by a couple of other people on PatternReview, I think you can skim over them if you've got enough experience to have your own opinions about how clothes seams should be made/finished. If the front overlay is supposed to be topstitched (as it appears in the envelope photo) then the instruction is definitely missing.

The pattern is cut partially on a single layer, and partially on a double layer. The asymmetrical pieces mean there's a really high risk of cutting a large piece the wrong side out or stitching one of the first seams the wrong way around. This could be a costly mistake if you've got a nice fabric. 

I didn't find much elsewhere on the internet about my issues with the supplies list...

As a non-American I found the supplies list incredibly unhelpful when it called for 7x packs of bias tape. In the UK you most often see bias binding available by the cut metre so the requirement for 7x packs was unhelpful. We can't be the only location where bias tape is mainly sold by the metre instead of pre-cut packs. I googled the length of a pack of bias tape at Joanns, which said it was 4 yards so 7x4 yards = 28 yards => 25.6m. I guess. Apparently you can buy packs of bias binding at Hobby Craft, but this is 2.5m so you'd need 10 packs of that stuff at least. I'm fairly sure other brands would have pre-cut packs of different length. I bought a 33m spool of green binding from William Gee and and then a 25m cream spool (from Backstitch) for my second version. Both had significant leftovers at the end of the project. Depending how you choose to finish the seams, you probably need somewhere between 20 and 25m of bias binding. 

Also, perhaps buckle covering kits are a easy to find in the USA, but finding nice buckles or buckle covering kits was impossible here so I opted for an adjustable slider at the waistband on both versions.


Muslins and Fitting

My measurements have increased a bit recently so I cut a straight Medium for my first muslin, mainly to account for my hip size. I was unsure how all the pattern pieces were supposed to go together and so I wanted to avoid introducing potential problems of grading between sizes incorrectly. I numbered all of the pattern pieces with a sharpie so I could reference how they go together. Naturally the first muslin ended up too big. I resolved to go down too a Small all over with a small amount of extra space at the hips instead. 

I will flag some of the classic errors in my first muslin you need to look out for. Honestly, if you can lay the first few pieces flat or drape them on a dressform, this will really help to establish how the first pieces go together and what shapes they make.  On my first muslin, the Centre Front seam ended up the wrong way out. In the subsequent muslins and garment makes, I tried to vary the order of construction to start with the back pieces (which are symmetrical) and then add the front ones to it to get the left front and right front pieces correctly oriented, but it messed up the sensible order of seam finishing as a result.

On the first muslin my right leg outseam [under the overlay] was also incorrect. You should hide outseams inside the legs like normal trousers, but it's relatively easy to get this wrong because there is an invisible zip insertion at the same time. 


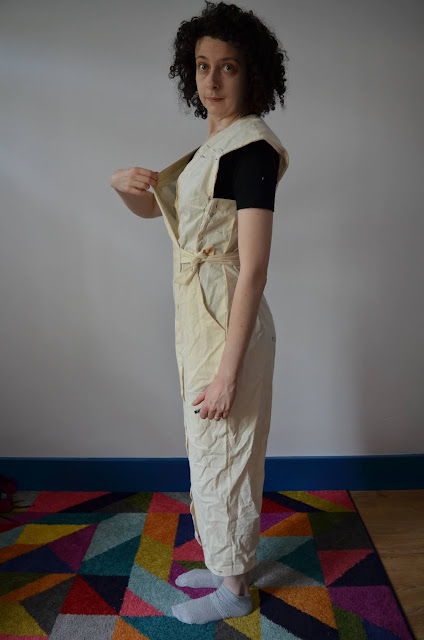
On the first muslin, I also noticed that the body was too long. The hem, crotch, belt and armholes were all too low on my body. Perhaps this pattern expected a lot more boob to fill out the long upper body (Mimi G and Erika Bunker don't seem to have the low armhole problems that other makers had). For reference, I took some photos to demonstrate how much extra space there was in the bodice that could be filled out. 


I did a bit of a slapdash Small Bust Adjustment to match my figure a little better by pinning length out of the bodice above the bust and across the upper back. I didn't specifically adjust the circumference of the pattern pieces but I was hoping that downsizing to an S would just fix it enough to carry on. Muslin 2:


Muslin 2 looked good enough so I made no further changes. There is a small amount of gapping under the arms but I was unwilling to spend time to fix it. 


The Creepy Crepe Version

Version 1 is made in a green polyester crepe from Stoff & Still. I have a love/hate relationship with crepe and am always wary of sewing/wearing it but it seemed like a very strong match for this pattern. Crepe has some visual texture that looks rich in photos, polyester crepe is easycare/non-wrinkling and I feel like this is a recognisable use of the fabric (RTW crepe jumpsuits are smart and relatively forgiving of minor fit issues!). So I decided to look past my mistrust and give this a try.


FYI I used the red colourway of this fabric for my V1672 Festive Dress.

To stabilise the fabric I used cotton tape on the shoulder seams, fusible interfacing on all the advised edges and in a few extra places around the pockets. With hindsight I should've also stabilised the zip area.

I accidentally ordered the wrong seam binding (green from William Gee) and it was super narrow. Some of my binding is a bit messy in places where it was tricky to attach, or where I realised too late I had finished seams in the wrong order. I am hoping no one will notice. 


I found the crepe a little challenging to work with. It has a tendency to creep, stretch and drape which needs to be kept under control. It's a bit springy when trimming the seam allowances and it doesn't press at all. Machine topstitching is an absolute no-no so I stitched down the facing and hems by hand with a tiny herringbone stitch. The crepe was very forgiving of this kind of stitching. 

I messed up the pocket construction on the zip side and some stuff is caught, causing a lumpy seam. I can see it, but it seems to not show up in photos so I am trying not to fuss over it too much. 

Once completed the jumpsuit is quite heavy and there's a lot of fabric hanging off the shoulders without much of an anchor elsewhere. Like I said earlier, the crepe stretches and drapes gradually, so the front and overlay were slowly pulling down and apart from one another. You wouldn't get this in a more stable fabric (it didn't happen in the muslin!) so I fixed it by attaching a small hook and eye at the top of the Centre Front seam. It's much better now. 

Stick around to hear about the occasion this was made for in a future blog post!


Slinky Smooth Tencel Twill

This was supposed to be a wearable muslin, but I found this fabric AFTER I had completed the green version. You're probably wondering why I was still hunting for wearable muslin fabric when I had completed the main non-test garment. I'm wondering too. 

This is a maroon smooth drape twill with tencel fibres by MeetMilk from Sew Me Sunshine. Hopefully this will be a more casual everyday version (complete with wrinkles) and I'm planning to make some long sleeve tees to go under it. The fabric is fun to sew and presses nicely. I wish the colour were a bit more red but it's fine. I noticed while pressing this fabric that it tends to ignore a bit of water (i.e. a fine spray or mist) but it really drinks once wet. Once wet it sort of smells and behaves like a ratty cotton that is beginning to perish slightly in the laundry. I wonder how it'll fare out in the wild!

My binding went a lot better on this version but it's still not perfect. The cream binding was a much better width and the fabric was easier to sandwich in one pass. I also learned some lessons from the previous attempt at binding and machine topstitching was allowed again!

I shortened the belt a little and tried to put it a little higher than on the green version (where I bluffed the placement because I forgot to mark it with a tailor tack).


I got a bit lazy near the end and just wanted to be done with the pattern so the topstitching around the armholes isn't exactly the same on both sides. The hem on my right leg is also 1-2mm deeper than on the left leg. Hopefully no one notices. 

Trying it on, I was pleased with the fit through the torso. I was a little disappointed with multiple issues below the hipline. Firstly, the pockets are lumpy and I'm not sure why they don't lie smoothly (the muslins were alright!). Secondly, the leg seam with the overlay ripples and pulls down. Maybe I should've cut the whole thing as a double layer and interfaced it like cardboard. It's disappointing. This version also fits quite snug over my hips - I sized down a little after the green version but it may have been too much!


Conclusion

So what are my concluding thoughts on this pattern? I think this would be a relatively good office outfit, but not really in a work from home setting. The inconvenience of using the loo seems pretty egregious when you're stuck in your own home. 

The crisper and sturdier your fabric, the better. I think the muslins showed a lot of potential to support the design elements, but the garment fabrics are maybe a bit too drapey. The bust is much bigger than expected, but the enveloped model doesn't seem too well-endowed so I I'm not sure how or why it fits her. She might be very long-bodied. The pockets are okay but a bit tricky to execute if you're grading between sizes in the waist/hip area, especially given the zip and overlay interference. The binding finish is fine but you could equally overlock all the edges before stitching. If you really like a challenge, I bet this whole thing could be made with French Seams. The pattern is a slog to complete because the first 28 steps seem to come together very quickly compared to the second half of the instructions. It is a fun puzzle if you're familiar with garment construction already and you don't mind being thrown by pattern pieces that don't look familiar.


K x


Thursday 30 September 2021

Vogue v1672 - A Festive Dress

I could tell you the backstory behind each element of this dress, but honestly it's a bit easier at this point to say it's a stashbusting project. The red crepe outer fabric is from Stoff & Stil, the lining is from Fabworks and the pattern came straight from the Vogue website. All the elements were bought with this specific project in mind.

Lining Fabric

Sometime in December 2020 I decided that even if no one was going anywhere anytime soon, I should make a defiant party dress. I pulled out the material and patterns to get started on this. 

V1672 describes itself as a Very Easy pattern but I think that's a little generous. The pattern does have big impact for a relatively simple set of pieces, but it does have a couple of elements that would cause issues for someone looking for a very easy pattern. For example, the bias cut bodice is prone to distort or stretch out if you mistreat it. The tradeoff here is that the neckline is on the straight grain, which means it probably won't gape as much compared to a bias edge. I also found that the bias cut bodice was tricky to fit. This might've been due to my spongy stretchy crepe, but I found I didn't need to make my normal adjustments (extra space at crossback for my shoulders, taking out some back length between shoulder and waist for my swayback) and was confused about which adjustments I should make. Instead of a small bust adjustment I just pinned out the excess along the princess lines on the front bodice. The back waistband does dip slightly but I decided I was too lazy to fix it. 

I do like the bodice and am wondering how the wrap front will fare over time. It shows my bra, so I'll either need to remember to wear a pretty lacy number or whip up a camisole. Depends on the occasion. As I mentioned earlier, the neckline does stay put and I don't think there's much risk of a wardrobe malfunction - when standing up. I have found that it gaps a lot more when sitting down. I think this makes a great party dress because the bias bodice allows for a bit of expansion if you've had a big meal! I should've tested this on Christmas Day but the dress wasn't finished in time. I had spent all of my sewing time making garlands and pyjamas.

The skirt is long. Vogue have done that trick again of using heels and shooting from below the model to create the illusion of showing more leg than the pattern allows. I left the length fairly long because I like the drama of the skirt and I think it contrasts nicely with the very deep v-neck.


This dress is fully lined. I used the burrito method on the neckline and I think it came out very clean! The lining hem is pretty horrible but I'm hoping no one is going to notice.

The zip is a centred zip. It does look a little puffy but hopefully it'll be mostly hidden under my arm. The pattern originally calls for the zip to be placed in the centre back but I moved it to the side seam, as usual.

The pattern envelope promises inseam pockets but I'll tell you right now that this is a lie. There are no pockets and no mention of them in the instructions.

I tried to avoid topstitching unless absolutely necessary. The crepe didn't take it nicely and the thread I had available wasn't a brilliant colour match anyway.

That's it - I ended up wearing this dress for a very special occasion: getting my first vaccine shot!


K x


Saturday 11 September 2021

The Doppler Dress

I think we can all agree that for those of us who sew, there is a perpetual quest to make clothes that look presentable, high quality and stylish but which feel like we're swanning around in our pyjamas. In the world of dresses, nothing exemplifies this more than the t-shirt dress (except maybe the slip dress, but bear with me). Quick to cut, quick to sew and infinitely customisable. The t-shirt dress is a great thing. So when I finished this project and showed it to B, I was very proud when he finally said "I think you've made a nighty".

This dress was another palette cleanser project. I had the fabric for over a year. On our autumn 2019 trip to Japan, B picked it out of the remnant bin in one of the Tomato stores in Tokyo and I wasn't too keen on it. It's a knit with barely any stretch and no recovery. If it weren't striped I would have probably used it for shorts or culottes but bold stripes on that kind of garment isn't my vibe. I settled on a plan for a dress fairly quickly but never really had the time or desire to sew it up.

Roll around December 2020...

I searched a few Burdas for suitable patterns. My first design idea included a centre front placket and collar so the dress would reference polo shirts a little. My second design idea was an overlapped bateau neckline (a bit like my purple stripe jumper) but using some fancy ribbing from my summer myfabrics.co.uk haul. For this second design I planned to copy my sloper and make adjustments.

I started making this in that quiet gap between Christmas and going back to work. I wanted a 'no stakes' kind of project, which meant that I chose design idea #2 over tracing a Burda pattern. This is not high quality drafting or sewing, but it was quite fun to get out all of my rulers, tapes and pencils. I cut the sleeves according to how much fabric I had left. 

I stitched up the ribbing and put the dress on my mannequin. It looked awful. The seam was scratchy and the ribbing pulled this weak dress fabric in all the wrong directions. With hindsight I shouldn't have tried to be clever with the shoulder seam as I drafted it badly. Oh well. I ripped it off and just bound the neckline using some jersey binding instead.


The seams are zig-zagged and then overlocked. There are no pockets because I didn't feel like adding them here. When we get another mega-heatwave I'm hoping this dress will prove its worth. Right now, I'm layering it with tights, fluffy slippers and a duvet.

K x

Saturday 28 August 2021

Low Waste Bog Coat

 I can't quite believe it has taken me until halfway through the year to break out my overlocker and play with the variegated threads!

Today is a quickie blog post to go with a quickie project


I wanted to make a birthday gift for a friend and thought that a bog coat would fit the bill quite nicely. I wear mine all the time and it's relatively easy to cut, size and fit. The pattern is somewhere between low-waste and no-waste depending on how you style it and it is pretty forgiving if you use the right fabric. I have used sweatshirting for both my versions to date. I think this would also work well in a fleece, terry, chunky knit, mock cable ponte roma, hachi t-shirt knit etc. The Threads instructions suggest fancier and more elegant fabrics but I probably prefer the fluffy loungewear vibe.


I used ~1.2m of pink sloth sweatshirting from Empress Mills.

All the stitching was done using the variegated blue and white thread cones from William Gee.

I used my overlocker for a lot of flatlocking detail and have overlocked all the seams. The patch pockets have a flatlocked opening but are otherwise zig-zagged using my regular machine with the same thread.

This took an afternoon to pull together and I think it's a hit!


K

Wednesday 18 August 2021

So long, sandpaper trousers!

Well, the re-upholstered Flintan office chair didn't last long. I got back and hip pain from sitting in that chair and then ripped up and completely disassembled the chair during a particularly grumpy moment. 

So, uh, I was without chair again. I bought a posh ergonomic one instead with a 12 year guarantee. Gotta love a 12 year guarantee.


I did make a workout weights bag from the seat upholstery though!


K x


Friday 19 March 2021

Lessons learned from a year of mask making

I'm trying to think of the right way to write this...

Does anybody else think that the impact of the pandemic has manifested in very specific ways amongst the home sewing community? I'm not necessarily talking about losing creative energy, having no motivation or concentration, or the paradaox of having all the time to stay in and sew but nowhere to wear our finished projects. I'm not even talking about mindfulness via embroidery, yarn or drawing etc. I'm talking about masks.

We may never be able to prove it, but hopefully these little projects have saved lives. No other project I have ever made, or will probably ever make, holds that potential power. I am so used to making projects to bring warmth, fun, joy etc that it was surprising to feel that only now my sewing skills actually mattered. 

Offering someone a homemade mask is a pretty radical act. It's an act of love, respect and protection.

Sewing has always had the power to be political and making masks en masse to distribute seemed like a hugely political move for all of us quiet revolutionaries. Making masks and scrubs was a way to protest against the inadequate government response and also to protest against that voice in our heads saying "you can't stay locked down, there must be something you can do!". As manufacturing shut down and PPE supplies dried up, suddenly we had power to step up and help. Small-scale hubs were set up to either alleviate pressure on remaining actual PPE supplies or to help supplement supplies. Millions upon millions of people, making millions upon millions of reusable masks is not to be sniffed at. I'm in favour of nations being able to manufacture their own PPE at scale, but hey, we were faster and more agile - we helped plug that gap. 

But enough about the social phenomena - let's talk about the sewing

As sewists we famously don't iterate on our projects too much. Get a garment done, move on to the next one. If you're really diligent you might make a muslin or samples of specific techniques, but mostly we jump around and hope to remember a tweak the next time we make a similar pattern.

So, I figured that it would be interesting to go through the versions of masks I've made over the last year and look at their evolution. 


Disclaimer #1

I have been sewing masks privately and giving them away to family and friends. I think I have made about 200 over the last year (this isn't a competition and I know this is much less than a lot of other sewists). I have never sewed masks with the aim of selling them (I have an alright job, there's no need to ask someone to cover my costs) and I haven't been sewing them for a collective. I joined the Mask Makers after Bernadette Banner mentioned it in her video, but it never had massive applicability to the UK. I did use their mask instructions as a basis for my own approach and have seen improvements made to the live google doc. I also joined the local Scrubhub but mostly used it for news because their need for sewers never lined up with my availability. They wound-down once the manufacturing employers came off of furlough. I was never reliable enough to sew for a collective.


Disclaimer #2

I am lax about using the word 'mask'. This is not a medical device, but I prefer the word over 'face covering' so you may see both in this post. 


Pattern of Choice: The Rectangle

A word about patterns: I have stuck with the rectangle style consistently because I think it is simple and effective. I can tear fabric along the grains and get a decent number of pieces with almost no waste at all from a piece of fabric. 

I also think that you can get a really good fit with a rectangle pattern. Why do I believe in the power of the rectangle when the blue plastic masks fit so badly? Well...let's think about what we know about about garments. One of the hardest parts of the body to fit is the bust. There is a whole industry dedicated to making garments to fit, enhance, reshape, support, compress or contain busts. We judge garments whether they succeed or fail by how garments gap, billow, strain or spread over our busts. In the sewing world we have spent hours poring over FBAs/SBAs, moving bust points etc. Where am I going with this? Well, who on earth thought that a 2-piece darted cup design would fit universally over - potentially - an area of the body even harder to fit than the bust was nuts. You've seen human noses, right?

It was that knit-fabric cartel, wasn't it?

Anyway, I get upset about consumer investigations of homemade masks where they assume we don't know anything about fit. I don't know if this is still true, but everything I read about double-masking was not arguing for better filtration, it was about attempting to improve the seal or fit of the disposable mask. You want to get a good seal on your face covering? In the absence of a specialist, ask a garment sewer to diagnose the fit of your mask. You'll learn something! 

Anyway, I have found that a rectangle mask with deep pleats and a nosewire provides lots of scope for extra fabric where you need it (over the nose and chin) and much less where you don't need it (over the cheeks). 


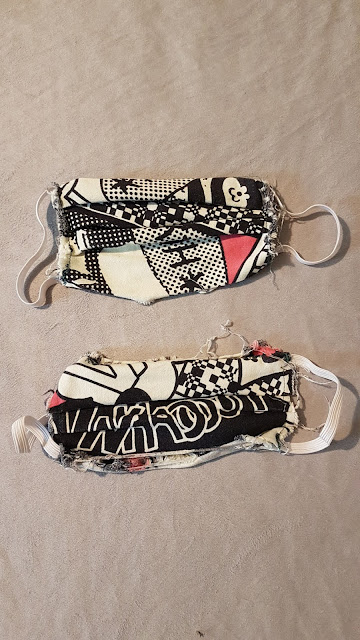
Mask #1: The Mod Dress

I made these on 16 March 2020. B and I had just been given our "stay at home" orders from our employers and I felt like I should probably wear something over my nose and mouth when I went to buy groceries. I spent an evening raiding the scraps bag and frantically googling how to make these things and ended up following an Emma One Sock tutorial (long since removed). The tutorial said to use 2x sandwich tie wires across the bridge of the nose. I didn't have any sandwich wire and ended up substituting in 2x 3mm gardening wire strips. I don't remember how the tutorial recommended to sew these in but I was on a zig-zag kick and just stitched over them with a #5 width.

I thought this fabric would be fun to match my Mod Dress for a bit of "stitch courage" while buying our weekly supplies.

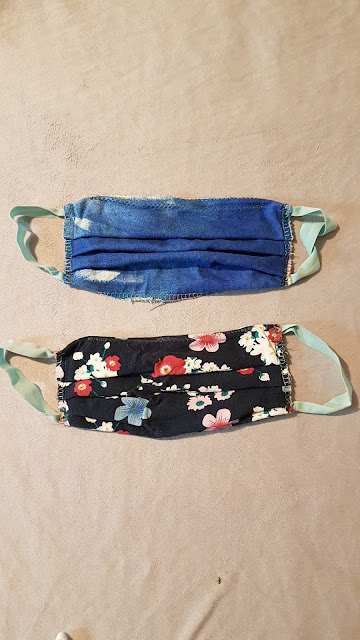
Used pleated fabric masks

I also used spare supplex to make some gloves so I wouldn't touch anything in the shop and share germs. I really hate making gloves and I am really bad at it. I stopped wearing gloves after I tried to manouvre a shopping trolley and realised they had NO grip.


Mask #2: Sea Waves and Jumpsuit

I made these on the first or second weekend after lockdown began. They were a "project of the week" kind of thing and I was mostly raiding my scraps for supplies. I made a couple of face coverings using leftover soft shell from my Mei jacket but I threw those out almost instantly. With hindsight, I wish I'd kept one for reference purposes because the debate has evolved over time regarding hydrophobic fabrics, anti-microbial coatings and other forms of technical textile. It would have been interesting to assess.

The main purpose of this batch was to have something to send to my family in Dorset. I was convinced they would think they were stupid or unnecessary but I was frustrated that we lived far away and I couldn't do anything else to protect or help them. I also wanted them to be early adopters and take face coverings seriously. I spent ages selecting fabric scraps they might like and then using bondaweb to fuse 2-layers of fabric together to get a 2-ply mask. I overlocked all of the edges in rainbow thread.

I also decided that 2x garden wires was overkill and maybe I should try with 1x 3mm wire instead. It worked like a charm.

This was still long before mask-wearing was compulsory in shops/on transport etc and long before western organisations were issuing guidance on what a fabric face covering should be made of/what its construction was. This was long-before shops were selling fabric face coverings too so the standard expectations hadn't been set in the public's mind. I think that by now the BBC had published guidance on how to cut up a sock and wear it over your face.

My elastic ran out while making this batch and I switched to Fold Over Elastic to complete the set. 

The family was polite when they received these coverings, but I think I didn't appreciate that maybe faces could be different sizes and that masks might be uncomfortable if they don't fit right. I think the fit issue here was the size of the ear loops and width of the mask - it pulled a  bit too tight for them! I was heartened when I found out they were taking face coverings seriously though (sensible lot!). I think that as soon as Amazon started selling fabric face coverings they switched for some new ones from the marketplace.

pleated fabric masks with FOE earloops

Mask #3: New method and tie-style

Some time passed. Maybe a month, maybe two...I don't really know. I was keen to do a more systematic approach to mask making because I wanted to produce better quality than the scrappy ones made to date. We were still deep in The Great Elastic Shortage and I was still working on a make-do with what you have in stock approach. So how do you make face coverings with no elastic on hand? You switch to the tie-back style.

Th obvious advantage to the tie-back style is that it doesn't hang off your ears and therefore the adjustable strap can pull a mask quite tight to your face. One of the best, but probably lesser appreciated advantages to the tie-back style is that if the tie is adjustable, you can adjust the curve of the side of the mask - a more effective version of the "twist the ear elastic on your blue disposable mask" trick designed to make them curve around a face slightly better. 

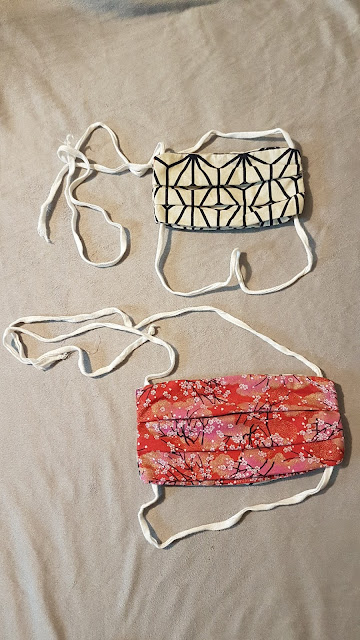
I threw open my stash cupboard and looked for fresh fabric (i.e. not scraps) and found some souvenir fabric from Japan 2019 that would work well. It is a tightly woven cotton in a couple of different designs. 

This time I decided to avoid the bondaweb and sewed/overlocked a rectangle with gaps at the corners [for the ties] and in the bottom edge [for turning, for a filter pocket]. I was beginning to think about filter pockets and how they were a useful feature if people wanted to upgrade their face covering when they weren't sure of the provenance of the mask.

I did buy more gardening wire, which didn't suffer as badly as some items in The Great Gardening Rush of 2020. I machine wash my masks and the wire has fared fine until now, so I'll just carry on. I kept 1x3mm garden wire and decided to try zig-zagging through all layers from the outside. I thought that adding the wire as one of the last steps would make it easier to turn the mask right-sides-out but it was very awkward to sew. When wearing the mask the zig-zag topstitching was also scratchy and uncomfortable, so there are only a couple of prototypes with this type of nose-wire. 

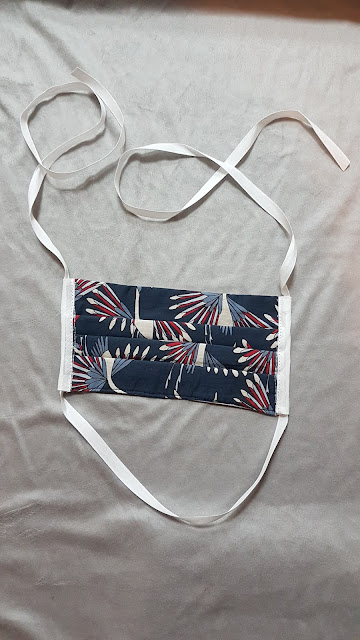
I had dithered between measured pleats and eyeballed pleats, but Mask Makers had just released a good tip to fold the mask in half, press a crease, then fold 2 edges into the halfway line and press a crease there. It worked really nicely and made things very simple. I like the deep pleats on the masks because they allow for a good curve and tight fit around the cheeks. Sometimes they end up a bit asymmetrical, but it's nothing major.   

Pleated fabric mask with rainbow ties


Mask #4: A Big Batch

This batch was basically a continuation of Mask #3 but with a modified nose wire insertion. I decided to zig-zag over the nose wire, attaching it to the seam allowance on the top edge before turning the mask right-side-out. This looks a little unconventional because there's no topstitching on the finished product but it fits nicely and there's some cushioning/give in the fabric to prevent irritation on the nose.


Plated fabric masks with ties

Mask #5: Ersatz Big Batch

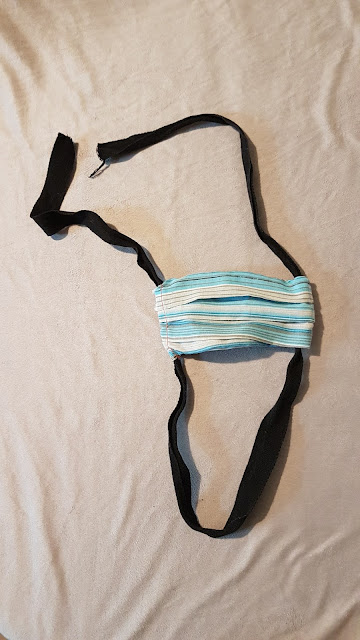
I sewed a lot of masks in the Big Batch and gave them away. I mis-calculated how much cotton tape was required for the ties and ended up harvesting bias binding, trim, ribbon and webbings for a few masks. The webbing was too thick for the tie holes and the bias binding looked shoddy after a couple of washes. I also ended up with more demand for the masks than I had originally made and needed to hastily cut extra masks from more fabric. Unfortunately, some of the supplementary masks were cut from a low-quality [poly]cotton and they pilled in the wash almost immediately. 

I made a few different sizes and really liked the smaller version. B found these too small. I received photos of friends wearing them in different sizes (which was heartwarming!) but showed that the larger masks can fit quite big faces and can fit over beards.


pleated fabric mask with webbing

Mask #6: Failed Prototypes

Many months later. WHO issues guidance and all home sewists say "wtf is non-fusible polyproylene?!"; Under Armour over-engineers a beautiful mask design for athletes; disposable mask plastic waste is showing up on beaches; shops are abundant with fabric masks; we start thinking about Christmas meetups and going back to work in the office...maybe I've missed the boat and maybe our household is going to get caught short with too few masks (of crappy quality)...variants start showing up and mask guidance changes; 3-layer becomes the product of choice, Germany demands actual FPP-rated masks on public transport; we enter new lockdowns...maybe I have got enough time to sew another batch of masks before they go out of vogue....

We have completed our house move, my brain is starting to think about stuff properly again. My sewing space is set up. I need to replenish my supplies and start researching. There has been some innovation since I last checked. Elastic has returned, online haberdashery tells you which interfacing is recommended as a non-woven filter layer; everyone is keen to sell you their cotton; Prym has packaged up aluminium nose wires (I'll stick with my garden wire thank you!); plastic woggles/adjusters are freely available. While on a late-night millinery binge, I stumble upon Parkin Fabrics which seems to specialise in millinery supplies and surgical-grade woven cotton (?!) - and suddenly I realise that you can overkill a homemade mask. 

Regular home sewists sew at a volume where there's no point in creating a certifiable medical device. Frankly, I don't want my masks relied upon as if they're a certifiable medical device. However I want to make an effective mask to help protect the people I care about. And discovering medical grade cotton might be available to lay people by the metre made me realise that I needed to chill out a bit.

I also gave up on the idea of making matching outfit/mask combos because eurgh.

So, I bought 2x quilting cottons from Stoff & Still with little patterns for some subtle fun and 1x cut of Egyptian Cotton from Empress Mills. Holy moly, that Egyptian cotton is lovely. I bought interfacing from William Gee for the filter layer. I bought a lot of cotton tape from William Gee for the tiebacks (and then used all of it making the festive bunting!).

I also bought some elastic from William Gee and some plastic adjusters from MacCulloch & Wallis (I'm a fangirl, what can I say). I figured my family deserve some new improved masks but without ear loops and without a fiddly knot in the back of their heads.

Maybe I should have prototyped this, but I didn't and cut out about 80x masks' worth of fabric rectangles ready to go. I always think that the rectangle style should be fast to sew, but it really isn't. The steps are simple and repeatable but they're not the fastest. I thought I could save time by switching the sewing order, sewing the masks shut (no filter pocket but these are 3-ply) and then folding over the edges to make a casing. I tried this but realised it was far too bulky. And of course, I'd already sewn and pleated all of the rectangles. So I tested a few potential solutions:

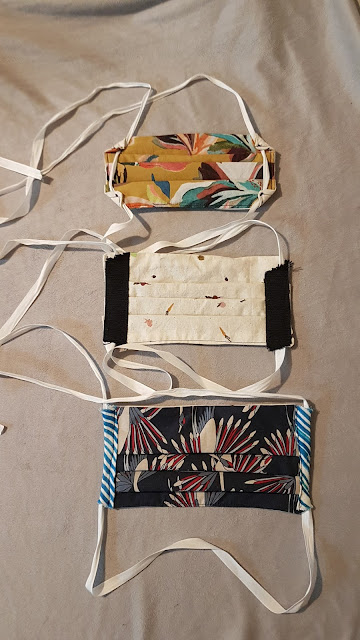
Three pleated fabric masks

Top. Fold over the corners, bar tack them down and thread the cotton tape through. This gave a really bad fit with gapping around my cheeks. It was also very irritating because the tape could be pulled tight over my cheeks and it would chafe.

Middle. Stitch on a petersham casing on a "back" side of the mask. The fit was better on this but the width of the casing took away the flexibility of about 1/4 - 1/3 of the mask and made the edges stick out like wings. Also it was pretty ugly.

Bottom. Make a casing over the edges using bias binding. This worked very nicely, but needed tidying up because the top of the casing was a raw edge and prone to stretching.


Mask #7: Big Batch 2

I made a huge batch using white bias binding with tidy top/bottom edges. Yes, I was annoyed that I had finished these edges on the actual masks and could have achieved less bulk at the edges if I had pre-planned this finish. Oh well. 

B lent me a crochet hook to pull the cords through the casing - it made very light work of approx 60 masks that needed to be threaded.

pleated fabric mask


Mask #8: Big Batch with Elastic

I set aside about 20 masks in order to add elastic and plastic adjusters to them instead of cotton tape. This means they don't need a knot at the back of the head. The elastic went through the casing and the plastic adjusters very easily with the help of the crochet hook.


So that's it, a year of mask making. I can't say it's my favourite project but I'm glad that we have a good supply of nice masks. Fingers crossed I don't need to make any more for a while. 

That's it for  now, what do you think of your homemade masks?

K x


Friday 5 February 2021

Distractions pt22 - The Important Box

Behold The Important Box. It is a box of items I sorted and kept together as "important" but "not urgent" when we first moved in to the previous house. This was a box filled with things I was supposed to deal with between August and December 2016. It is a box I accidentally put (irretrievably) under the stairs. It is a box which, in June 2020, I decided to open and inspect before moving to the current house.


I took one look inside, immediately chickened out, and taped it back up. I moved it and "safely" stored it in one of our many box piles in the new house.

Finally now, in winter 2020/21, let's take a look at the treasures inside...

Souvenir fabric from my first Japan trip (a gift for Mammafairy)

Many, many post-its

The mug in which we keep our earplugs

A Punt & Dennis VHS 


Old project lists

Truly this was sacred treasure...

In other news, our central heating sprang a leak and all of my sewing corner has been shovelled back into Ikea bags to allow some contractors a look under the floorboards *sigh* I am also in the middle of making a new batch of face coverings and so my sewjo has gone into full hibernation. It is frustrating but I need to wait for it to pass.

K x