Wednesday 14 November 2018

Catchup: I made an outfit


I made these pieces in the early spring and I feel like I really should write a bit about them. They don’t seem particularly interesting – and I sewed them so long ago with no notes so it’s tough to know what to say. I did post a review on PatternReview.com, so pop over there if you’re interested.

I also haven't been in the mood to be in front of a camera for a while so there aren't any new photos to go with recent projects. Hopefully you'll get something new before Xmas, but I make no promises. The making carries on, slowly and surely, but it is taking a while to appear.

Green Corduroys

I used my self-drafted Helsinki Jean pattern but mixed it up a bit woth a double-height waistband. I really should add an elastic or wear with a belt as the fabric is still quite loose. The fabric is from Edinburgh Fabrics, the pocket linings are Liberty’s Harkness McNair in purple.


Grey Top

This pattern still needs perfecting. It’s too tight, and I only wore this once before cutting it up and turning it into underpants.

You can see how I feel about this top...

Nike Hoodie #2

I’ve been meaning to remake my Nike Hoodie for a very long time! I finally got round to it! This time I left off the zips, but still found it to be a bit complicated to construct. The main fabric came from my Japan trip, it’s a lovely blue/stone knit with a crinkly textre. There are 2 knit layers which are meshed together in the fern motifs. The hood lining is a plum jersey from Goldbrick Fabrics.

This hoodie is being truly used and abused – it’s wonderful.


That’s it for now
Bye!
K

Monday 22 October 2018

Bleach stains? What bleach stains?

Confession time: I am a lady of bottled, carbonated enthusiasm. Shake me up the right way and I’m frothing all over the place.

So on a hot summer night, I offered my throat (no, not to the wolf with the red roses) to the bar offering free alcohol. And, well, I took the dye right outta my pants.

CRINGE


I worked so hard on those jeans!

 I bundled these up for a few months before deciding what to do. Had these been RTW jeans, I may well have admitted defeat and sent them to the recycling pile. If they had been a crappy make, their fate would have been similar. But these were pretty darn good, they weren’t even particularly worn out yet. They were struck down in their prime!

Being a stubborn sewist who doesn’t like seeing her makes go to waste, the only option was to fix them. And fix them so that I would wear them again. No cut-off shorts, no cliché miniskirts.

My first idea was to go heavy on the appliqué and embroidery. Huge patches of layering and coloration and textures. But I did a few hours of work and wasn’t loving it. Sure, it was probably fine, but that’s not enough to make me want to wear the jeans regularly. I was also not very excited to work on it each time. Coming up with 10-15 ideas to coordinate is quite tiring. So I packed the jeans away again.
 
After starting the stencils, before removing the needlework

A few more months passed and I entertained ideas of re-dyeing the entire pair of jeans, or adding additional bleach deliberately (*cue raised eyebrows*). But the former felt like it would end up ugly, and the latter made me worry that the new bleach wouldn’t complement the existing stains if I tried to apply it sober (*cue more raised eyebrows*).

Turns out, I like the bleachy bits. The fringing is a beautify bright orange-y colour and the blotches have a wonderful dappled continuity. And my left leg is still completely plain.
So how about stencilling?

People pay good money for painted jeans...


I paid a visit to Henny Donovan Motif and picked out some blossoms and paint. I already had several components of a colour palette on the jeans, so instead of trying to hide them, I could supplement them.

Trying out stencils for the first time!

Now, I tried doing a few stencils with no adhesive and a makeup sponge, but that went pretty badly. I then got hold of some repositionable spray mount and a paintbrush. And, since we were ankle-deep in winter, I had to do some work out in the snow.

Spray glue in the snow


But! I loved working on this! For my first time stencilling (and one something that can’t be laid flat), I had a lot of fun. And I’m pretty happy with the result. I have definitely worn these quite a bit and though the jeans now play a slightly different role in my wardrobe, I’m so happy to have them back in circulation.


Until next time,
K

Monday 10 September 2018

Make your baby look like the Thirteenth Doctor

It's not every day that your massive Doctor Who addict friends have their first child (who conveniently ended up being female). It's not every day that the BBC announces that the Thirteenth Doctor will be female, played by Jodie Whittaker. It's not every day you realise that these two events need to be married together and that you need to make sure that (when the time is right) your friends can dress their daughter up like Doctor Who.

So I made a baby outfit.

A tiny version of Jodie Whittaker's Doctor Who costume, including boots, socks, shorts, braces, t-shirt and jacket

This is sized approximately for 6-12m in the hope that it will be the right size when the new series airs later this year. It's also sized for 6-12m because I have a very poor concept of how big/small babies actually are and this felt like a safe bet.

I had this idea way back in November 2017 and no sooner had it popped into my brain than Zenith & Quasar had announced that they would be stocking some custom print ABP in the style of the Doctor's costume. I quickly joined the preorder for some t-shirt fabric. The rest would be pretty easy to find in London. The Z&Q fabric took TWO MONTHS to arrive at my doorstep. Two frustrating months! It got lagged with pre-order lead time, Christmas, customs and stuff of that nature in the way. I was so relieved when the package finally arrived.

Supplies:

Coat: Stash fabric and bought fabric from London. The rainbow trim is actually from a pair of Stonewall shoelaces!
Tee: Z&Q
Shorts: Stash fabric. The yellow braces came from my stash of plush elastic.
Socks: RTW
Boots: RTW

Patterns used:

Burdastyle 09/2013 #143 Quilted Baby Coat
Burdastyle 09/2013 #146 Baby's Ruffle Blouse
Oliver & S Sunny Day Shorts

The shorts were lengthened slightly, and I added some attachments for the braces but otherwise it was made as drafted. The blouse and the coat both had some significant modifications. The coat was modified to match the costume. The t-shirt was modified to match the RTW style of overlapping shoulders (instead of the closure at the centre back).

I also entered in the the PR Match Your Shoes contest. It was pure coincidence that the timings lined up, so I thought this would be a fun tiny outfit. If you want more technical detail, I give more in my reviews over on sewingpatternreview. Otherwise, feel free to ask.

K

Tuesday 4 September 2018

The Road to Sidmouth (part 4): The Food Edition

I've got about 5 drafts queued up/nearly ready to go, so excuse the potential deluge...

You read earlier that we got a Jetboil and decided to embrace dehydrated meals. You saw earlier some cosies for our little mealboxes. Now you will see the fabulous borrowed dehydrator making its presence known on top of my sewing cupboard:


And all over my sewing space:


With hindsight I think I may have over-prepared our food for Sidmouth. While we did follow an ultralight dehydrated food method, it was too much food, and when all the meals added up I wasn’t really able to carry the weight of my own bag. In total I prepped breakfast, lunch and dinner for 2 people for a full week. And, naturally, I made massive portions. And then insisted we pre-buy all of the snacks.

In general it was a success, though some meals didn't turn out as good as others. I guess that's not uncommon, but we got exceedingly lucky considering the whole method was new and I invented most of the recipes. The runaway recipe winner was my Upside-down Fish Pie, although the chickpea curry and Jetboil couscous were also really good. So, for the benefit of maker-kind, here’s the recipe:

Ultimate Dehydrated Upside-down Fish Pie for camping, hiking and fast cooking.

Serves 2 generously

You will need:
Boiling water
Cooking pot or cosy

Ingredients:
A handful of dehydrated vegetables (I mixed carrots, peas and sweetcorn, and measured about ¾ of an American cup measure per person)
2 tbsp powdered full-fat milk (e.g. Nido)
1x sachet of Coleman’s Cheese Sauce (or any other sachet of cheese sauce with a respectable level of cheese content)
60g Smash instant mashed potato
Pinch of black pepper
2x60g cans of no-drain tuna
1x can of anchovies in oil

Method:
Before Your Trip
  • Assemble the meal by putting the dehydrated vegetables into 1 zip-lock bag, and by combining the powdered ingredients + black pepper (to taste) into another zip lock bag.
  • Store the bags and cans of fish together in an airtight container until ready to use
At Camp
  • Boil some water and pour the veg into your cooking pot/cosy. Stir in a small amount of hot water, just enough to cover the veg, to rehydrate. Cover with a lid and leave to sit for a few minutes.
  • Tip the sauce sachet into your cooking pot/cosy and stir, gradually adding more water until you reach a potato-y fluffy consistency. Cover again and leave to sit for a few mins.
  • Fluff up the tuna in its can and add to the pot/cosy. Stir.
  • Divide the anchovies between serving and pour in a little of the oil to loosen the mixture if desired
  • Serve.

Well, there you go, enjoy!
K

Friday 31 August 2018

The Road to Sidmouth (part 3): Utilitarian Makery

Hello hello, welcome back.

I know you come here for the sewing and not the snark (or do you?) so today’s post is going back to basics of the blog. I decided to put sewing skills to use for festival camping. I made a lot of colourful clothing already (which you can see here) but today this post is more about addressing our practical needs through sewing

Pillowcase

More of a scrap buster rather than genuine need – I could easily bring a regular pillowcase – but the scraps were burning a hole in my stash cupboard and the polyester fabric content is probably beneficial for sweat or dirt of something.

I don't have a photo of the final item in use, and I'm not sure where I've actually put it now. So instead, here's a photo of  the sewing space from earlier this summer. The pillowcase is made from the diamond fabric, which is still available to buy from Girl Charlee here. One word of warning: the print is much larger in scale than th website suggests.


Camping cosies

While researching dehydrated backpacking meals, I saw that a lot of people use a pot and post cosy combo to insulate a dish while it’s rehydrating. This frees up the stove for other uses or saves fuel (you’re not keeping something simmering) or allows you to leave your dinner unattended for a while.

Most people out there are using scraps of thermal insulation foil apparently to make theirs, though I have seen kitchen aluminium foil versions and glorified jiffy envelopes as well. All the camping cosies are round, and while we could have bought one or repurposed a soup can, we chose to try using our regular 750ml Lakeland boxes. The Jetboil has neoprene insulation, and we happened to have some on hand, so now it’s all one cohesive dinner set (kinda)!

Mine is a black, grey and lime green combo and B went for a black, blue and rainbow combo.


That’s it really, I was hoping to make a new swimsuit ready for the trip but that didn’t happen. Oh well.

K

Thursday 2 August 2018

The Road to Sidmouth (part 2): The Camping Challenge

I'll admit that I haven't been camping in a long time. B is similarly (in)experienced.

So we've got a lot to do before spending a week at the Sidmouth campsite. If there's one thing I'm sure of, it's that we will be a lot better off by planning and preparing, and we will suffer if we just try to wing it on the day.

We're transporting almost everything on the train with us so we can't just overpack for every eventuality either. So, I've been looking at the ultralight movement for ideas so we don't get weighed down by our own supplies.

One thing working to our advantage is that we can afford to throw a bit of money and a bit of makery at the problem. So this is what we've done to get ready

Buy a tent

Trading off weight against ease of setting up, we picked one of the Decathlon Arpenaz 3-person tents. The concept of a blackout tent is new to me but we chose this one for a few reasons:
  • B doesn't like being woken up by the sun
  • If there's a remote chance of anyone suffering migranes, this is a ready-made dark space
  • We need it to stay cool as it's blisteringly hot at the moment and we need some actual sleep.
  • We need it to stay cool because we've got nowhere else to store our food or stuff.

Buy something to sit on

A week of sitting on the ground is likely to be unpleasant. I got a posh chair, B got a cheap one and each of us thinks that our own is better. Let's see who wins.

Buy a camping stove

Actually, we got a Jetboil.

Ah the Jetboil, the Macbook of camping stoves. With its neoprene sleeve and colour changing logo. It boils water. It boils water damn well and it boils waer damn fast. Just don't ask it to do anything else.


This thing cost twice as much as the tent. It cost more than anything else coming on the trip (with the exception of B's fancy new headphones). But we are a couple of compulsive tea drinkers and we couldn't avoid getting something optimised for boiling water. Cue the constant (almot instant) mobile supply of tea.

This has made it quite fun planning meals. We have no ability to keep chilled food and need to keep things light and compact. Our only cooking facility is boiling water. Dehydrated food party it is!

I'll go into more detail about food planning and other  makery in another post, but for now you need to know that we're going to play to the Jetboil's strengths, and our love of laziness by embracing dehydrated backpacking meals.

Bye,

K

Buying supplies


Wednesday 1 August 2018

The Road to Sidmouth (part 1): Deny all knowledge of the molly

Sidmouth Folk Week? Oh yeah, I've heard of it. We used to go and visit during the summer holidays. Had a big craft market on the hill, right? I wonder whatever happened to that festival...

What? It's still going on? Over 50 years old? Except everything that moved to the other end of the seafront?

Well I never. How charming! I guess we might pop by for a visit if we happen to be in the area in August.

Maybe I'll be wearing a few of my new clothes - it is a festival after all, one must try to blend in with the revellers. I'm sure you understand.

A New Hat

To keep the sun out of my eyes. Fabric: sold to me over FB by a caberet performer who was getting rid of old costumes and said this would be good for a refashion (fabric originally from Berwick Street). Pattern: MadebyYaya's tutorial on YouTube

A Scrappy Waistcoat

Just in case I need to dress up. This uses my beloved fabric slashing technique. I love how the front turned out,  but am not so happy with the back. Still, that's what you get with a scrapbusting project. It's drafted from one of the slopers from Metric Pattern Cutting for Women's Wear. It's also reversible!


Some Activewear T-shirts


Because it's going to be hot and sweaty (if this weather continues) and I want something airy and fast-drying. The fabric is Southwest Colours Swirls, Rock Art 16-Scarlet Magenta-YD, and Desert Sunset from Spoonflower and the pattern is another sloper from Metric Pattern Cutting for Womenswear. I've tried some small variations in hem finishes and neckline.


A Square Skirt

I haven't had one of these since I was a teenager! Ooooh, pixie fashion will fit right in at a folk event! I hope no one else is wearing the same thing! Pattern: self-drafted, fabric: Girl Charlee


Safety Pants

For decency's sake. What do you wear under your skirts? Fabric: Z&Q Supplex, Pattern: MadeIt Play Pants (graded up 2 sizes as it's a teen pattern. There are rumours of an adult-size pattern coming soon...).

***Okay, I don't seem to  have a photo of this...let's just say I'm  being decent***

Mesh Garters

Making the mud on my shins a little prettier. A wacky idea, but I like the result - they could even go over wellie boots for a fun contrast. Fabric: eBay, football socks RTW from eBay, Pattern: self-drafted


Rainbow Infinity Scarf

You've just got to have a bit of neck coverage - to stop the sunburn. Plus, rainbow colours means I can embrace my inner hippie and keep my neck hidden. Fabric: B's stash, Pattern: I followed an Instructables tutorial for measurements, but tweaked it a bit as I wanted exposed overlocker seams.


Maybe I'll see you there?

K x

Saturday 28 July 2018

Sports bra mania


I know I swore I'd never make bras. And I know that these aren't strictly (technically) bras. But, since I don't carry much on my chest, a compression-style croptop sports bra works pretty well for me. So I guess I make sports bras now. I'm loathe to spend money on a pre-made one when there are pretty scraps and elastics sat in my stash.

First, late last year I made this:


Then tweaked the pattern to create my London Spitfire bra:


After that I decided to raid my scraps stash and make a "cut up" copy of the pattern to fit small and oddly-shaped pieces. I've tried to position the seams strategically to avoid lumps and chafing but I'm sure some purists would be horrified at  my approach.

A lot of the styling and colour choices came from what was in my stash at the time and what would coordinate nicely. I'm  beginning to run low on plush elastic, but I need to wait to stock up since I prefer to buy in person. Not all elastics are created equal.

So, out of this process came the (slightly scrappy) all-black bra:


The black and blue bra:

(with variegated thread in the topstitching!)

And the bumblebee bra:


This one is my only 2-layer bra, the large panels are lined in a knit on the front, but the centre and back panels are not. I think where I am using supplex, two layers will be needed in future. For the black bras, the main fabric had a lot more resistance and only stretched in one drection. So it seems fine.

That's it for now,

K x

Wednesday 18 July 2018

Kaisla number two

I've finally cleared a WiP/UFO! This one has been cut out sitting around since September 2015. I have shamefully hidden it in a bag and just hoped that it would work itself out. I think the fabric was hanging around 6 months prior to that as well, so this has been maybe 3 years waiting to get done.

Welcome to my newest Kaisla jacket


Why?

I've forgotten my original rationale, so let's just say that I really like jackets. I started actually sewing this in Jan 2018 because I was sick of having this sat unfinished for so long. I've used up almost all of the scraps from my original cutting out by now. I just couldn't understand why that meant the original garment still hadn't been made.


The Pattern

This is my second version of Named Patterns' Kaisla Blazer. I really like the slim nature of the jacket and the fact that there are lapels without too much bulk around the neck and shoulders. It is a really good office-appropriate pattern.

As far as blazers go...it's not too difficult either. Sure, it's not as simple as the BHL Victoria but it is quite simple in its design lines. Also, because of its slimline nature, you only really need shoulder pads and fusible interfacing for the structure. Yay for speed tailoring! No optional horse canvas or sleeve heads!

In terms of modifications, 2015-Katrina decided that she wanted functional sleeve vents and created a pattern. She even cut out all the pattern pieces for this option. 2018 Katrina was not up for that. I think they'll show up on a different project instead.

I again used extra pieces on the sleeve lining so that rolled up sleeves will match the body lining. I again used my modified lining pieces rather than the originals in the pattern.

A spot of pocket detail.

The Fabric

This may be one of my most expensive fabrics ever. The wool was £33/m from MacCulloch & Wallis. I got it in 2014, after much debate, and have long forgotten the composition. I think it's wool, a bit of viscose and a hint of elastane. I don't remember if I bought it felted or if that was an effect of washing. The right side and the wrong side are very subtly different, which was a bit a nightmare for construction. Still, the main point is that it's very warm.


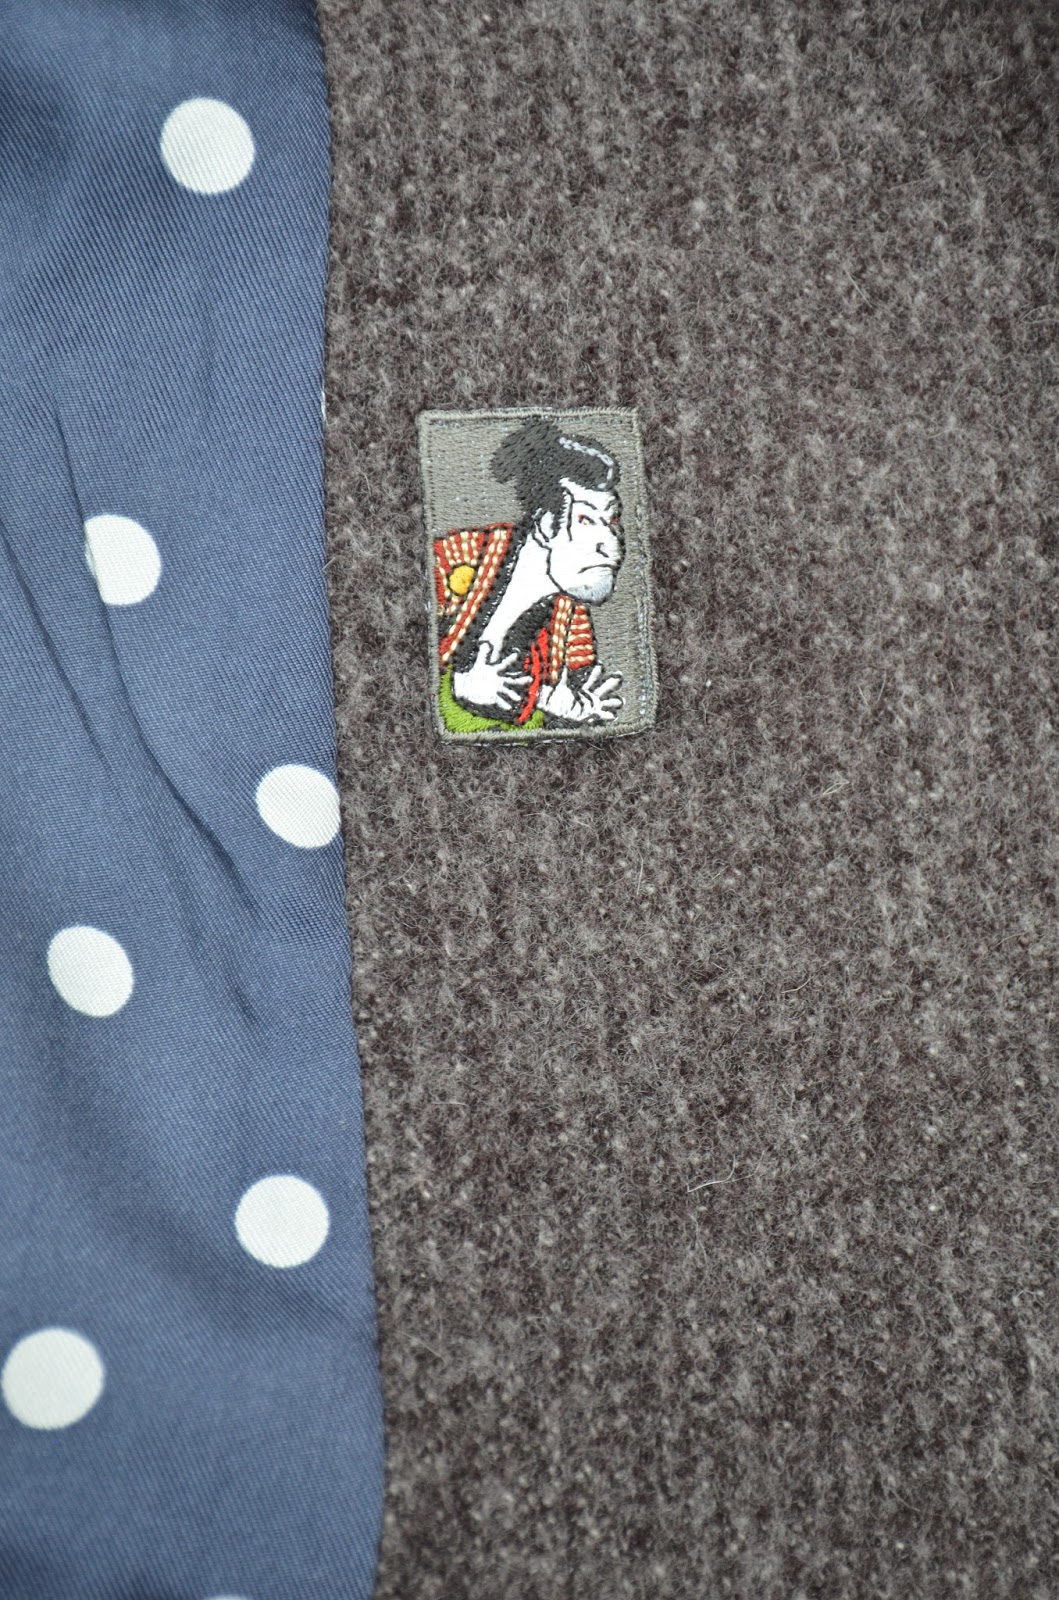
I also included a litle japanese iron-on patch in the facing.

The dotty lining is a silk twill from Mood Fabrics. The interfacing and shoulder pads are also from MacCulloch & Wallis.


The Construction

Lesson learned: I should never leave something so long again without actually sewing it up. I just wanted the darn thing done. With that in mind, I thought I could cut some corners and take account of the fabric loft by sewing a smaller seam allowance. Surprise, surprise that didn't come out great and I spent just as long trimming and restitching it. The original shoulder pads were pretty weedy and couldn't handle the (unexpectedly) oversized jacket.

I didn't bother to mark the pocket placement and that now feels like a mistake.

The fabrics press well and do hold their shape but the lapels don't lie flat on my chest and that's not stopping things bouncing out of position or being pressed into a new one. I keep accidentally pressing one lapel flat because of the way I sit when this is hanging on the back of my chair.

In all, I think this was a bad pairing of outer fabric and pattern. I am so in love with my first Kaisla but this one gave me many many problems The original plan of how I'd wear it doesn't match the reality. We were in mid-winter when I finished it and this jacket doesn't really lend itself well to the concept of "bundling up". This looked almost like the Honetone Coat...but it wasn't quite right.


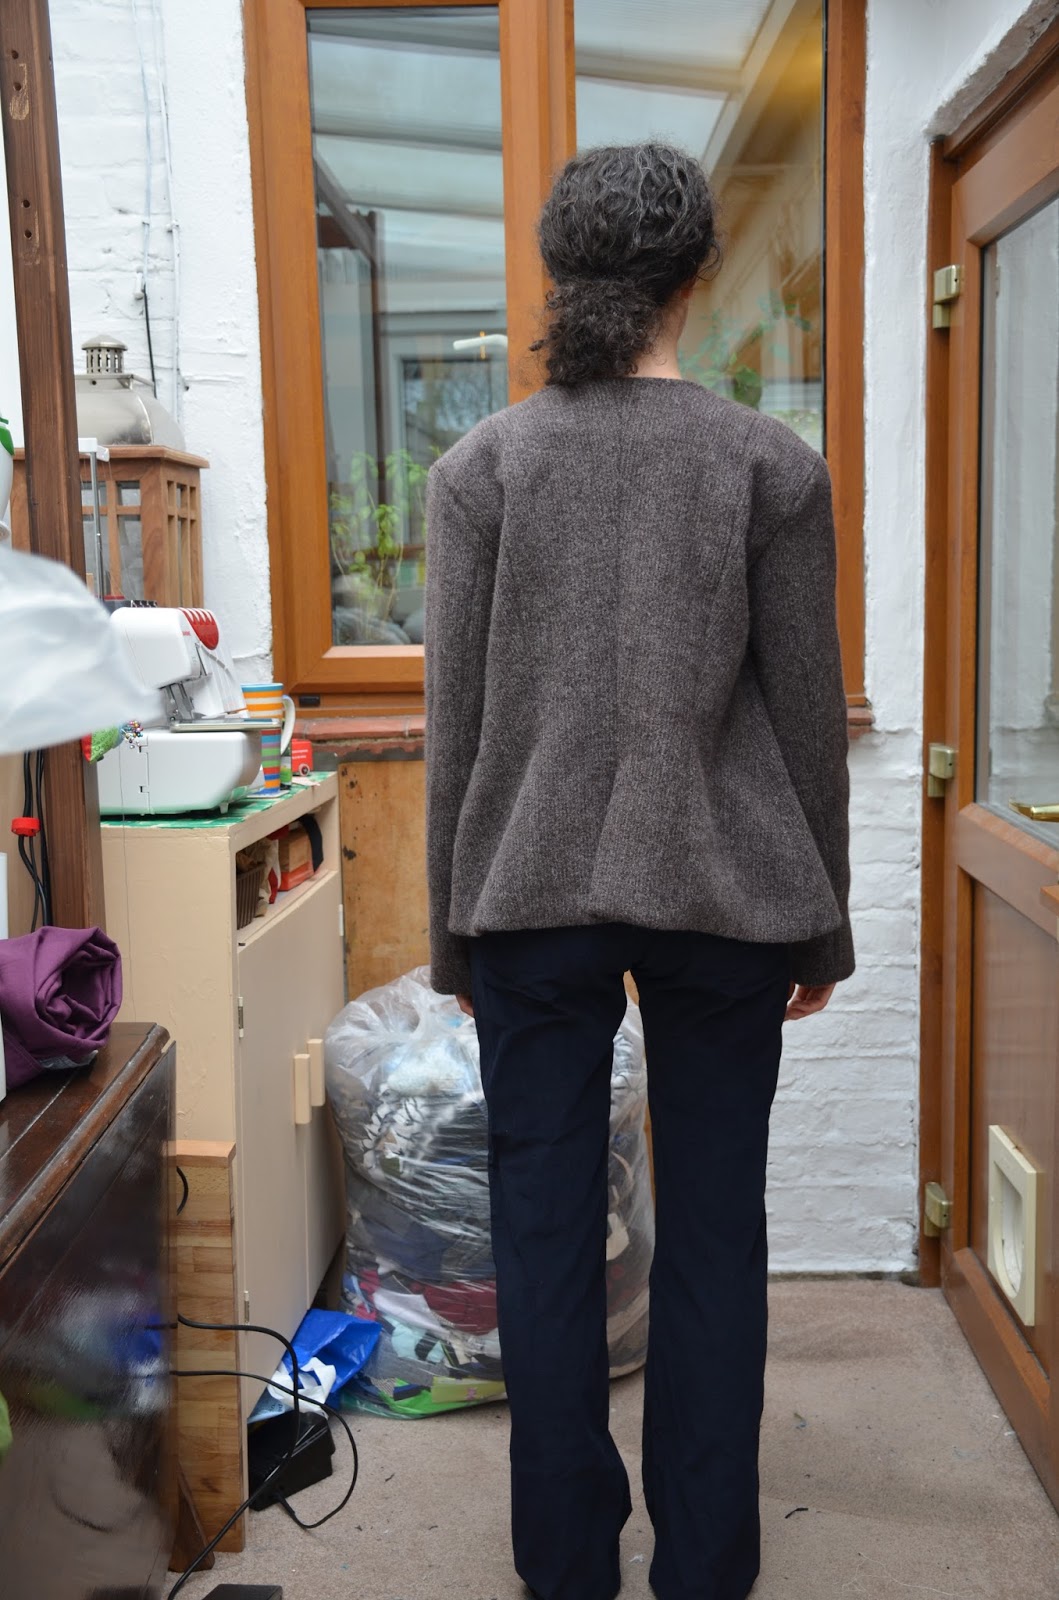
I tried to live with this jacket and it sat in my wardrobe for a few weeks (nominally finished) before I pulled it out again for fixing. One of the big issues seemed to be a fitting or balance problem. This is really weird and wasn't an issue in my first version. I wonder if I had the pattern pieces mixed up. Anyway, I was really unhappy with this issue:


The issues: Shoulders collapsing a bit, sitting far past my shoulder point, vent not lying flat and loads of excess fabric at the back, dipping at the sides. I'm not pushing anything backwards here, it's all just sitting funny. See:


At first I thought this might be an exaggerated case of sloping shoulders, but I tried the jacket on the mannequin (whose shoulders are a bit more square) and added another set of 1" shoulder pads on me. Neither solved the issue.

Here I am wearing 2x sets of shoulder pads to see if it'll make a difference
2x sets of shoulder pads on the mannequin
So I cut it open and did some more modifications to try to get it to work. Firstly, I sewed the vent shut. This is a shame because I like the feature, and it was pretty straight when the jacket wasn't collapsing. That being said, the loft of the fabric made it a bit bulky so it didn't feel very smooth. I wanted to eliminate the possibility that the lining was pulling the outer in strange directions - removing the vent made things simpler.

Secondly, I took a small amount of width out of the CB seam to try to bring the shoulders more upright (actually on my shoulders instead of overhanging). Thirdly, I unpicked the side seams and underarms and tilted the side back panel - changing the direction of the grain and trying to re-balance the back. Lastly, I rehemmed it so that it would be more even all the way around.

(Apologies for the quality of these photos...just don't ask)


Thr shoulder is still collapsing, but at least the back looks a little better


It's not perfect but I'll take it.

K