Monday, 9 November 2015

Fitting - Janet and Kaisla


Hey y'all,

I've been working on fitting recently, a large part of this learning curve was coming to terms with the iterative nature of fitting and the fact that (despite what THEY tell you) it's a very subjective assessment. All of the expertise in the world is no match for a basic preference from garment to garment.

I'm developing an almost unerring faith in patterns - if the paper is right, the seams will match up. If the paper is right, it'll hang correctly. If the paper is right I will be able to move unrestricted.

I'm also very aware that fitting is an alien and scary process to people, both makers and non-makers. Have you ever had that thought that something isn’t right with your clothes, but you're not sure what? Have you ever tried to explain to the parcel delivery guy why you're stood in your lounge in your bra, tissue paper and covered in pins? Have you ever gone straight for something in your size only to find out it looks awful. Probably all to do with fitting. In one recent muslin session my housemate passed by and commented "That's a really interesting peekaboo effect, what's it going to look like on the final one?" - before having her hopes sadly dashed by the reality that we're just making extra space for lumpy bits.

With that in mind, I thought it would be useful to share some recent adjustments and the rationale behind them.

Janet
I used the bodice of the first Janet dress to make several new dresses, but over time I realised the fit was really off. This second time around I've gone a bit freestyle with transferring adjustments to the flat pattern from the muslin. I'm trying to stick to vertical and horizontal adjustments wherever possible because they're easier to understand and keep track of. No FBAs, diagonal lines or adding random darts for me. I also try to minimise any changes to the actual seamlines - slash and spread as they say.

I suppose the main things I had to do to the pattern was to adjust for rounded shoulders, a narrow swayback  and (amazingly) an adjustment to the upper chest.

 A lot of these adjustments seemed to just be moving shaping out of one place and moving it to another. It seems silly but a couple of significant changes in fabric actually cancelled each other out on paper!

I've done some sketches to show  how I interpreted a few of the fitting issues and justified a few of the adjustments.

Rounded shoulders and sloping shoulders


Okay, so I needed to add length at the upper back in the centre, and I needed to raise the inner edge of the shoulder so it slopes more. I squared across from the centre back (CB) to halfway along the shoulder, then raised it until the slope was correct.

This still wasn't enough space at CB, so one the first adjustment was taped up, I cut slightly below it and I extended the vertical line down into the side seam and added more space at CB as appropriate.


Swayback adjustment   
When the pattern was straight out of the packet, there was some excess fabric in the small of my back. By making the adjustment above to the muslin, this was made WAY more extreme.  What I need to do here was remove fabric so the waist hits the correct place. The amount taken out would integrate the shortened body and and the swayback issue.

Apparently my only photo of this is when it had been taped up again. See the horizontal line below the armhole? There you go!
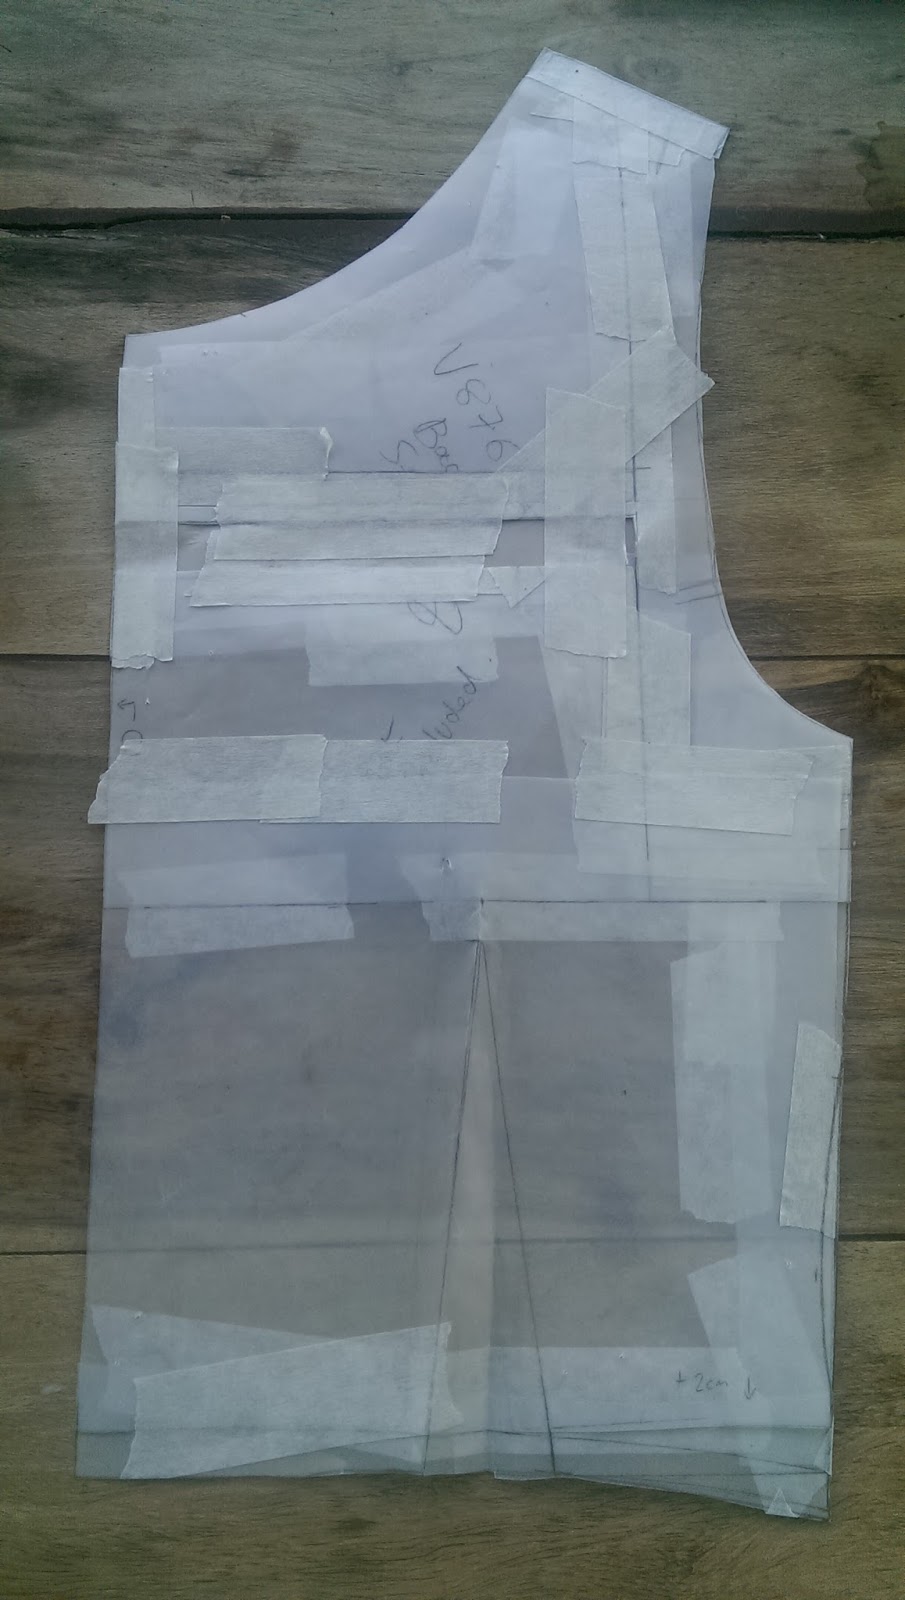
 
Upper chest adjustment - Front
Very similar to the adjustment I made to the back. My cup size was about right or a little small for the pattern. I split the length added across a sloping shoulder and a side seam below the armhole.


Below are some fast and dirty muslin shots - after almost all the fitting tweaks had been adjusted. The only thing left is that it was too long:


Kaisla
These adjustments were really minor, the sleeve wasn't long enough, the shoulders needed a tiny adjustment after adding shoulder pads, the swayback issue is exactly the same as above. B helpfully pinned the muslin and it really visibly changes the drape of the jacket.


Above is the jacket straight out of the packet with no adjustments. You can see the top of the shoulder is collapsing a bit, and the middle at the back is a bit flouffy. At first it looked like we could fix it by taking some vertical room outside up the princess seams (like vertical waist darts). Didn't fix it.


Here you can see the tiny shoulder adjustment, as well as the actual fix for my swayback. Take out a horizontal amount, above the visible problem area. This is level with the base of my shoulder blades.


See how much better that looks? And you know the rest of how the Kaisla turned out.

I have also been working on fitting some jeans too. Once V3 is made up, you'll get a writeup.

K. x.

Sunday, 1 November 2015

Moomin Skirt

I went through a spate of hand sewing recently. Not embellishments or ill-advisedly dragged out Alabama Chanin projects but simply a lot of hand basting. In practice, this means I actually spent a lot of time sewing pleats.


Pinning and basting pleats

This skirt has some of the techniques you use to pleat a kilt. Ever loathed to call this kind of thing self-drafted, I will just admit to not using an actual pattern. This was a great improvisation - I just cut, basted and tweaked a bunch of different rectangles.

The lining is a hemmed rectangle gathered to a suitable length of the waist. The outer was a very long hemmed rectangle pleated into some sort of interesting repeat. The stripes are printed and not woven so there were a few issues with straightness and evenness of stripes. It's surprising how pedantic you can become about these things!

Pleats and pockets. Freshly pressed and most basting still in place.

The pocket looks like a welt but is actually very simple. It's a separate panel, folded to make a pocket, basted into place and matched to the rest of the skirt.


Folding the panel to make the pocket

The waistband is an interfaced rectangle and there is a lapped zip hidden in one of the pleats.

Functionally, the skirt is cool and breezy but the lining contributes some warmth on cool days and some modesty if there's a draft. The care is very easy, but I'm resigned to never having perfect permanent pleats. RTW pleated skirts have fibres, finishes and factory machines that produce and set these pleats, but those aren't at my disposal.

After wearing and laundering

After wearing and laundering

Yes, it runs a bit large. Consider it as an insurance policy against gaining weight.


I want to say this was a simple project. In a way it was - no sizing, alterations or prep. I just ran with what happened as it happened. On the other hand, it was a test of patience because the pleats took about a month to hand baste. Perhaps that was excessive, perhaps it was a good lesson in virtue and improvisation. You're not really supposed to bust out flash moves unless you're happy with the risk that it might not work out. It's good improvisation because you can start out with an idea in your mind, but explore and create several variations around it. It's good improvisation because it hangs together fairly well on an established underlying structure and because you're supposed to respond to other influences and interruptions.

On this occasion, the idea was borne of the fabric. I spotted this in a clearance bin on the street in Stockholm. Deep in the heart of Scandinavia, inspiration struck me like a bolt: I could look like Moominmamma.

I took this idea and ran with it...

K


Monday, 26 October 2015

Sewing for Babes

I know that sewing for kids is right on the horizon. No, I'm not expecting - but a few friends have started adding new people to their families and I'm super-excitied about all of the embarrassing and amazing sewing opportunities afoot.

The First of Many
T.Rex was the first - she's just been joined by Sprog. I tried to make a bit of a care package for the whole family:

Family Baby Bundle

The two priorities for making were: dinosaur/monster theme, bung in the washing machine at 40c with minimal care instructions. In the bundle was:
  • PJs and vest tops with poppers/snap fasteners
  • Jumper with pocket and contrast cuffs
  • T-shirt
  • Blanket and Sock-ons
I admit to refashioning the jumper, not making it from scratch. Most of the stuff is made from scraps, jersey from Ray-Stitch and Nani Iro Pierre Pocho double gauze. The double gauze was super-difficult to track down! This is from a couple of seasons ago and most places had little or none left in stock. I odered 3m through a Belgian store called Le Hibou Sur Le Fil, who were extremely helpful.

Nani Iro Pierre Pocho
Have you ever seen so much Nani Iro?

The blanket is a basic rectangle with some binding and flannel in the middle for warmth and bulk. I machined the binding but hand-quilted around all of the blobs, which took absolutely bloody ages.

Nani Iro Pierre Pocho Quilt


The sock-ons were a bit of an experiment/prototype. We went shopping back in January and while these doodads seemed to be a great idea, the price was extortionate. £6 a pair! They are lycra with a couple of seams, so I made up some pairs using stretch scraps and fold over elastic (FOE), the pattern is below:


I used a newborn sock as a base and it seems very short-sighted, in future I'd use a 3-6m sock as a starting point. I'd also leave off the FOE as it adds a lot of bulk. Anything with lycra content will probably be fine.

Next In Line
The next one is due soon and I'm planning on a teddy bear, plus a bundle of bibs, leggings etc. I'm not sure yet of the specifics. The bundle is going to the other side of the world so I'm thinking about how everything will work together.

After the success of the Highland Cow, I'm keen to try more soft toys and animals as gifts. Any ideas or suggestions would be greatly appreciated!

K

Thursday, 10 September 2015

"No offence but..."

"…the stuff you made when you started, you could tell you'd made yourself"

A good friend said that to me once. They were there when I wore my first ever handmade outfit on a fancy dress bar crawl, they were there during the beginner's euphoria, and I'm honoured to still count them among my friends now. Still, it's an interesting thing to say to a person.

Now, I think I'm "good" at sewing. I'm not Ann, or Carmen or anywhere near the professionals who come out of art school. But I think I'm good.

I've never worried that it would take 5-10 years to get "good" at sewing - I either thought I was good already, or was so excited about every step of the journey that it never struck that something I produced would have been rubbish. What was perfect in 2012 definitely isn't perfect by my 2015 standards, what's perfect now might not be in a few years. To me they're perfect just as they are.

The reason it's important to write this out is because the thought of putting in the effort to level-up is scary. It's not the fear of failure that gets me most of the time, but becoming daunted by the enormity of the task ahead - the time, the rubbish, the expense, the embarrassment, the frustration, all of those things. All that stuff. Sewing has never given me that problem, while other things do on a daily basis.

So no, dear friend, you didn't cause offence.

But there are a few treasured moments in life that take you by surprise, where you realise you've reached a milestone. One of those happened last week as I went to visit B in his new digs. Those are really nice shorts, wonder what brand they are, I should copy them. Thoughts moved on to making tea, playing Flux, building an office chair, plans for next weekend, noticing the dodgy paint job in rented accommodation. 

HANG ON A COTTON WEAVING MINUTE. I KNOW WHERE THEY'RE FROM. 

I shit you not, have you ever forgotten something you've made? It's like an unbelievable high. It's like finding 10 discount pizzas in M&S on clearance for £0.08 each, like Hank Moody when he realises the baby's not his, like crafting and deploying the perfect deadpan pun.


So, these are the shorts. They're the Jeds again, though apparently I needed to size up a little for this version. I added 1cm down the centre of the leg, for the whole length whole of the leg, for both front and back. Otherwise, the only alteration was to make the pockets a bit bigger and add a tiny coin pocket. Apparently B is a man who uses the tiny coin pocket, I thought they were just part of some useless RTW diktat. No, people use coin pockets, who am I to judge?


The fabric is some sort of synthetic steal I got from Misan Textiles, about £30 for 4m. It's got a bit of a spring, a bit of a sheen, it's a bit water repellent and I can't tell the right side from the wrong. I'm going to make some office trousers from it as well - they will be gorgeous.


Sewing late at night...ALWAYS stop sewing when your fabric pieces start laughing at you
The lining and accents are a combination of some bias binding I made in 2010, and the OCTOPUS DAMASK that haunts me like a lingering squid. 

Amazingly, I made these in March - they were ready for the Stockholm Tap Festival and I had it in my head to finish them as the fancy dress flapper outfit was never going to materialise on time.

The weirdest thing? The first time the shorts got washed, all load of dye came off the button. It's a completely different colour! It was a vintage thing I'd found in some charity shop bucket, but has this happened to anyone else?

Not sure what else to tell you about these shorts. Any questions?


BYEEEE
K

B waves bye as well


K

Wednesday, 29 July 2015

Kaisla Toil

How do you pronounce Kaisla?
Did you spot the Nikola Tesla pun?


Anyway today I have a guts post for you. This might be the best thing I've EVER made and I really want to tell you all about it about it. Anyone who's come across this blazer in recent weeks months will have seen me model it like a peacock and fluff my stitchy tailfeathers.

My first blazer was a bit dodgy, the second was a proper blowout, the third was a big step in the right direction, this one's actually petty damn good!

It's possibly my magnum opus of sewing. I literally don't think I can get any better than this blazer. It's just perfect. Brilliant. Excellence in wool. I was so astonished by how this blazer turned out that I should basically quit now. Everything else will pale in comparison to this blazer.

Sorry T.Rex, I made your baby shower gifts immediately after this. Please do let them get covered in muck and baby spew because there's much better stuff I can do for the kiddos.  

This is the Kaisla Blazer from Named Patterns, from the Finn's trendy first collection. This was back when apparently they had weird bugs and sizing issues. Don't ask why I haven't looked at anything in the newer collections - this one stuck and I've been eyeballing it for a long time.

The main attractive point on the Kaisla was that there was a lapel, but no massive collar. I'm a bit wary of big collars at the moment - I can't handly the fitting challenge, and they just seem to be too stuffy and bulky. You see, I just needed something LIGHTER. I'm a skinny, bony, blithering little weed and this is one of the jacket styles that looked like it might work.

Anything you might want to read on the pattern is over on Pattern Review

Fit adjustments were made around the shoulder and across the back. B helped come up with a genius alteration, which will probably merit its own post over the summer. I scrapped the lining from the pattern and redrew it. I also added a lining to the pockets and split the sleeve lining so there's a contrast if I roll up the sleeves.


Fabric? Oh, it's high society baby
Outer - Liberty Wool Twill (from Mandors in Edinburgh)
Contrast Lining - Liberty Tana Lawn (from Mandors in Edinburgh?)
Sleeve Lining - Bemberg (Macculloch & Wallis)

This was my first time using shoulder pads and I am a complete convert. These doodads totally change how the jacket hangs and how it stands up to wear. Never again will they be forsaken in a jacket. This was also my first time fusing in all the sensible places. Don't ask me why I didn't before, let's chalk it up to experimentation and experience. You guys - this following instructions lark has its advantages. This thing actually has structure!

I spent a lot of time not rushing it, which is hard. This was a real exercise in patience. No matter how simple a blazer is - it will always take ages. It's got over 40 pieces once you've got the lining included. It just takes ages to sew. You dither between excitement to wear it, and abject despair because you want it finished.


B's started telling me off for doing a slack job. Sometimes you need someone telling you off - you know...someone who will notice if you've done a bad job. On the flip side, they will also you shower you with praise and treat you like a monarch if you do a good job. Perhaps they will buy you an ice cream at the weekend too (does B read this?)...

Anyway, I love this jacket. I'm so proud of doing a good job. The print doesn't respond well to photos, and I'm still too lazy to organise an actual shoot so the next best idea was to take a series of bathroom selfies and steal other people's photos of it in the wild. It really is great.

Kaisla Blazer Bathroom Selfie
Paired with Boomerang

Kaisla Blazer Bathroom selfie 2
Paired with Lizzie

Kaisla Blazer int he Ashmolean
In the Ashmolean
Kaisla Blazer closeup
On the tube paired with my Matthew Williamson dress

KAisla Blazer London Tap JAm
Trying to look cool at the London Tap Jam
Kaisla Blazer Jedediah Trousers
Paired with B's clothes, including Jedediah trousers

Back Kaisla Blazer Jedediah Trousers#
Total bloody hipster
 Kudos to B and Pink Panther for the non-selfies.

That's it for now...

K

Thursday, 25 June 2015

I've been mending things!

Guys, guys, guys! I've just broken a six-week stint of not buying any sewing stuff! I'm pretty proud of this, and had to finally break the fast for new needles and thread. I have some gift sewing due as well, for which I'm missing some fabric. Off to Raystitch...

Anyway, the breaking of this fabric fast has been a good time to round up some mending and reworking I've been doing over the past few months. It's an odd conflict between the refashioning/alterations world and the make-from-scratch world. I personally still think refashioning is an alien concept, and am sure I'm not alone in prefering to make new things from a rectangle of fabric. I like my new pristine fabric and my carefully chosen matching, functional notions.

Generally in the RTW world, there's a bit of a stigma around repairs and mending. When something's broken, you believe it's unfixable and you throw it away. There's an interesting segment on an old episode of The Forum, the Sixty-Second Idea to make mending an artform,which sticks in my head. Namely for how this idea translates into the self-sewn world: why repair my project when I can make it anew?

Actually, it's almost like a time capsule. You see whether you were thinking straight, whether you were in a rush, what types of materials you liked, the colours of threads you used.


I have been repairing and remaking a few things recently. B's bag was showing some stress on the edges so they got reinforced.


I lengthened my black zig-zag trousers and had to totally reopen my green trousers to make more room for my backside. Yes, I actually went back and fixed them and now have a wearable pair of trousers! And the button doesn't pop off!


The no-face policy in these pctures is because there's a towel on my head...

My Long Way Back Home messenger bag fell apart quite quickly once it was made. The outer fabric was a medium-weight dress linen. It couldn't stand up to daily abuse, despite interfacing etc. So I finally took the whole thing apart and replaced the outer fabric. To be honest, it was a real chore. Repairing something you've made is fine enough, particularly if you did a shoddy job in the first place, but because the textiles aged unexpectedly? That's heartbreaking. (In good faith I did everything right the first time!) But it's fixed and I still don't like the new version as much as the old one. Ah well.


Anyway,I have oodles of projects and drafts to be getting on with. I may even share the results of breaking my fabric fast with you. It's shameful, but hey...we all like pretty fabric don't we?

Stay safe,
K

Wednesday, 3 June 2015

I AM TRICERATOPS, HEAR ME ROAR

On 22 Feb 2015 I ate Nutella for the first time.

Why am I telling you this?

You know, I'm not really sure. I reopened this draft today (after a 6 week bout of laziness) and found the confession above. At some point there must have been a drastically serious reason to tell you about this. It might have something to do with childhood...

You know what else has to do with childhood? Dinosaur hoodies.

EVERY CHILD NEEDS A DINOSAUR HOODIE

And increasingly, a lot of adults seem to need one. At least, from the number of requests that have come in since I've been showing off this beauty.

Mccalls 6782

Mccalls 6782


The pattern is McCall's 6782, the fabric is sweater knit (probably poly), spoonflower jersey and felt. The crest and cuffs are my own design, the horns/spikes are based on the many inspiring dinosaur hoodies already floating around the internet.

The backstory is that a very dear friend, T.Rex, wanted a birthday present made for a kiddo. A dinosaur hoodie, it had to be a triceratops, it needed a pocket on the front. That's all. No sweat.

Not knowing the size of the kiddo, I guestimated something suitable from the pattern. After cutting out the pieces I was adamant there was no way this would fit anyone. It was way too small!

Mccalls 6782


The hoodie is made straight from the packet with a few design alterations. First, I added spikes down the back (not totally true triceratops) and modified the cuffs for claws that fit over the ends of your fingers like mittens. They can also be folded back out of the way.


Second, I lined the hood with ceanirminger's Oh No, Tokyo! jersey and drafted an extra piece on the front to slightly cover the face. This was a good spot to put the centre-front horn, and also should help to keep the hood up when worn. That's because the best addition is pretty heavy.


Look at the crest! Isn't it brilliant?!


I traced the curve of the hood and drew in a suitable size/number of points, cut 1x sweater knit, 1x in felt and 1x thick wadding. I sewed them right sides together at the lower edge, then flat sewed this to the hood after finding the right placement. This method means you don't need to cut a new seam into the hood, which I'm hoping is a bit more stable and secure. The wadding is secured to the felt with several rows of (graded sizes) zig-zag stitching. The crest is closed with a few rows of zig zags on the top edge.

I love this hoodie. It's just great.

K

P.S. The request from T.Rex was that kiddo remain anonymous, so please forgive the dodgy face covering and my poor picture editing skills.

P.P.S. I've been losing it over this tumblr it's just hillarious